Armor:
Armor. No, we're not talking about one of those suits of armor that knights wear... something like that would just be rediculous on an actual battlefield of today. However, we are talking about extra layers of stuff that can protect you from blows of any certain kind. Armor can be anything you make it. It can be a fork or a spoon. It can be a peice of rebar embedded in your clothing. It can be one of those shin-guards soccer players wear. It can be a bullet proof vest. It can be anything you make out of it. But it's important to keep in mind what you're making when you're making armor. Something to protect you completely would be lovely, but it does no good if you cant do anything else.
So, then... what makes good armor? That's the issue we're here to address. Before we go on to good locations for armor, or how to make your own, lets detail what makes some good armor. Some common misconceptions about armor are that it has to cover every vulnerable part. This is a manner of thinking that keeps armor restrictive. You should already be covering vulnerable areas of the body with your technique, rather than relying on armor to protect it for you. We never completely trust our armor, because no armor is without its fallicies. Another common misconception is that the added defense that the armor levies takes a higher priority to our ability to maneuver ourselves appropriately. My answer to this again, goes back to the fact that we should never trust our armor... only ourselves. If you cant move, you're placing your defense in the hands of your armor, rather than defending yourself personally. For this reason, armor shouldnt be restrictive in any way, unless you know fully how to work around the restrictions. Keeping your ability to move could save your life in several circumstances. The last grave misconception we will touch on, is that armor needs to be able to defend against everything, in order for it to be protective. Again, this isnt true. Each of the above misconceptions leave out the element of the wearer, and his or her abilities outside the armor. No armor can defend against everything that is thrown at it, but to be honest, the wearer has a better chance of protecting themself against a wider range of attacks. If you make armor that can only protect against bullets, you might still be able to defend against sword attacks and defend yourself in hand to hand combat. For things like this, armor is nice, but isnt necessarily needed. And dont forget, armor can always take a back seat to escaping from the danger.
Now that we've covered that, we can ask ourselves; what truely makes good armor? Honestly, that answer is up to you, and up to the situation at hand. If you need armor to defend against bullets, armor to defend against arrows wont do you a whole lot of good. We do however, know that armor is best when it isnt restrictive of movement in any way. When it's low profile, and works will in conjunction with our natural abilities. When you take all of these considerations in mind, along with what materials to use and where to where your armor, you're ready to start building.
Where to put your armor?
Making your own armor
Where to put your armor?
So... where are good locations to wear our armor? We need to keep in mind that we have to allow for a free range of movement when wearing our armor. In order to minimize restriction of movement, we need to keep armor light, durable, and away from our joints. It generally works best when it is able to breathe (like with silk) or stretch, so it can move along with you. Also, it's generally preferred to be able to be worn under your street clothes. If you can wear armor under this, you should be able to wear it under anything else, but wearing it under your street clothes means keeping it low profile. Armor goes best along the bones of the body, to reinforce the areas of the skeleton that would take impact, and clearing away from the areas where the bones need to move. Dont forget, joints can be prepared to greatly lessen injury or the chance of injury by manipulation and stretching everyday. Bones dont generally have the ability to lessen injury, unless they're well conditioned(which they should be anyway ;). If you have any suggestions for additions or changes to the list, please let me know.
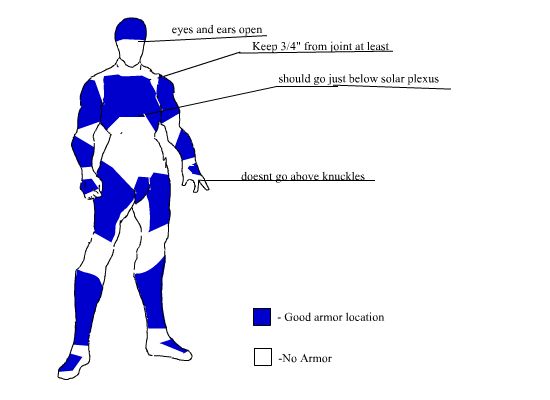
Good Places:
- Along the front of the shin, or the area from the lower-back of the calf to the top of the heel. Dont let it dig into your heel or your thighs when you crouch or run.
- The top of the foot. Dont let it dig into your shin, or your toes when you flex your foot and your toes up.
- The front, back, and outsides of the thighs. Dont let it dig into your knees, calves, or hips whenever you move. Practice running, jogging, sneaking, kicking, stances, etc. in armor to make sure you can move freely in it.
- The groin. 'Nuff said
- The back of the hands and the forearms. Careful not to let anything dig or push into your bicep, forearm, or wrist when you move your arms and hands.
- The outside of your upper arms. Dont let it dig into your forearms or shoulders
- Your upper torso, front, back, and sides. Careful that this is relatively tight armor and doesnt dig into your arms, abs, or back when you move. Keeping the armor in this area snug will actually help your range of motion. and help you to breathe through your hara easier
- Your head. Make sure you can move your head in all directions, and that any armor here doesnt hinder your vision or hearing.
|
Bad places:
- Kneecaps. Kneepads arent terribly bad, so long as you can move your leg just as well with them as you can without them. It's best if a kneepad is connected to other peices of armor, or other peices of your leg, so it doesnt keep you from bending your leg any.
- Elbows. Once again, elbow pads arent terribly bad, just make sure you can move normally with them. ANY restriction of movement or cutting off of circulation to the rest of your arm should merritt NOT using the armor.
- Your lower torso. This really messes with your balance. Even loose armor here isnt advised, because it keeps you from being able to crouch, duck properly, etc... It keeps your back straight, which is horrible when trying to change your sillouette.
- Your ankles. Any restriction of movement here makes it hard to run, or even walk properly. Sneaking steps become extremely awkward, because now you have to move your entire body to move your toes in a certain direction. Just dont wear anything on your ankles.
- Wrists. Just restricts your movement too much. Dont wear any armor here.
- Neck. Being able to turn the head quickly is important for spotting danger or looking around an area. Restriction in the neck area keeps your joints from working properly, could restrict blood flow to the brain, cut off your air, making it hard to breathe and in the long-term could give you damage in your neck area.
|
<<Back
Making your own armor
So, you're ready to make your own armor. Great! All you have to do is choose where you want to put it, and what materials to use. In order to do this, you first need to determine what kind of situation you'll be needing armor for. I'll leave that up to you, but for the purposes of convenience, I've compiled a short list of suggested materials and their uses.
Foam Padding - Not the best of armor, but if your opponent has a crowbar or a basbeball bat, you'll be thanking God every second that you're wearing it. Very lightweight, but a bit awkward. Train in it to get used to it.
Plexiglass - Very durable and lightweight. Good for blocking fairly strong attacks from blunt objects. If you can, try to wear a layer of padding or fabric underneath to make sure that, if it does break, no shards or anything end up in your skin.
Neoprene - Used as a form of padding. Lightly stretchable, and fairly durable.
Denim - Pretty durable fabric. Figured it was worth mentioning
Kevlar - Yep. Kevlar is the stuff they put in bullet-proof vests. Dont expect that this stuff will make you invincible, because taking a bullet is still taking a bullet. Dont be suprised if you get shot while wearing a bullet proof vest, and you end up with some broken ribs. Most vests have padding under the kevlar to help reduce this, but it still hurts. Also, dont forget that things like arrows, knives, and several types of special ammunition are made to peirce kevlar. On the up side, it's pretty light, and extremely durable.
Leather - Also pretty durable. Can help decrease the chance of getting injured from a sharp object like a knife or a sword. Doesnt work too terribly well against stabbing attacks, but it's good to have on.
Silk - Very, Very durable fabric, but pretty expensive. It's said that in old china, it used to be used to help decrease injury from arrows. They'd just tug the fabric, and the arrow would come out. It breathes really well, making it pretty good armor to use.
Chain Maile - Everyone knows what chain maile is! Maile is a series of rings all looped together to make various peices of armor. It can be a little heavier than most other things, but it's steel and steel is good for deflecting other steel(usually). Dont count on it saving your life, but it's good about spreading out the force of a blow. Easily sewn or riveted in under various types of fabric, and it can be fairly easily fabricated.
Wood - Once again... not the best armor. It can be fairly light or it can be fairly heavy. Really, this is whatever you want to make it. Old samurai often used wooden armor covered with laquered leather for more durability.
Steel - This can be as complicated as you want to make it... From 1/16" of steel under a gauntlet to a full on suit of armor. A technique often used is steel plates or bars riveted or sewn in under parts of clothing, or riveted in with chain maile.
As far as making it, it's all pretty simple. Most fabrics can just be sewn into clothing, and most other things like plates of steel or plexiglass, or like chain maile can be riveted into clothing. It's just that simple. The lower-profile the armor, the better. Dont forget that when you're wearing your armor, you ARE vulnerable, and you'll still need to rely on your own skills as much with armor as without it.
UPDATE: I've decided I'm going to make a tutorial once I get all the materials together, and link to it here, just as an example. If you know of one already made that I can link to temporarily, please contact me here.
<<Back
|

