| Valve cover leaks are common. Sources include the grommet at
the valve cover opening for the PCV system, the valve cover plug at the
end of one of cam used for the distributor shaft on non-turbo engines,
and the valve cover gasket itself. Most valve cover gaskets lose
their elasticity eventually and start to leak. Replacement is fairly
straight forward, and a good opportunity to inspect the valve cover for
oil deposits which form in many engines by 100k miles.. There are
relatively few tools required (T25 and T30 bits, a small ratchet with a
bit holder, a new set of gaskets (there is an inner and outer gasket, sold
as a kit), and optionally some gasket sealer or gasket "dressing". |
| Access |
|
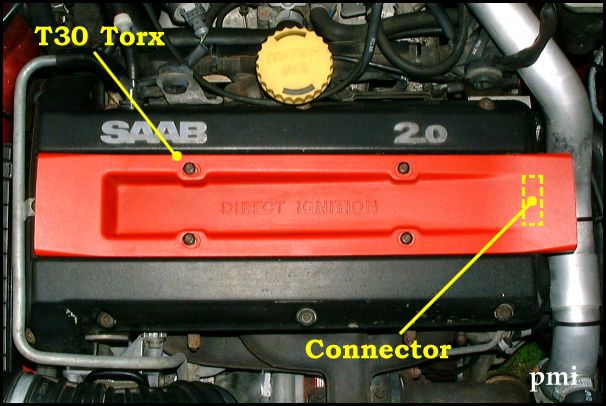 |
Ignition Module (IDM, a.k.a the DIC)
The plastic cover over the intake manifold and the Ignition Module
have to be removed first. The ignition module (IDM, a.k.a. the DIC)
is held in place by T30 screws and an electrical connector.
Ignition Module Removal
|
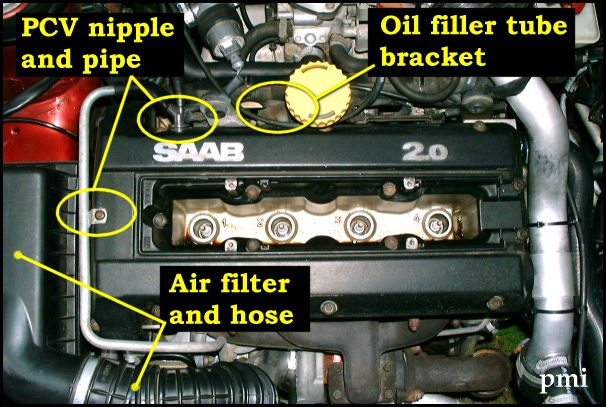 |
Other Components
-
Air filter box, 10-mm nuts
-
Air intake hose, hose clamps
-
PCV Nipple, unplug from valve cover
-
PCV pipe screw, T-30 torx
-
Oil
filler tube bracket, 10-mm hex bolts
|
| Removal |
|
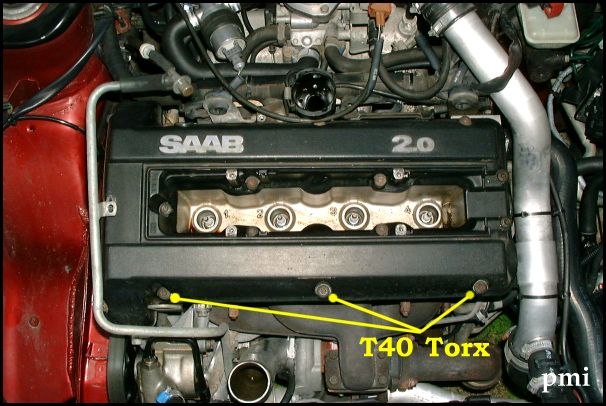 |
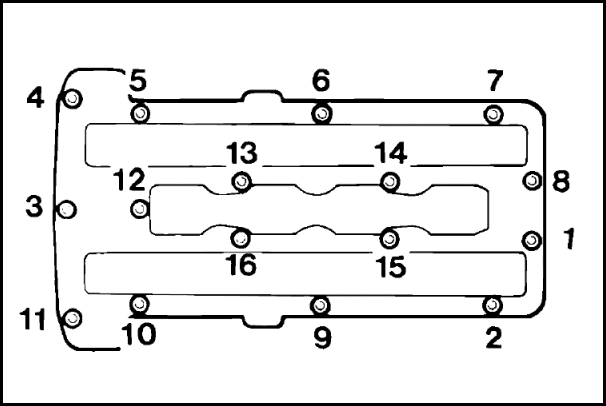
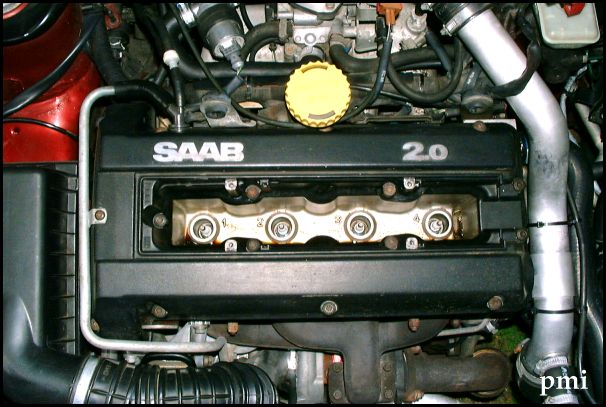
Valve Cover Bolts
The valve cover is attached by 16 T-40 torx bolts. Eleven bolts on
the outside of the valve cover, and five on the inside. The bolts
are fairly tight, and have to be removed using a small ratchet with a short
extension and a T-40 bit holder. Clearance for the bit holder is
tight near the PCV pipe and the oil filler tube. |
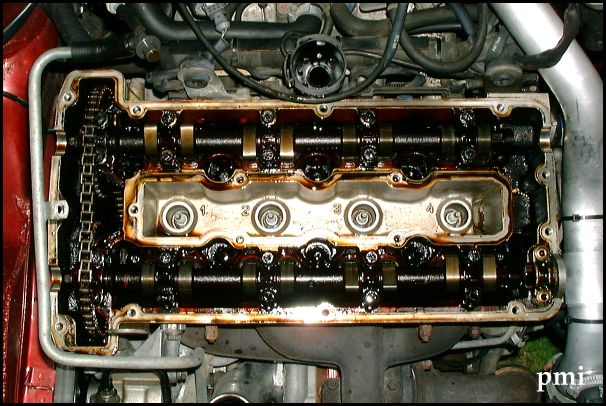 |
Valve Cover
The old gasket usually sticks to both the valve cover and the head.
It may take a tap with a rubber mallet to break the seal, and some careful
prying with a screwdriver before the valve cover comes loose, and can be
lifted off. The top of the engine, timing chain, timing gears etc.
can now be inspected.
Oil Sludge Examples |
| Assembly |
|
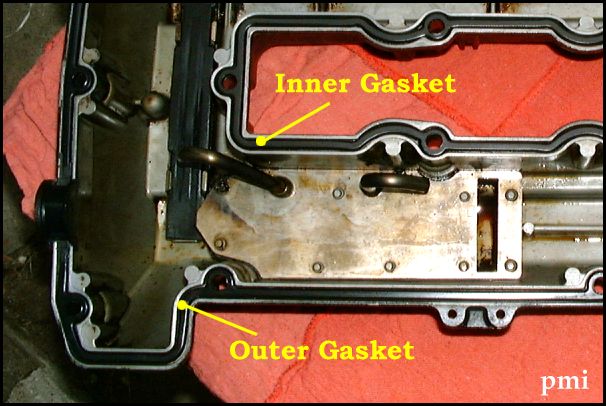 |
Gasket Replacement
The valve cover groove should be cleaned and dried before inserting
a new gasket. It can be coated with a few dabs of tacky grease or
gasket sealer/dressing to help hold the gasket in place when the cover
is turned over for assembly. The surface at the head where the valve
cover will be seated should also be clean and dry before reassembly. |
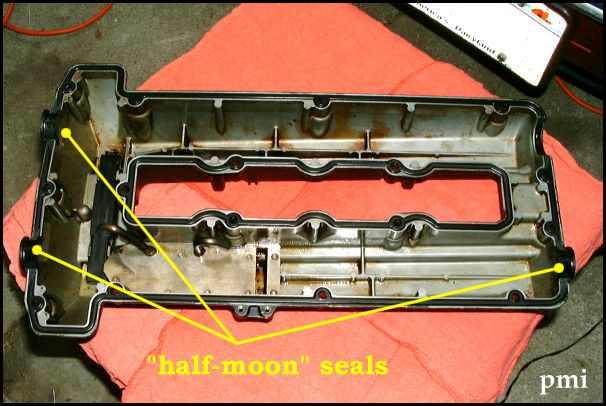 |
Gasket Sealer
Sometimes a new gasket is not engough to stop the leaks. In that
case, small amounts of silicone gasket sealer may have to be used in areas
where the cover leaks, like the half-moon seals which close off openings
in the block. Otherwise some tacky grease or gasket dressing is sufficient. |
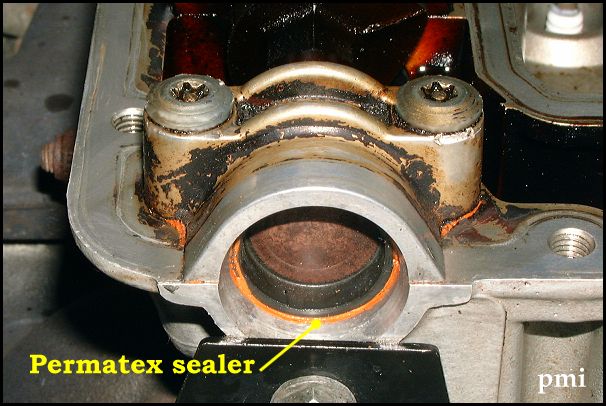 |
Valve Cover Plug
If the plug was also leaking, it can be replaced or sealed with Permatex
sealer, as shown on the left. For more details on the plug:
Valve Cover Plug Repair |
 |
Valve Cover
The valve cover is turned over carefully with the gasket in place and
replaced on the engine. Use two bolts to locate the cover in the
correct position. Next check the position of the half-moon seals.
Finally, tighten valve cover bolts to about 11 lb-ft, in the sequence shown
at left. |
 |
Remaining parts
Reassemble in reverse order,
Oil tube bracket
PCV pipe
PCV nipple, clean and insert into the valve cover bushing
Air box
Air Intake hose
Ignition Cassette
|
Valve Cover Gasket Kit
p/n 8822041
Torque Wrench Settings
Ignition cassette, 8 lb-ft
Valve cover bolts, 11 lb-ft |
Tools
-
3/8 drive ratchet
-
T-30 bit or driver (ignition cassette)
-
T-40 bit (valve cover bolts)
-
10-mm socket
-
Torque wrench (optional)
-
Solvent (cleaner)
-
Wire brush (valve cover groove)
-
Grease or gasket dressing
-
Permatex gasket sealer
|
|
)
)
)
)
)
)
)
)
)
)