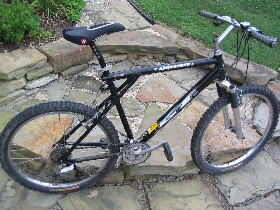
Aggressor
This is my current mountain bike. I took this picture before the Wooster race, before the mud. Before I bent the rear derailer. So far I have upgraded everything except for the fork and stem/bar. Those are next on the list to upgrade. For upgrading your bike it really depends on 3 things.
1) How much you ride. (Weekend Warrior, Racer, or Ohiopyle rails to trails)
2) How rough you are on equipment (You like to run into tree's like me)
3) Budget (No explanation needed)
If you are just starting out and have a beat up bike already, go out and kick the crap out of it a couple times before you think about upgrading. The last thing you need is to start learning on a 2,000 bike by bending the wheels and ruining an XTR Derailer down at Coopers Rock. Upgrading is all about COMPONENTS and WEIGHT REDUCTION..
There are two routes from there. Once you go about 30 miles start replacing the stuff that breaks with good replacement parts. The good thing about this route is that you gradually pile money into components, then you can look at getting a good frame for cheap because you already have the components. The other way is just to ride the hell out of your bike balls to walls to find out what you need out of your bike. Then go to the LBS (Local Bike Shop) to find a good deal on a frame that fits you and components worth the money. What do you mean "What you need out of the bike?"
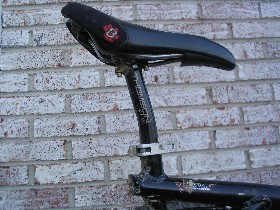
For me. I am 6'2" 200lbs. With a long torso I knew I needed a frame that was laid back over the back tire so I wouldn't be straight up. You cant get under the logs at Zanesville straight up! I got a Thompson seat post with 18 degree setback that has the double bolts on the post so my 200lb butt doesn't strip the threads. This also sets me a little farther back over the tire. I also have 3" knobby tires because most of the trails last summer were wet and muddy all the time. I got Mallet style clip pedals because I knew I wasn't that good and when going around the curves or setting up for the log bridges of Wooster OH I was slipping off and needed a good base to push instead of the small clips that are so popular for road bikes.
Sizing a bike:
1) First sit on the bike with one leg at the full stroke. Your leg should be slightly bent at only about 160 degrees, so adjust the seat to fit. 60% of your weight should be on your seat and about 30% on your handlebars. The other 10% is for you to be able to move around with.
2) Drop your ass over the back tire like your goin to go downhillin.
3) Ride in a circle and tip the bike off to the side like your going to lay it down or cut around a tree.
4) Get it off the ground! Pretend that the parking line is a 5 inch root like at Bavington.
5) Ride it off a curb to check the compression in the forks.
UPGRADES:
(Many people just stick with the same brand name so their bike doesn't look like a garage sale)
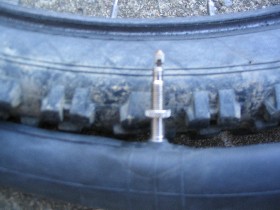
Tires: For PA trails get at the very least 2.25 in tires because of the mud. Kevlar tires are stronger and provide protection. Tires can add a lot of weight so be careful. I ride on Kenda's. Get the Knobby ones for the trails and smooth ones for road riding. Pay attention to your tire pressure. It's written on the side of the tire. I also heard Kenda's can be hard to take off but mine are not.
Rims&Hubs: These most of the time come in sets. I suggest double walled for anyone going over rocks. Single walled is mostly for rails to trails. You have to watch out for Hubs. You want something that is sealed so the sandy trails in Ohiopyle. The more expensive brands have better bearing packing and sealing. Rims can be sized for Shrader or Presta Tube nipples.
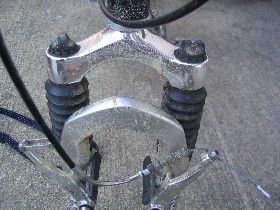
Fork: Forks can be deceiving. First to look for is travel. 80-100 is good. Make sure that both forks are active. There are forks where only one fork is used for compression the other is a dummy. Unless your Cannondale- they make the "Lefty", a one sided fork. Also Rock Shock makes a fork that locks into place allowing you to select a hard front end (no compression). This is good for roads where you don't want the compressions taking away from your uphill drive.
Stems and Handle Bars: They are all basically the same. The major differences are sizes and weight. Weight also has to deal with strength, so if your hard on your bars pick a thicker one.
Headset: This is the reason your front tire moves so don't get a cheap one.
Drive Chain : There are two types ones with 3 gears and ones with 2 gears and a bash guard. The ones with the bash guard are for those who jump around and frequently break off teeth in fallen logs. Remember you will loose your high gear which is essential when your climbing the Mountains of PA and WV. Go for strength.
Petals: Metal petals suck when you get a chain fault and it bear claws the back of your leg. They are good when you need to quickly jump off the bike. Petals with toe clips are hard to get out. It took me a long time to be brave enough to go to clipped petals and about 20 miles to get used to them. The famous saying is once you go clipped you can never go back. . . I agree. You can maneuver your rear tire, bunny hop, you notice an extreme difference in stability but you loose the ability to give up and jump off. once you get some miles on your clipped petals you will be able to jump in and out easily. Watch out for petals that collect a lot of mud, it makes it hard to clip back in.
Seat Posts : A good place to shave a pound off the bike. Make sure you get the right size and I strongly suggest the double bolt seat posts. Get a quick release seat post clamp. That way if you know your going to go over a hard section you can drop the seat to give you a little more clearance for the boys. The size for the seat posts are almost always cut into the post. Some people cut their seat posts to drop some weight. Be careful not to jeopardize the integrity of the post.
Derailers: The more expensive "the longer they will last" nothing will stop cracking it off of a tree.
Cables: Kevlar coated cables are awesome. They reduce friction and are easy to work with. They don't have that annoying fray that normal cables have when you clamp them down or try to tug on them with pliers.
Brakes: V brakes have worked for a million years but now people are moving to disk. Disks provide better stopping power because they are less prone to gather sticks/dirt/mud/small children. You will have to have a frame that is disk compatible and also buy new rims.
Frames:
Hard Tail, frames either have front shocks or they don't.....You want front shocks if you want to own a "mountain bike". Hard tail bikes can vary depending on the manufacturer. GT developed what is called the triangle which forms a triangle underneath the seat post. Since triangles are pretty strong, it makes for a good frame for me because I weigh 200 lbs and like to beat the crap out of my bike. In the efforts for weight reduction most manufacturers like Gary Fisher and Schwin are moving toward Carbon fiber rear arms. This allows for more flex and sheds a couple ounces. Specialized makes a pretty damn light aluminum bike. The all aluminum frame might be more $$ but weight and strength along with good welding provide for a good frame. Other manufacturers claim to have developed this new hybrid of metal that is better than any other! The bottom line is weight. When you need to get your bike over a 2 foot rock, you don't want to haul a 30lb bike up and over.
Full Suspension, frames have a front shock and a shock connected to the rear assembly. The reason I say that is because you can have numerous different setups. Some put the shock connected to the rear arms, others are more elaborate and cross through the center of the bike. Full Suspension bikes are used for extreme downhill, jumping off logs/rocks and anything higher than 2 or 3 feet off of the ground. The good thing is that it takes the job of absorbing hitting the ground away from your legs and lets them do more important things like balance and rip past the next guy. The bad thing is the more compression the harder it is going to be to petal uphill's. The absorbs ion takes away momentum. With technology they have developed hydraulic, mechanical and compressed shocks that allow the user to adjust either on the move or on a per/trail basis. Some are even battery powered to predict the desired pressure. You can turn shocks on or off so if you are on the trip back on a road you can switch it back to hard tail so that you can have the stiffness of a road bike.
The Real Deal, is that you probably don't need a full suspension unless you plan on going pretty extreme. Full's add more weight-PA hills are not fun to climb with a sack a bricks between your legs. Sizes range from 17" to 22" the bigger the frame the taller the inseam is and the less maneuverable the bike is going to be to curve around tree's on the switchbacks of Zanesville. Don't listen to the 2" rule which states that a frame is good if you can straddle the bike and have 2" from your junk to the top cross bar. Its a good starting point but you really can get by with 3 or more if you like the maneuverability. Don't go less than 1"! if you drop off your bike when your tire gets wedged, you want as much leeway so your kids don't look like crash test dummy's.
Go to your LBS(Local Bike Shop) and get on a couple bikes. Tell the BSG(Bike Shop Guy) to let you take it for a spin around the parking lot. It's hard to feel the difference right off the bat. Pay attention to how much pressure you are putting on your front hands, how arched your back is, and how bent your leg is at full stroke.
