Maintenance: (I tried not to go into too much depth, these are some quick suggestions while you are on the trail)
I go to Volpati's Cycles in Washington, PA for all my maintenance. They are awesome and can give you a pretty good turn around to get you back on your bike.
Wheel is bent : Leave it up to the BSG(Bike Shop Guy). Bike tuning starts about 20$ but if you got a wiggle in your tire it WILL only get worse.
Gearing is off : There are many ways to adjust your gears. The main adjustment starts at the shifter on the handlebar. The shifter allows you to do minor adjustments to your gears by tightening/loosening the cable. First thing you want to do is to adjust the tensioner on the shifter while looking at your derailer. You should see it move either up or down. Common sense tells you that if you have 2-5 selected the front derailer should be riding exactly over gear 2 and the rear derailer top guide right under gear 5. Start adjustments by putting your seat over a limb so your bike is eye level off the ground. Petal the bike with one hand while adjusting the derailer with the other hand by the shifter. When you realize that this is impossible, Adjust then get behind the bike and run that gear. Those are the basics to get you back home or on the fly (in the middle up a uphill and your gears are popping).
Front derailer: First adjust your front shifter adjustment 3 turns from tight. Put your shifter on the smallest drive chain (lowest gear -1). From there loosen your cable clamp so the cable is loose and adjust your derailer so the inside(toward the bike) side of the derailer is touching the chain. Do this only by spinning it on your bike, don't touch the set screws yet. If this is already in an ideal place with a lot of clarence from your back tire then make sure this is tight to the frame. Next Manually push your derailer so it acts like it is switching to the top gear. Do this to make sure you are able to even get up to it without rubbing. Then attach the shift cable back to the derailer pulling down on it with pliers while tightening the clamp nut with the other. Keep it tight!. Check out your gears now by running through the gears. Those two tempting screws determine your top and bottom limit. These screws are used as a last resort adjustment because you have to have your top/bottom limits exactly right in order to reach your top and bottom gears. Sometimes "You push as hard as you can but your derailer does not go up to your top gear. This is where you either need to adjust your top + screw looser to allow your derailer to move. This exactness is hard to get because your cable might be too tight(that's why you have to manually push the derailer up to the top gear when you locked down the cable in the first place. Remember that you only need a little bit of friction on the chain to get it to move up a gear! Don't adjust it too much because your top gear might work now but you wont be able to get into your lower gears. The only way to get your gears exactly right is adjust and run through the gears then adjust and run through the gears. One last tip is when you get a gear all lined up in the front then flip through all the gears in the back cassette to make sure your front gear stays.
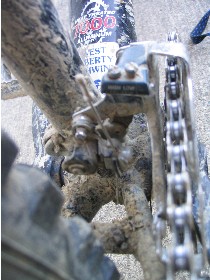
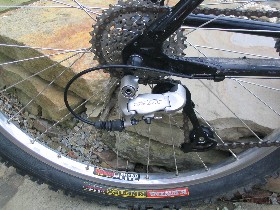
Rear Derailer: The rear derailer is the most fun because it is easy to bend it off a tree/rock. You can follow the same guidelines as the front derailer.The difference with the rear is that the bottom guide that returns the chain back to the front drive chain can get bent.
Chain is broken : Always carry a Link Wrench! Especially at 6 in the morning during an adventure race! There is a trick to replacing a chain link. You have to perfectly align the chains inner pin with the wrench pin. If you are off to the side at all the Chains inner pin will mushroom out causing it to expand which is why when you push it back into the replacement link it is too tight and hard to get exactly flush. Another tip is to carry two wire ties to give you some slack to work. Spin one tie around one section of the chain and one to the other side of the chain, then tie the two together so that they are taking all the tension and you don't have to fight the chain and can concentrate on hitting the center of the pin for replacement. If you only have one wire tie then just pigtale the two sides together as much as you can.
Brakes are rubbing: V Brakes: You need to look at your brakes and determine what part of the brake is rubbing. If its only one side of the brake then you can just release the tension arm and bend it farther away from the wheel to create more tension and pull the brake away from the tire. If both brakes are rubbing check to see if the brake is releasing all the way and is not sticking. If it is sticking release both of the tension arms and bend them away from the tire to create more tension. Some models have a little screw attached to the tension arm that increases the tension for you.
Brakes are squishy: V Brakes: This usually means that your pads are not aligned with the tire rim. The entire pad is not hitting the rim at the same time. The best way to solve this problem is pretty easy. It requires releasing the tension on both of the pads so you can move them around. From here clean off your rim and your pad so there is no sand or dirt in the way. Take off your tire and make sure that you have it on perfectly and it is not tilted to one side, clean off your forks where the skewer rest. Next put your tire on and spin it to let yourself know if there are any bends in the rim. LAST grab hold of the arms that your brake pads are connected to and push your pad onto the rim. Adjust the pad so that is exactly in the middle. Move the spacers that are in between the pad and the arm so that they are set into place and go ahead and tighten the pad so that it stays in place. Do not crank it down yet. Do this with the other pad. Now that we have both pads in place it's a good idea to put everything back together to make sure everything aligns up correctly when you hit the hand brake. Now that everything is flush and you have both pads hitting the rim at the same time tighten the pad making sure it doesn't move.
After you get off a trail. Slap the bike on the back of the truck because it looks good when your bike is goin home muddy. That's when the dad's in mini vans look at you and wish they were pushin pedals instead of the grocery cart. Wash it off when you get home. Dirt = rust and if you don't clean/lube up your components and moving parts they will start to stick up too which can lead to chain faults (slipping off gears, not being able to shift exactly to a gear). So clean it up. Take a couple towels with you to the trail. After you clean yourself off, give the bike a buff. There are a bunch of tools for cleaning Chains, gears, and derailers. They come in the form of brushes, cloths, and chain cleaning crank tools. Here are the DO's and DONT'S of cleaning your bike.
1) NEVER WD-40 YOUR PARTS. WD-40 has a harsh rust breaker that can eat away at bearings .\
2) use some wax based lube. The wax based lube doesn't come off after you go across that stream crossing.
3)Don't Lube your brake and shift cables. This just promotes dirt to stick and mess up your shift/brake reaction time.
4) Hose off your frame but becareful. Do not directly spray your hubs or casette. Water can get into the bearings or gears and can cause drag. Its ok to high pressure hose off your frame, tires, seat, but just beware of the parts that have bearings.
5) Lube up your chain before and after every ride. If a link in your chain does not flow with the chain drive then you will feel it every time you petal! This will cause Chain Faults (popping in your gears or missed gear switches).
6) Flip your bike over and give your wheels a spin checking for wobbles. Wobbles are loose spots in your tire frame. They get loose by a mismatch of tension.
7) Tire pressure depends on the trail. If it is soft and muddy you might want to go for a lower inflation so you can power through the mudd and your tire will give more to stick onto slippery rocks. If it has sharp rocks, hidden roots, or you are on the road, pump it up close to maximum. You don't want a pinch flat (when your tube gets pinched inbetween the rock and the tire rim).
