Flash animations at: www.dentalwisdom.com/animationstudio/animationstudioflash.html Link available
through their website.
Frequently Asked Questions:
What is Plaque?
Plaque is the accumulation of bacteria,
microorganisms and their products which sticks to the tooth
surfaces. Dental plaque is soft and easily removed by brushing and
flossing the teeth. Accumulation of plaque can lead to gum disease
(gingivitis) and periodontal disease, as well as tooth decay.
What is Calculus (Tartar)?
Calculus is dental plaque that has mineralized.
Calculus can form when plaque is not removed from the tooth
surfaces. This plaque becomes old and eventually forms into
calculus. Calculus can form above or below the gumline. The
bacteria that sticks to calculus can cause gum disease
(gingivitis) or periodontal disease. Calculus cannot be removed by
brushing and flossing. A dental hygienist checks for calculus
formation when you visit the dental office. It is removed with
special instruments designed to adapt to the tooth surface
affected without causing trauma to the soft gums.
What is Gingivitis?
Gingivitis is inflammation of the gums. Some
common features associated with gingivitis are red and swollen
gums, and the presence of bleeding while brushing and flossing.
The cause of gingivitis is the bacteria in dental plaque. This
disease is reversible with good oral hygiene practices.
What is Periodontal Disease?
Periodontal disease affects the periodontium (the
supporting structures of the teeth). The cause of this disease is
multifactorial, but the presence of bacteria in plaque certainly
plays a major role. The supporting periodontal structures begin to
breakdown. This can mean that part of the bone that supports the
teeth or the ligaments that hold the teeth securely in place are
destroyed. This disease process is generally not reversible and
may require treatment from a dental professional specializing in
periodontal disease. Periodontal disease can develop as a result
of poor daily plaque control (e.g. brushing and flossing).
However, not everyone with poor brushing and flossing techniques
will develop this condition. It is wise to visit your dental
hygienist or dentist regularly in order to detect early stages of
the disease and to prevent further damage.
What is a Cavity?
A cavity is the destruction of the tooth enamel,
dentin, cementum and may involve the tooth pulp.
How does a Cavity Form?
The formation of a cavity is due to many factors.
For example, the tooth itself plays a role (how strong it is); the
mouths ability to cleanse itself (your flow of saliva); diet
(frequency and selection of sugary foods); the bacteria in your
mouth (good or bad); and the length of time the tooth is under
attack by the bacteria in your mouth.
Heredity: may play a major role in how susceptible
you are to the formation of a cavity, for example:
·
tooth structure, size and shape of the tooth may be passed down
through generations. This includes deep pits and grooves which are
ideal "plaque traps", and therefore, are susceptible to
decay
·
there may be a higher risk of cavities forming if your parents also
had a large number of cavities
·
teeth that are malpositioned in the mouth, that are hard to access
with your toothbrush or floss may also provide an ideal breeding
ground for the bacterial dental plaque.
·
the absence of fluoride during tooth formation and following tooth
eruption can increase the incidence of cavities. fluoride promotes
strong tooth development and remineralization of the tooth
Saliva: has a protective function in the mouth,
for example:
·
a good flow of saliva washes away food and bacteria that sit on the
teeth and gum tissues
·
salivary flow helps to neutralize the acids produced by bacteria
from plaque, thus a good flow helps reduce the chances of a cavity
formation
Diet: a well balanced diet from each of the four major
food groups is essential for your oral health, as well as, your
overall health.
·
avoid frequent consumption of high sugar foods, especially sticky
foods
·
the longer the time the food stays on your teeth, the greater the
chance of forming a cavity. If you do have a sugary snack, it's
best to brush your teeth soon after
·
select between meal snacks that are low in sugar concentrations such
as white milk, fresh fruits, raw vegetables, dark breads and whole
grain and enriched cereals
·
sugar free candies, gum and other snacks are an option
Time: the actual amount of sugar eaten in one sitting
is not as important as when and how often you choose a sugar
containing food.
·
the consumption of high sugar foods is best if eaten with a regular
meal. This will confine the sugar exposure to one sitting. It's
best to eat the whole chocolate bar at once instead of at
different periods throughout the day
Bacteria: the mouth harbors many types of bacteria
that are considered to be normal in the human mouth.
·
bacteria, in a healthy mouth tends to live in balance, but for
reasons yet to be truly identified, that balance can be tilted and
oral disease may result
.
Signs of a Cavity Formation
The first sign of a cavity forming may be a white
spot, which in time may turn brown.
If it is a white spot, low concentrations of
fluoride applied frequently can arrest further development.
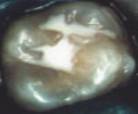
 White spot phase
If the white spot phase progresses, further
breakdown of enamel will occur. At this point, a visit to your
dental professional is necessary. The cavity may be restored with
a filling.
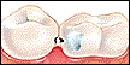 Breakdown of enamel between the teeth
Good Habits to Help Prevent Cavities
·
regular visits with your dental professional on an appointment
schedule that he/she recommends based on your own needs. Regular
visits will ensure you have the benefits of preventive care and
early diagnosis, as well as, treatment for any dental problems.
Guidance about home dental care can also be provided to avoid
future problems
·
diet plays an important role. Minimize the frequency of sugary
foods, thus reducing the amount of acid produced. Select snacks
that are less cavity causing, such as fresh fruit, plain yogurt
and raw vegetables
·
the use of fluoride will help decrease the risk of cavity formation
·
good plaque control. Maintain a strict and regular home care routine
to minimize plaque growth
·
it is recommended that you consult your dental professional before
using any commercial products. You want to make a selection based
on the effectiveness of the product and your own personal needs
Sealants
·
Sealants are thin plastic coatings applied in the dental office on
the chewing surfaces of back teeth, a prime spot for cavities.
Sealants act as a barrier to prevent bacteria and food from
collecting and sitting on the grooves and pits of teeth.
·
Sealants are best suited for permanent first molars which erupt
around the age of 6 and second molars that erupt around the age of
12. It is important to have the sealant applied as soon as the
tooth has fully come in.
·
Before the dental professional applies the sealant material, the
tooth surface is prepared by using a dental solution which cleans
the tooth surface and helps the sealant stick to the tooth by
penetrating the enamel.
·
Sealants may last for several years once applied, but should always
be examined at the child's regular checkup. Even if the sealant
becomes lost, the material that has penetrated the enamel will
still provide protection. Sealants are easily replaced if lost.
·
Sealants are nearly 100% effective in preventing decay in the
chewing surfaces of the back teeth. Fluoride helps fight decay on
the smooth surfaces of the teeth.
So,
sealants + fluoride + good oral cleaning habits + wise eating = a
great reduction in cavities.
Check with
your oral heath professional to see if your child is ready for
sealants.
Thumb-sucking

Thumb-sucking or
finger-sucking is a habit that occurs with many infants. Your
child will usually give it up naturally by the age of four. If the
sucking habit continues beyond the time when permanent teeth start
to erupt, your child may develop crooked teeth and a malformed
palate (roof of the mouth). This results from pressure applied by
the thumb on the teeth and roof of the mouth. The severity of the
problem depends on frequency, intensity, duration and also the
position in which the thumb is placed in the mouth. The
relationship between the upper and lower jaws may also be
affected. Speech defects can occur from malaligned teeth resulting
from thumbsucking and/or finger-sucking.
Treatment:
·
The best prevention is to get your newborn to take up the pacifier
instead of thumbsucking or finger-sucking. (Although prolonged use
of the pacifier can lead to similar problems, it, at least, is not
attached to the child and can be removed.)
·
Children should be helped to give up the habit before they enter
school to prevent teasing.
·
Timing of treatment is important. Your child should be willing to
give up thumbsucking or finger-sucking. If your child is not
willing to stop, therapy is not usually indicated. Pressure you
apply to stop may only lead to resistance and lack of cooperation.
Try again later.
·
Give your child attention and understanding and gently discourage
the habit. Reminders such as a band-aid on the thumb can help.
·
Offer rewards (star on chart, dimes, extra story) for days when your
child is successful. Praise your child when successful.
After daytime sucking is controlled:
·
Help your child to give up the sucking habit during sleep. This is
usually an involuntary process and a glove, sock, or thumb/finger
guard can help stop the habit.
·
Take one step at a time. Encourage your child not to suck during one
daytime activity, like storytime or television watching. Gradually
add another activity until daytime sucking is controlled.
·
If these considerations are not successful, see your dental
professional or doctor for further support. By the time your
child's permanent teeth begin to erupt (at around 6 years of age),
it should be brought to their attention. Your dental oral health
professional may have other suggestions such as a reminder bar
that is placed in the upper mouth.
Pacifiers

For babies to suck is very natural. It is how they
nourish and soothe themselves. When a baby is not eating, the
pacifier is better to use for soothing than a finger/thumb or a
toy.
Pacifiers are less likely to cause a malocclusion
and are usually discontinued at an earlier age than is
thumbsucking. It is easier to take away a pacifier then a finger
or thumb. Thumbsuckers typically continue the habit until 3-5
years.
Thoughts on Pacifiers
·
if you notice your child beginning to suck their fingers or thumbs,
during the first 3 months of life, you can introduce your child to
a pacifier
·
to avoid any trauma to the gums, it's important to buy a pacifier
with a nipple made of rubber
·
do not use the soother around the clock, only when necessary
·
in rare instances, pacifiers may cause complications, like abnormal
swallowing patterns
·
check the pacifier daily for breakage. They do not last forever. The
child could suck a "ripped" pacifier and choke on it
·
do not hang the pacifier around your baby's neck with a string. Your
baby could be accidentally strangled
Choosing a Pacifier
·
to avoid improper breathing and abnormal molding of the baby's jaws,
choose a soother that resembles the natural nipple and breast
Pacifier use can cause abnormal development of the
jaws and teeth. Some reasons are:
·
improperly sized and shaped soother
·
strength of sucking action
·
length of time the soother is present within the mouth
If you have any questions or concerns about pacifiers, talk to
your dental hygienist or dentist.
First Dental
Visit
Your child's first visit to the dental office should
be around his/her first birthday, but could be as early as you'd
like (as soon as the first tooth erupts or even sooner). Here are
some Do's and Don'ts.
Do:
·
have a tour of the dental office by going in for a casual, friendly,
get acquainted visit and checkup
·
make an appointment for a visual check of your child's teeth
·
have a discussion with your dental hygienist or dentist about oral
health care for your child
·
familiarize your child with the dental office. Consider taking them
along when you or a sibling has a dental appointment
Don't:
·
wait for an emergency for the first visit
·
over prepare your children for dental visits
·
use phrases like "It won't hurt much" or "It won't be
too bad". Such phrases do not soothe; they only create
anxiety
Some dental offices provide a free first dental
visit for children under the age of three.
Call your dental office to find out if they are
participating in the program.
Oral Hygiene
for Children

Should I clean my baby's teeth?
Definitely. Even before the first tooth appears,
use a soft, clean cloth to wipe your baby's gums and cheeks after
feeding. As soon as the first tooth appears, begin using a small,
soft bristled tooth brush to clean the tooth after eating. Don't
cover the brush with toothpaste. Young children tend to swallow
most of the toothpaste, and swallowing too much fluoridated
toothpaste can cause permanent spots on their teeth called dental
fluorosis.
I find brushing my child's teeth awkward. Any suggestions?
Try having your child lie down. Put your child on
your lap or on the floor, keeping his/her head steady with your
legs. If your child is standing, have his/her back to you with
their head tilted slightly and resting against your body. Have
your child hold a mirror while you brush and floss their teeth so
your child can see what is being done.
Is it important to brush before bed?
Yes. If you have to miss a brushing, the bedtime
one is probably the worst one to miss. If you don't get rid of the
bacteria and sugar that cause cavities, they have all night to do
harm. While you are awake, saliva helps keep the mouth clean. When
you are asleep, there is less saliva produced to clean the mouth.
For this reason it is important to brush before bedtime.
Brushing
Tips
Tooth brushing will remove dental plaque and
other debris from your teeth. Plaque plays a primary role in oral
disease such as tooth decay and gum disease. The best way to
remove plaque from the tooth surface on a daily home care basis is
through toothbrushing and some form of "between the
teeth" cleaning.
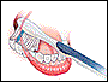
HOW TO BRUSH
The following toothbrush technique is commonly
recommended by dental hygienists. You should see your dental
hygienist to ensure that you are using a technique that meets your
needs.
·
Use a soft bristled brush (synthetic bristles preferably because
natural bristles tend to harbor the oral bacteria as the bristles
are more porous). Be sure it is the right size (generally smaller
is better than larger).
·
Place the bristles at a 45 degree angle to the teeth. Slide the tips
of the brush under the gums.
·
Jiggle the bristles very gently so that any plaque growing under the
gum will be removed.
·
Be sure to brush the outside, the tongue side and the chewing
surfaces of your teeth.
·
For the front teeth, brush the inside surfaces of the upper and
lower jaws by tilting the brush vertically and making several up
and down strokes with the front part of the brush over the teeth
and gum tissues.
·
Brushing your tongue will help freshen your breath. Debris and
bacteria can collect on your tongue and cause bad breath.
Your toothbrush will only clean one or two teeth
at a time. Change its position to properly clean each tooth.
To prevent plaque damage, be sure to brush at
least once every day, preferably at bedtime. Adding a brush time
after breakfast increases your chances of thorough daily plaque
removal.
Don’t rush your brush. A thorough brushing
should take at least 3 minutes.
Brushing the teeth too vigorously or using a
hard bristled toothbrush causes the gums to recede and exposes
root surfaces. It also wears down the tooth structure. Both of
these conditions can lead to tooth sensitivity.
A pea-sized amount of fluoridated toothpaste is
all you need, should you choose to use a toothpaste.
Replace your brush when the bristles begin to
spread. A worn out toothbrush will not properly clean your teeth.

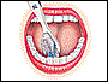
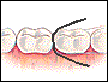
FLOSSING
TIPS

Flossing helps to remove plaque from in between
your teeth, in areas that your toothbrush can’t reach. It is not
the space between the teeth you are flossing, but the tooth
surface. HOW TO FLOSS
·
Wrap about 18 inches of floss around the middle fingers of your
hands.
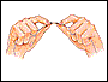
·
Holding the floss tightly (use your thumbs and forefingers) gently
guide the floss between your teeth. Never "snap" the
floss as this can cut the gums.
·
When the floss reaches the gumline, curve it into a C-shape against
one tooth and gently slide it into the space between the gum and
the tooth until you feel pressure against the tooth.
·
Gently scrape the side of the tooth with the floss.
·
Repeat this method on all your teeth.
·
Move to a clean area of floss after one or two teeth.
Don’t be discouraged with your first attempt.
Flossing is a skill that is learned and after a while, it will
take only a few minutes of your time.
If you do not have good finger dexterity, you
may find it helpful to use a commercial floss holder.
Children may find it easier to use a loop of
floss. Take a piece of floss about 10 inches long and tie the ends
together, into a circle. Then hold the floss tightly between the
thumbs and forefingers to floss. Most children cannot floss their
own teeth properly until about the age of 10.
Establish a regular pattern and time for
flossing, so that you don’t miss any of your teeth.
Remember to be gentle when inserting floss
between your teeth and under the gumline. Flossing can injure your
gums if done improperly.
Your gums may bleed and be sore for the first
few days that you floss. Your gums should heal and the bleeding
should stop once all the bacteria are removed.
See your dental hygienist for a demonstration. It
takes practice.
Special
Brushing and Flossing Aids

|
Your dental hygienist may recommend the following plaque removing
products if you have: dental implants, braces, bridges, or
if you have trouble cleaning effectively with regular
brushing and flossing. When used properly, along with
regular brushing, these products will help remove plaque
from the teeth and thus promote oral health. However, if
improperly used, these products can damage the gums. See
your dental hygienist to discuss if these products would
be beneficial to you and how to use them properly. Use
them only as specified by your dental hygienist.
|
|

|
Denture brush - specially designed to clean
complete and partial denture surfaces including clasps.
|
|

|
End-tuft brush- permits easier access to
difficult to reach areas
|
|

|
Floss holder - for holding floss comfortably
and securely
|
|

|
Gum stimulator - for massaging gums and
firming up problem areas after surgery, not to be used on
healthy tissues
|
|

|
Wooden interdental cleaners - for loosening
food and plaque
|
|

|
Interdental brushes (foam or bristles)- for
cleaning spaces between teeth or underneath bridges
|
|

|
Special floss - for cleaning difficult areas
like under bridges or braces
|
|

|
Orthodontic toothbrush - special v-trimmed
bristles designed to effectively clean around braces
|
