Making a Catapult Using
func_ut_train
Urban Terror Mod (Quake 3)
by: moc_mr_fitz
last updated Nov 6/01
[moc_mr_fitz HOME]
links | contact
Introduction
This catapult is ugly but it works. While most maps won't
include a catapult, the point of this tutorial is to show the versatility
of the func_ut_train and to encourage mappers NOT to be intimidated from
using it. This particular catapult is operated simpy by stepping on the
catapult plate - it returns automatically. To make things a lot easier
on you here is the mapfile for
this tutorial (including a complied .bsp). If you do not know where
these go, well...
Step 1 - do the brushwork (origin
brush too!)
-
make your catapult - do a better job than I have. Below is the catapult
in the attached mapfile (see figure
1)
-
make sure you provide an origin for the object - you can do this
manually as a key/value pair but it is more intuitive to use a brush -
in figure 1 below the orange box on the left end of the catapult is the
origin (flush with the bottom and outside end of the catapult) - it is
a 16x16x16 brush covered with common/origin texture (you could make
the origin brush smaller for more precise hinging)
-
once you have it looking the way you want select every brush that
will make the catapult...
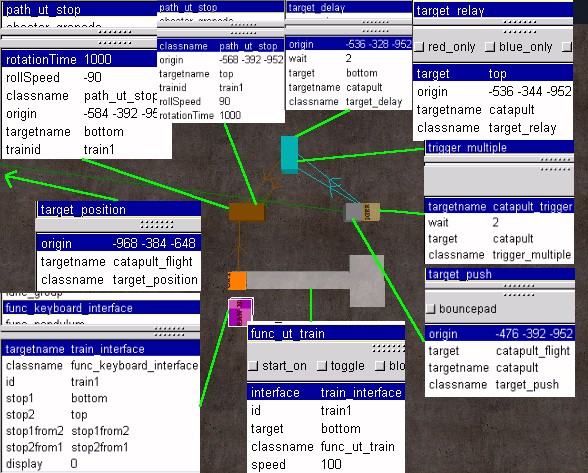
figure 1 (compact but ugly)
Step 2 - make it a func_ut_train and set the key/value
pairs
-
with all the brushes selected bring down the entities menu (right click
in Radiant) and select func_ut_train.
-
set the keys/value pairs for the train as per the diagram above
(figure 1)
-
note: that the func_ut_train targets one of the path_ut_stops
in step 3 - allowing you to actually draw the catapult where ever you like
- this is useful when you include complicated texturing which (if
I remember correctly), like rotating doors, aligns with the world origin
(x-0; y-0; z-0) - in such cases it is a good idea to do the final texturing
with your catapult's origin exactly overlapping the world origin
Step 3 - tell it how to rotate - path_ut_stops
-
insert two path_ut_stops - these are the brown boxes in figure 1
-
in gtkradiant for example right click anywhere on the worksurface
window and select path_ut_stop
-
remember that the origin brush is what aligns with these path_ut_stop entities
when it moves
-
set the key/value pairs as per figure 1
-
in this case the rotationTime (in milliseconds) and rollSpeed
(actually an angle not a speed, but the final angle is determined by
the formula: rotationTime * rollSpeed - e.g.s 1 second * 90 degrees = 90
degrees; 2 seconds * 45 degrees = 90 degrees) keys are used to get
the catapult rotate - thus the catapult actually moves from one path_ut_stop
to the other and at the same time it rotates
-
note: that the path_ut_stops are not in the exact same spot, allowing
just rotation - the func_ut_train seems to require some lateral
movement - not just roll
-
note: the path_ut_stop that causes the reverse or return rotation
(targetname bottom) has a negative angle (-90)
Step 4 - connect the catapult to the path_ut_stops - func_keyboard_interface
-
the func_keyboard_interface is what connects everything up - the
source of many errors in making func_ut_trains
-
make a brush, cover it with common/nodraw texture (purple) on all
sides (see figure 1)
-
set the keys as in the figure 1
-
note: the display is set to 0 so you do not actually see the interface
Step 5 - include entity to actually fling player - target_push
-
unfortunatley the func_ut_train will not actually fling you, you need to
add a target_push to do that
-
a target_push is unique in that it has to be triggered (unlike a regular
jumppad trigger_push which is automatic)
-
in radiant right click and add a target_push (grey box) with the
keys as listed in figure 1
-
the target_push has to target either an info_notnull, or as in this case,
a target_position which represents the apex of flight (not drawn,
in figure 1)
Step 6 - trigger the "fling" and include auto-return -
trigger_multiple, target_relay, target_delay
-
the target_push will be triggered by an invisible trigger_multiple (a brush
covered on all 6 sides with the pale brown common/trigger texture)
as shown in figure 1
-
noting where the catapult will be drawn in game (see note in Step 2) place
the trigger_multiple over your fling platform, or basket (help me
out here I didn't grow up in medieval times so the terminology escapes
me)
-
upward fling: have the trigger_multiple target the path_ut_stop
that causes the positive 90 degree rotation, in this case the one
with targetname top - of course to complicate things I have had problems
with direct triggering of path_ut_stops so we do this through a target_relay
-
catapult return: to return the catapult to the start position include
a target_delay with a wait key set to 2 seconds - thus after flinging
the player, the catapult returns to the bottom in 2 seconds
-
note: the trigger_multiple and the target_delay have the same
wait keys (2 seconds) - why? because the trigger_multiple stays on
the ground and does not move with the catapult arm - thus, you don't want
players being flung about when the arm is still in the up position
NOTES
-
to use the catapult simply jump on the fat end - uh err, /god helps when
testing the catapult
-
if you want to encourage teamplay with the catapult make it triggered by
a button - thus you atually need a teammate to launch you (i.e push the
button while you stand on the catapult)
-
a func_ut_train can be transformed into various interesting in-game moving
objects - hopfully this simple use gives you ideas - for tutorials on other
uses of func_ut_trains (e.g. the object rotates as it moves) see the tutorials
on making a helicopter and an elevator that stops at several
floors at the 6th
Floor. A tutorial for a simple 2 floor elevator is located
here.
-
for further help with func_ut_trains please visit the UT
level design forum
Contact
[email protected]
Urban Terror sites - with thirdparty maps
(6th floor for other UT mapping tutorials)
Just a counter, click at your discretion
