|
The Plan.
Though the actual idea of the attack was very simple, just fly into
Taranto and torpedo the Italian fleet, the plan behind its execution was
complex indeed. Six groups of British warships and four convoys of merchantmen
were to have their movements co-ordinated in an operation that stretched
from Gibraltar to the coasts of Greece and Turkey. There were five main
tasks to be accomplished; the Mediterranean Fleet was to be reinforced
by warships from England, a convoy would be pushed through to Malta, other
convoys would take supplies to Greece and Crete, empty merchantmen would
be brought back to Alexandria and Taranto would be attacked. A total of
two aircraft-carriers, five battleships, ten cruisers, thirty destroyers,
four armed trawlers and a large number of merchantmen would take part.
The naval forces were arranged as follows:-
Force A: Battleships Warspite, Malaya, Valiant, aircraft-carrier
Illustrious,
2 cruisers and 13 destroyers. This force would cover convoy MW3 going to
Malta, rendezvous with Force F, then detach Illustrious and 4 cruisers
for the Taranto attack.
Force B: Two cruisers (Ajax and Sydney) would take troops
and supplies from Port Said in Egypt to Suda Bay in Crete. First Sydney,
later Ajax would then join Force A.
Force C: One cruiser (Orion) would take RAF supplies and
personnel to Piraeus in Greece and then go on to Suda Bay.
Force D: Battleship Ramilles, two anti-aircraft ships
(Coventry and Calcutta) 13 destroyers, 2 armed trawlers and 1 minesweeper.
Part of this force would help escort convoy MW3 to Malta and later ME3
to Alexandria.
Force F: Battleship Barham, 2 cruisers and 3 destroyers
(3 more destroyers were temporarily attached from Force H). This force
consisted of reinforcements for the Mediterannean Fleet.
Force H: Aircraft-carrier Ark Royal, cruiser Sheffield
and 5 destroyers sailing out of Gibraltar would escort Force F as far as
the island of Malta.
The merchant ships were gathered into four convoys:-
Convoy AN6: Three merchantmen and two armed trawlers were to
take petrol and bunker fuel from Port Said to Greece.
Convoy MW3: From Alexandria, five ships to Malta and two to
Suda Bay, Crete.
Convoy ME3: Four empty, fast transports returning from Malta
Convoy AS5: Empty merchantmen returning from Greece and Turkey
to Egypt.
Though a highly complicated series of movements needing great co-ordination,
the very complexity caused great confusion within Supermarina, the Italian
Naval Command, and at no point did the Italians have a clear picture of
what was going on. This confusion was compounded by the striking lack of
success of Italian aerial reconnaisance. Although their pilots often flew
with courage and determination, their planes were generally obsolescent
and no match for the radar directed British Fulmar fighters sent up from
the carriers to intercept them.
The Take Off.
On the afternoon of November 10th, 1940, HMS Illustrious, four
cruisers and four destroyers detached from forces A and F and steamed north-east
in the direction of the Greek island of Cephalonia. A further force of
three cruisers was to make a series of diversionary attacks on Italian
shipping in the waters between Italy and Albania. At 9.00PM on the evening
of the following day at a point not far from the western end of Cephalonia,
Illustrious
turned
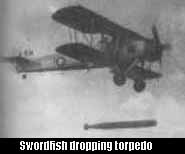
into the wind and began to launch her planes. A mere 21 Swordfish were
available to the British that night and they were launched in two waves
with a little over an hour separating them. The first wave was led by Lt.
Commander K. Williamson and consisted of six torpedo armed Swordfish, four
more armed�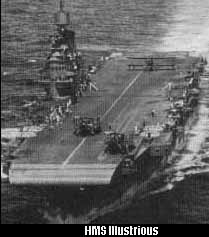 with
either bombs or a mix of flares and bombs and two carrying only flares.
The Swordfish carried a crew of two that night, a pilot and an observer,
the normally carried gunner being left behind in favour of a large auxiliary
petrol tank that was located next to the observer. The first wave took
off uneventfully and slowly climbing, the planes straining under the weight
of weapons and extra fuel, headed for Taranto. At first they flew through
thick clouds and all flying was done by instrument, then after about 30
minutes in the air and at about 7,000ft they arrived above the clouds into
a clear sky lit by a crescent moon. It must have been bitterly cold in
the open cockpits of the Swordfish as they rumbled on their way but the
aircrew probably didn't complain, they knew where they were going was sure
to be very hot indeed.� with
either bombs or a mix of flares and bombs and two carrying only flares.
The Swordfish carried a crew of two that night, a pilot and an observer,
the normally carried gunner being left behind in favour of a large auxiliary
petrol tank that was located next to the observer. The first wave took
off uneventfully and slowly climbing, the planes straining under the weight
of weapons and extra fuel, headed for Taranto. At first they flew through
thick clouds and all flying was done by instrument, then after about 30
minutes in the air and at about 7,000ft they arrived above the clouds into
a clear sky lit by a crescent moon. It must have been bitterly cold in
the open cockpits of the Swordfish as they rumbled on their way but the
aircrew probably didn't complain, they knew where they were going was sure
to be very hot indeed.�
Although the Italians had no radar they did have a fairly effective
accoustic early warning system that detected the noise of aero-engines
at quite long distances and the Royal Navy aircrew knew they had no chance
of achieving complete surprise. Taranto was a heavily defended anchorage,
its defenders at wartime readiness levels, well trained and with plenty
of ammunition. Around the harbour the Italians had positioned a formidable
array of anti-aircraft weapons. There were 21 batteries of four inch guns,
84 anti-aircraft cannon of 20-37mm in calibre and 109 machine guns. Complementing
the land-based guns were 22 large searchlights capable of either illuminating
planes for the guns or dazzling attacking pilots and spoiling their aim.
Originally, 90 barrage balloons had been deployed across the harbour in
three rows. Tethered by steel cables which could shear the wings off unwary
planes, they considerably reduced an attackers room for manoeuvre. Luckily
for the British a lack of hydrogen had meant that only 30 balloons could
be deployed on the night. The British pilots, however, were unaware of
this. Apart from the land-based guns, the British had to contend with the
guns of the Italian fleet. There were 6 battleships, 7 cruisers and 28
destroyers in the inner and outer harbours of Taranto and together they
mustered more than 600 anti-aircraft weapons. As a final defense 4,600
yards of heavy steel-mesh anti-torpedo nets were slung across much of the
harbour. The British had their work cut out.
|

 planes.
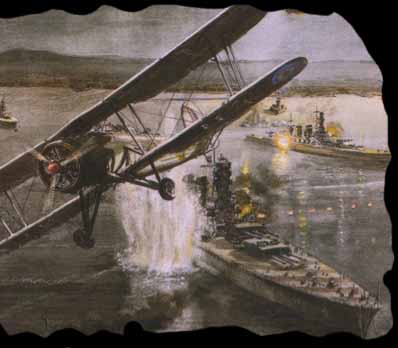
Then came Lt. Com. Williamson's Swordfish. Approaching from the west he
turned south-east as he flew over San Pietro Island, barely missing a ballon
cable as he came up on Conti di Cavour and dropped his torpedo from
a height of thirty feet. As he banked away his Swordfish was hit by machine
gun fire and crashed into the sea. Both Williamson and his observer survived
and were captured by the Italians. His torpedo just missed a destroyer
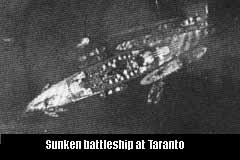
and went on to hit the Cavour about halfway between the bridge and
the B turret. Water poured into the stricken ship and she began to sink.
Two more Swordfish flew a similar course to Williamson but slightly to
the north. Both loosed their torpedoes at the Cavour, but both missed.
The two planes turned and flew through the anti-aircraft fire unscathed.
The fourth plane to make its run came in over San Pietro Island and then
dived to the right, between the city of Taranto and a line of anchored
cruisers that blazed away at him as he passed. He saw the Littorio
in front of him and at a thousand yards from the ship dropped his torpedo.
The torpedo struck home and the Littorio's starboard bow was torn
by a 49ft by 32ft hole. Lt. Swayne, the pilot who had arrived early, now
made his run. He came at the Littrio from the other side and 400
yards out dropped his torpedo. It struck the Littorio on the port quarter
and opened a hole 23ft by 5ft. After two hits in such quick succession
the Littorio started to go down. The last torpedo armed Swordfish in the
first wave was piloted by Lt. M. Maund. He came in from the north-west,
jinking and jerking as much was possible with a full load of weapons, desperately
trying to avoid the ferocious fire of the Italian gunners who had already
seen three torpedoes find their targets. 1,300 yards ahead Maund saw what
was probably the Vittorio Veneto and he released his torpedo. The
Swordfish, lightened by the dropping of the torpedo, leapt forward and
at maximum speed raced through the anti-aircraft fire and out to the the
safety of the open sea. The torpedo missed. The results from the four bomb
carrying planes were disappointing. Although all four pilots daringly pressed
home their attacks, two completely missed their targets and one landed
a bomb on an Italian destroyer only for the bomb to fail to explode. The
fourth pilot Sub. Lt. W. Sara dropped his bombs on the hangars of the Italian
seaplane base causing great destruction.
planes.
Then came Lt. Com. Williamson's Swordfish. Approaching from the west he
turned south-east as he flew over San Pietro Island, barely missing a ballon
cable as he came up on Conti di Cavour and dropped his torpedo from
a height of thirty feet. As he banked away his Swordfish was hit by machine
gun fire and crashed into the sea. Both Williamson and his observer survived
and were captured by the Italians. His torpedo just missed a destroyer
and went on to hit the Cavour about halfway between the bridge and
the B turret. Water poured into the stricken ship and she began to sink.
Two more Swordfish flew a similar course to Williamson but slightly to
the north. Both loosed their torpedoes at the Cavour, but both missed.
The two planes turned and flew through the anti-aircraft fire unscathed.
The fourth plane to make its run came in over San Pietro Island and then
dived to the right, between the city of Taranto and a line of anchored
cruisers that blazed away at him as he passed. He saw the Littorio
in front of him and at a thousand yards from the ship dropped his torpedo.
The torpedo struck home and the Littorio's starboard bow was torn
by a 49ft by 32ft hole. Lt. Swayne, the pilot who had arrived early, now
made his run. He came at the Littrio from the other side and 400
yards out dropped his torpedo. It struck the Littorio on the port quarter
and opened a hole 23ft by 5ft. After two hits in such quick succession
the Littorio started to go down. The last torpedo armed Swordfish in the
first wave was piloted by Lt. M. Maund. He came in from the north-west,
jinking and jerking as much was possible with a full load of weapons, desperately
trying to avoid the ferocious fire of the Italian gunners who had already
seen three torpedoes find their targets. 1,300 yards ahead Maund saw what
was probably the Vittorio Veneto and he released his torpedo. The
Swordfish, lightened by the dropping of the torpedo, leapt forward and
at maximum speed raced through the anti-aircraft fire and out to the the
safety of the open sea. The torpedo missed. The results from the four bomb
carrying planes were disappointing. Although all four pilots daringly pressed
home their attacks, two completely missed their targets and one landed
a bomb on an Italian destroyer only for the bomb to fail to explode. The
fourth pilot Sub. Lt. W. Sara dropped his bombs on the hangars of the Italian
seaplane base causing great destruction.
 Slaughter.
As they flew over the Italian cruisers they disappeared, probably victims
of anti-aircraft fire. The following day Bayley's body was recovered from
the sea. There was no trace of Slaughter. The Swordfish of Lt. Lea attacked
next and after turning a full circle in which to lose height he came in
very low. He saw the Duilio ahead of him dropped his torpedo and
hit the battleship 30 feet below the waterline. A hole 36ft by 40ft was
opened in her hull. Lea's Swordfish sped away just above the surface of
the harbour and as he passed between the cruisers Fiume and Zara,
the two ships fired on each other in their eagerness to bring him down.
The crew of the Duilio ran her aground on a beach to stop her sinking.
The remaining two Swordfish made torpedo runs on the Veneto, neither
scoring a hit although one of the pilots remembered flying over an anti-aircraft
barge so close he could feel the heat from the guns' muzzle blasts. The
other aircraft had one of its ailerons shot to pieces and a hole about
3ft by 1 1/2ft blown in the lower wing. Only the legendary, in this case
miraculous, sturdiness of the Swordfish was able to bring the plane safely
back to the Illustrious. As the planes of the second wave were heading
for home L5F, the aircraft damaged in the flightdeck collision, appeared.
This Swordfish was piloted by Lt. E. Clifford and armed with bombs. Clifford
aided by the light of the burning seaplane hangars, spotted the cruiser
Trento
and made a dive-bombibg attack from 2,500ft. None of his six� bombs�
exploded, though one hit the Trento and ruptured her oil tanks from
the force of the impact. Clifford also departed unscathed.�
Slaughter.
As they flew over the Italian cruisers they disappeared, probably victims
of anti-aircraft fire. The following day Bayley's body was recovered from
the sea. There was no trace of Slaughter. The Swordfish of Lt. Lea attacked
next and after turning a full circle in which to lose height he came in
very low. He saw the Duilio ahead of him dropped his torpedo and
hit the battleship 30 feet below the waterline. A hole 36ft by 40ft was
opened in her hull. Lea's Swordfish sped away just above the surface of
the harbour and as he passed between the cruisers Fiume and Zara,
the two ships fired on each other in their eagerness to bring him down.
The crew of the Duilio ran her aground on a beach to stop her sinking.
The remaining two Swordfish made torpedo runs on the Veneto, neither
scoring a hit although one of the pilots remembered flying over an anti-aircraft
barge so close he could feel the heat from the guns' muzzle blasts. The
other aircraft had one of its ailerons shot to pieces and a hole about
3ft by 1 1/2ft blown in the lower wing. Only the legendary, in this case
miraculous, sturdiness of the Swordfish was able to bring the plane safely
back to the Illustrious. As the planes of the second wave were heading
for home L5F, the aircraft damaged in the flightdeck collision, appeared.
This Swordfish was piloted by Lt. E. Clifford and armed with bombs. Clifford
aided by the light of the burning seaplane hangars, spotted the cruiser
Trento
and made a dive-bombibg attack from 2,500ft. None of his six� bombs�
exploded, though one hit the Trento and ruptured her oil tanks from
the force of the impact. Clifford also departed unscathed.�
