|
      
I Also did a valve adjustment when I was installing the stage 2
jet kit. Accessing the valve inspection covers was easy since the carbs were
already out of the way. Suzuki recommends you use a tool to adjust the tappets,
but I decided to make my own tool. What I used was
a square head deck screw held on by a locking pliers. All you have to do once you get the inspection
covers off is to buy yourself some thickness gauges. Since their are four valves
per cylinder, you have to adjust 2 valves at the same time. Using two thickness gauges will give you added accuracy (and less frustration). If you get the straight thickness gauges you have to
bend them 90 degrees so that allows you to maneuver them easier. You must adjust
your valves when the bike is cold otherwise you will not get accurate
results.
Here are the valve tolerances:
0.08 - 0.13 millimeters
0.003 - 0.005 inches
This is for both the intake and exhaust valves.
1. Remove tank
2. Remove air filter boxes
3. Pull carbs out and set them aside, or remove them completely
4. Put a rag in the intake manifold to prevent tools from falling inside the engine
5. Remove inspection covers
6. Remove spark plugs and shove a rag down the opening to prevent tools from falling
inside the cylinder
Note: this is a good time to check the gap of your spark plugs and remove carbon
buildup.
7. Remove the timing inspection plug
8. Remove the crankshaft cover
9. Use a socket and a breaker bar to rotate the crankshaft
10. When adjusting the front cylinder (the cylinder closest to the front wheel)
look inside the timing
inspection plug while rotating the crankshaft, when F | F | T is in the center
of the inspection plug
you are at TDC (Top Dead Center) for the front cylinder valves. You can also
double check the top
dead center by "wiggling" the rocker (both intake and exhaust) arms and if you can feel play in them you
are in the correct position.
Remember: you must be on the compression stroke for the front cylinder
otherwise
you will not be adjusting the valves correctly. Why do you have to be on the compression stroke? Because when your on the compression stroke both the intake and exhaust valves are closed. When they are closed the tappets are not pushing down on the valves thus allowing you to "wiggle" them. Your front cylinder valves are now ready for adjustment.
11. When adjusting the rear cylinder (the cylinder closest to the rear wheel)
look inside the timing
inspection plug while rotating the crankshaft, when R | F | T is in the center
of the inspection plug
you are at TDC (Top Dead Center) for the rear cylinder valves. You can also
double check the top
dead center by "wiggling" the rocker (both intake and exhaust) arms and if you can feel play in them you
are in the correct position.
Remember: you must be on the compression stroke for the rear cylinder
otherwise
you will not be adjusting the valves correctly. Why do you have to be on the compression stroke? Because when your on the compression stroke both the intake and exhaust valves are closed. When they are closed the tappets are not pushing down on the valves thus allowing you to "wiggle" them. Your rear cylinder valves are now ready for adjustment.
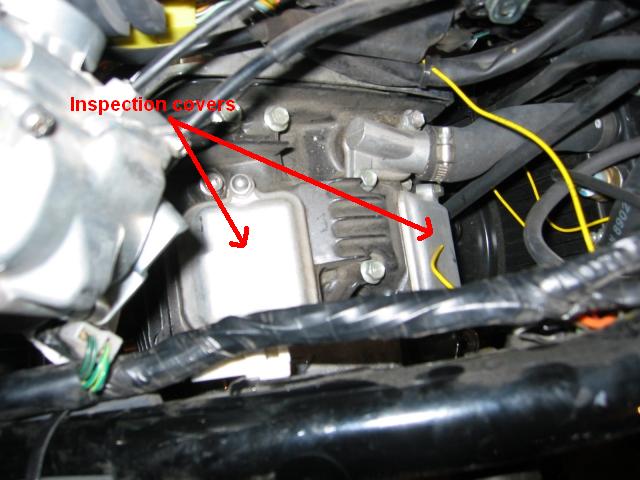
This picture is of the front cylinder inspection covers, the rear are
identical.

The timing inspection plug allows you to find the top dead center by lining
up F | F | T or R | F | T
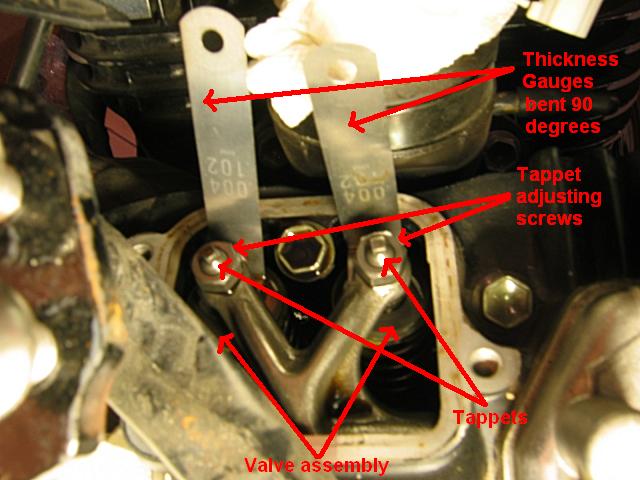
As you can see adjusting both the valves at the same time makes
it much easier to get the job done.
Once you have your thickness gauges (I used .004 inches as you can see)
between the tappet and the valve
you then take your tool and a wrench provided in your toolkit and adjust the tappets until the
thickness gauge has a slight
resistance when moved around. Do the same for all the valves.
|
