Previous Page |
 Next Page | |
 | ||
Previous Page |
Next Page | |
| ||
A tab stop is where the cursor will jump to on a line when you press the Tab key on the keyboard. The most common tab type is the left alignment tab (see below), but there are also center alignment, right alignment and decimal point alignment tab stops. To set tab stops, the ruler should be showing in the window. If the ruler is not showing, open the View menu and select Ruler. When the ruler is showing in the document window, the word "Ruler" will have a checkmark next to it in the View menu.

If Ruler is dimmed (not accessible) on the menu, make sure you are in the Print Layout view. (See Lesson 1, "Microsoft Word: Document Windows and Document Views.")
Here is an example of what a ruler might look like:

The dark areas on either side of the ruler are areas that are outside the margins. The left margin is the farthest edge on the left in the white area and the right margin is the farthest edge to the right in the white area.
To place a tab, first check the picture on the far left side of the ruler (in the dark area) to see if the type of tab stop you want to set is showing. If it is not, click on the tab stop picture until the tab stop is the type you need. Next, move the mouse pointer up to the ruler and left-click once on the ruler where you want to place the tab. Whichever type of tab stop is showing in the picture is the type of tab stop that will be placed on the ruler.
|
The left alignment tab stop is the most commonly used tab stop. A left alignment tab stop will be placed when you left-click on the ruler only if the following image is shown on the left side of the ruler:
 Left Alignment Tab When a left alignment tab stop is placed on the ruler and you use the Tab key on the keyboard to jump to that tab stop, all of the text typed there will be aligned on the left, like this:
See how all of the words are lined up by their first letter? | |
|
The center alignment tab stop will center the text typed after the tab key is used to jump to that particular tab. The center alignment tab stop looks like this:
 Center Alignment Tab Text typed at a center alignment tab stop might look like this:
| |
|
The right alignment tab stop aligns text to the right.
 Right Alignment Tab Text typed using the tab key and a right alignment tab stop might look like this:
| |
|
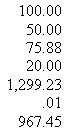
A decimal point alignment tab stop aligns rows of numbers at the decimal point. This is what a decimal point alignment tab stop looks like in Microsoft Word:
 Decimal Point Alignment Tab Stop Here is an example of a list of numbers aligned with a decimal point alignment tab stop:
 |
If you do not set any tab stops in a Word document, the default is a left align tab stop about every one-half inch or so. In other words, if you don't place any tab stops on the ruler and yet you press the Tab key on the keyboard, the cursor will jump about one-half inch every time you press the key.
Practice: Check to see if the ruler is showing in the document window for your letter. If the ruler is not showing, open the View menu and select Ruler. Make sure the left alignment tab stop picture is showing on the left side of the ruler. (If it is not, left click on the picture until the left alignment tab stop picture is showing.) On the ruler, move about five positions (dots) to the right of the far left margin and left-click once to place a left alignment tab stop there. Save your document.
The amount of space between lines can be changed in Word documents. This is called line spacing.
Here are some line spacing examples:

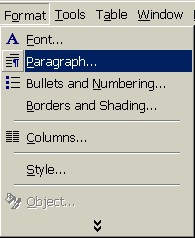
Single line spacing is the default. In Microsoft Word, if you want to change the line spacing from single to something else such as double line spacing, select the text you want to change, open the Format menu and select Paragraph.
In the Paragraph dialog box, in the Indents and Spacing tab section, choose from the list in the Line Spacing drop-down box and click the OK button.
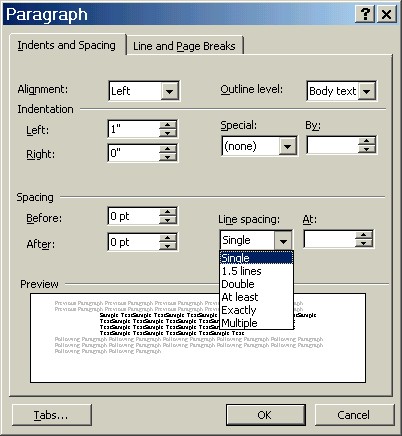
Practice: Open the Format menu and select Paragraph. In the Paragraph dialog box, make sure the Line Spacing has the Single spacing option selected. Make no other changes. Click the OK button.
Step 6: Set the page alignment.
Page alignment (also known as paragraph alignment) is the way the text appears in the document in relation to the left and right margins. The four alignment choices are left, right, center and justified.
|
Left alignment is the default. The button on the toolbar for left paragraph alignment looks like this:
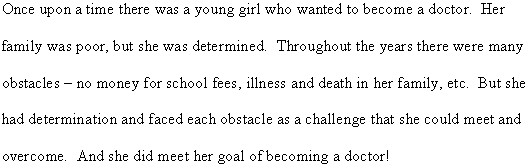
 Left Align A paragraph of text aligned to the left would look like this:
Text Aligned to the Left Notice how the left side of the text is even but the right side is not? |
|
Right alignment aligns text to the right margin. The toolbar button for right paragraph alignment looks like this:
 Right Align Text aligned to the right would look like this:
 Text Aligned to the Right Notice that now the text is lined up on the right side, but uneven on the left. |
|
If you want to center text on a page, use center alignment. The center alignment toolbar button is this one:
 Center Align Text centered in a document would look like this:
 Text Centered on the Page |
|
Justification is when the text is lined up evenly on both the left and right margins. This is the justify toolbar button:
 Justify Align Justified text looks like this:
 Justified Text Notice how the lines of text are even on both the left and right sides? That means they are justified. You need two or more lines of text in order to use justification, however. |
Practice:
We want our entire letter to be aligned on the left, which is the default so the document is probably already left-aligned. However, look on the toolbar and make sure that the left alignment toolbar button has been turned on. If you cannot find the left alignment toolbar button on the toolbar, right-click anywhere over the white part of the document window, select Paragraph from the shortcut menu and in the Alignment (or General Alignment) drop-down box, select Left. (You may need to click on the "Indents and Spacing" tab at the top of the Paragraph dialog box.) Save your document.
 Previous Page |
Next Page |