 | |
|
|
 This costume was inspired partly by Satine's Black and Gray Walking Dress. It will be modeled after the bolero jacket she wears and paired with a full circle 'cancan' skirt and a striped green and white bodice. All components will be green with black and white accents. This will go over my Tango Underwear. See the sketches I made of the costume and ruffle placement [here]. This costume was inspired partly by Satine's Black and Gray Walking Dress. It will be modeled after the bolero jacket she wears and paired with a full circle 'cancan' skirt and a striped green and white bodice. All components will be green with black and white accents. This will go over my Tango Underwear. See the sketches I made of the costume and ruffle placement [here].
[Skip to in-progress costume.]
Tango Underwear
I wear this costume over my Tango Underwear, which consists of a corset, chemise, and lots of accessories. For details on how I made my Tango Underwear, check out my v.1.0 costume [here] and v.2.0 [here]. 


Left to Right: front and back [up] [finished costume] Overskirt and Underskirt
I created my own circle skirt pattern using Cameo (a patternmaking software). In order to avoid seeing stitching lines from attaching the ruffles, I made an overskirt from green satin. The skirt closes with a side invisible zipper and has a 2" waistband. From the same pattern, I cut the base fabric for attaching my ruffles (sturdy taffeta). The underskirt also closes with a side invisible zipper and has a 1 1/2" waistband. I cut both waistbands on the lengthwise grain to make them stronger and less likely to distort. I also made the waistbands wider to hopefully distribute the weight of the skirts better. I *hate* hemming, especially on a curve, so I just finished both hems with extra wide double fold bias tape (contrasting black for the overskirt and matching green for the underskirt). This has the added bonus of adding a little more body to the satin overskirt and creates a very nice edge on both skirts. :) 


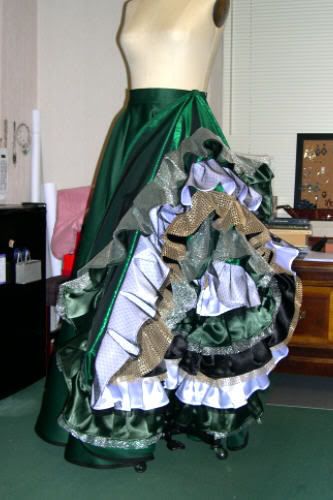
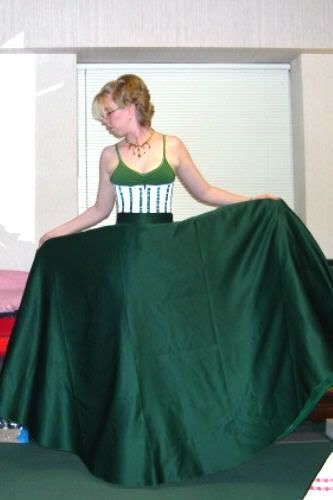
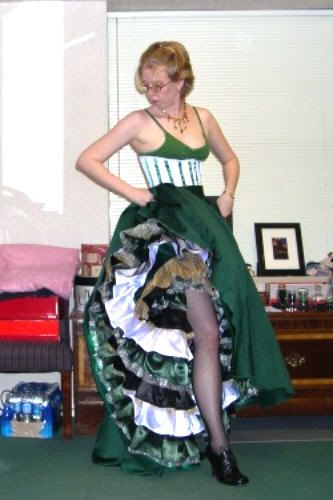
Left to Right: pattern, test muslin, overskirt, underskirt; on me, cancan! [up] [finished costume] The Ruffles
I used two layers for each ruffle and three different colors for both the netting underlayer and the satin overlayer. Each strip of fabric is 6" wide, allowing for 5" wide ruffles after seam allowances and such. I sewed all of the strips together using french seams. I didn't hem the netting underlayers since the fabric didn't ravel, but I did do a rolled hem on all of the satin layers. This was probably the most time consuming part of the whole process, as I don't have a rolled hem foot. I then serged the corresponding netting underlayers and satin overlayers together. It took me approximately 50-75 hours to finish just the ruffle construction. I then marked the ruffle placement on my underskirt with 


[up] [finished costume] The Ruffle Odyssey
These pictures show the progression of attaching the box-pleated layers of ruffles to the taffeta underskirt. I invested well over 100 hours into the underskirt alone on this costume. Time consuming, tedious, and so much work, but the result was worth it! 


[up] [finished costume] The Finished Skirts
I love the amount of fullness the underskirt creates. I'm toying with the idea of adding black beads in a Celtic design around the overskirt hem, to give it a little more bling. That may be overkill though. Hmmm... 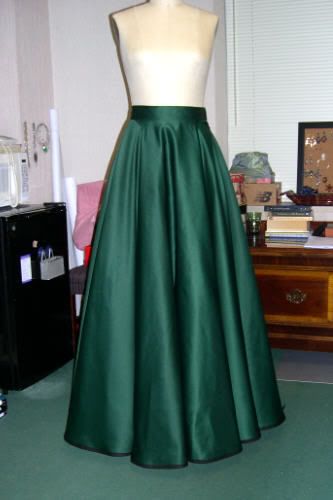


[up] [finished costume] Bodice
I draped the bodice from scratch, based on the pattern I created for my corset but modified as far as number of stripes/pieces. The bodice is made from white and green satin, mimicing the stripes of my corset. Each seam is trimmed in black satin piping created by me. The bodice actually closes in front with hook and eyes to prevent strain on the front closure. The loop buttons are only semi-functional. The black from the piping is repeated on the upper bodice with black beads along the neckline and at the points of the flutter sleeves. COMING SOON Left to Right: - [up] [finished costume] Jacket
The bolero jacket is based on Satine's Gray Walking Dress. With a coat pattern as my base, I modified the sleeves to a leg-o-mutton. I tightened the lower sleeve so that I could insert black satin-covered buttons for closing. The front crosses over and closes with a large black satin button made by me. The jacket is fully lined in black satin and all edges are piped with matching satin. COMING SOON Left to Right: - [up] [finished costume] Covering and Trimming the Hat
I originally thought to use a vintage Vogue pattern for the hat, but the look was more 1950s rather than turn of the century. So taking inspiration from two 18th-century hat tutorials (here and here), I instead covered a straw hat that I found in the doll section of Michaels.
For more in-progress pictures of how I did this, click [here]. 


The Finished Hat
Here's a picture of the finished hat with the final trimming scheme. I hand pleated 1" wide white satin ribbon to the hat and stitched in in place. This stitching was then covered by thin dark green ribbon. The bow is formed from a tube of green satin left over from my overskirt that was lined with netting and sewn shut at either end. The gathering is formed completely by the rhinestone pin it's threaded through. The bow is merely tacked in place with a few strategic hand stitches. I covered the join of the black crepe and white bias tape on the inside with green/gold trim that I've had forever (and matches quite nicely). This trim also decorates my chemise. I decided against a veil, but did add matching green ribbon as ties to help keep the hat on my head. These tie in a bow at the base of my neck when worn.


Left to Right: finished hat front, side, back, detail, inside; hat on me front, side [up] [finished costume] The Finished Costume
To see more pictures of the costume on me and on a dressform, click [here]. COMING SOON Left to Right: - [up] To see the reference images used to make this costume, check out my CanCan Research. |
|
| |