

1. Follow the Creating Your Line Art Layer tutorial and Coloring Part 1 tutorial to get started.
After you�ve done all that, you image a layers pallet should look like what is pictured below.
This tutorial is similar to the Coloring Part 2 tutorial, but taken a step further in more detail to create more realistic skin tones.
 |
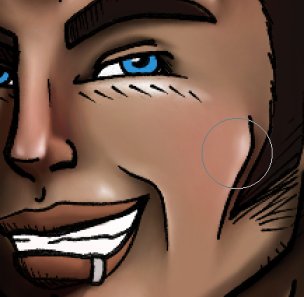
2. Create a new layer above your Color layer. All of your shading is going to be done on this layer. 3. Use the Eyedropper Tool  to select the soild skin color you�ve laid down. to select the soild skin color you�ve laid down.Open the colors pallet and select a color that is a darker shade of your original color. 4. Now go in with the Paintbrush Tool  and start adding some shadows, using the Smudge Tool and start adding some shadows, using the Smudge Tool  to blend them (see to the left). to blend them (see to the left).
|
 |
5. Now grab different values of your shadow and go in again, adding more and more depth, still using the Smudge Tool to blend. Keep doing this until you are satisfied with the shadows (see to the left). |
 |
6. Now choose a lighter value of your original skin color and add very delicate highlights the same as you did the shadows (see to the left). |
 |
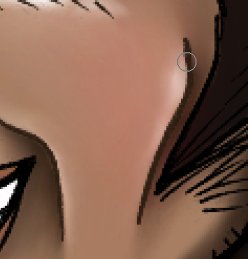
7. Open your colors pallet and select the color white. You are now going to take a small Paintbrush Tool and add small spots of reflection in areas such as the nose, cheekbones and chin. See the picture to the left to get an idea of where to put these white spots.Use the Smudge Tool to blend them in.
|
 |
8. Open your color pallet and choose a vibrant red (#FF0000). Set your Paintbrush Tool to Opacity 1% and get a brush about Size: 65, Hardness: 0.Begin to dap red into areas like the nose, cheeks and ears to flesh your skin out (see to the left). |
 |
9. Select your Line Art layer and a dark brown color and change the color of some of the black lines so that they blend into the skin better (see to the left). |
 |
10. Now go in with the Eraser Tool  and clean up wherever needed. and clean up wherever needed.11. After you make sure you are totally satisfied, hit �ctrl+E� on your keyboard to merge your shaded layer with the layer directly below it, which is your Color layer. You should now be left with some nice looking skin. You can use the same basic techniques to color other areas on your picture. |