So you want to build a combat robot? Here I will present some tips to help you get started. This is stuff mostly gained from my own experience, as such, your mileage may vary. Like I have said before, these things are dangerous, so be careful and always wear your safety glasses. Test your bots out in a safe area away from people, pets, and expensive breakable objects. Also until you are sure of your bots capabilities, ensure there is a barrier between you and any bits that may potentially fly off. Those bolts might not hold your blade together as well as you think, so hide behind something solid the first time you spin it up, and stay out of the plane of rotation.
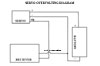
A lot of people seem to have trouble with the whole overvolting servos thing. On antweight bots this is a great way to get increased speed and power out of the servos. It is really simple to do provided you can solder decently. Many servos can be overvolted, I have taken mine up to 8.4 volts without problem, I have heard of people running 9.6v into them as well but personally have never gone that high. Beware that smaller servos (like the Hitec HS-85) may be able to take the voltage without smoking but the gears may not. Even in a metal gear servo there is always one plastic gear, and that one has a tendency to strip. As shown in the diagram below, you cut the positive and negative lines from the servo to the receiver and send them to the battery. The negative or ground line from the battery must also be connected to the ground of the receiver. On Futaba servos the positive wire is the red wire and the negative is black. The white wire is the signal and connects to the receiver. On Hitec servos the yellow is the signal, the black is the negative, and the orange is the positive. In this scheme you also must power the receiver. This can be done with a voltage regulator, a 7805 from Radio Shack works fine. Or, if you use a speed control for a weapon, you can use it's BEC to power the receiver. In that case you can omit the negative connection back the receiver as it will be handled by the speed control.
Hacking servos is something almost every antweight builder will do at one point or another. I will show a specific example, the Hitec 225, but the principle will work for any servo. The way a servo works in a nutshell is as follows. The receiver sends a signal to the servo to move to a specific point. The servo knows where it is by the position of a variable resistor (or potentiometer) which is connected to the output gear of the servo. It compares the position that it is at with the commanded position and moves the motor accordingly so that it tracks to the commanded position. In general (or at least for wheeled bots) you want the servo to rotate continuously, hence we need to "hack" it. The first obstacle is that servos have a mechanical stop to prevent the gear from rotating 360 degrees. Remove the screws from the case of the servo and put them in a safe place. Be sure you work area is clean, any stray bits that get into the servo can wreak havoc on the gears. A good thing to do is to work over a clean white towel as it will help prevent things from rolling off as well as show any small parts against the white. Open the case carefully and look at the gears. The one that connects to the servo horn is the important one here. There will either be a pin (in metal gear servos) or a small tab (on the plastic gears) that needs to be removed. Use a sharp x-acto knife for the plastic gear or a good pair of pliers to yank out the pin. Be careful of the teeth, any damage could screw up the servo. Now on to the electrical stop, the potentiometer. This is the shaft the sticks out where the output gear is. On some cheaper servos this is the only bearing, so it needs to be in place for the servo to work (the Hitec HS-300/303 are like this). If there is a ball-bearing or bronze bushing elsewhere in the case you can skip this part. If you have one of these type of servos, remove the pot from the case. Bend the tabs that hold the metal back on and remove it. You will see a semicircular metal ring which touches a semicircle of black material. Bend the part the touches the black stuff up or better yet, remove the metal with a dremel. Then reinstall the metal back and put the potentiometer back where you found it. The other option with this type of servo may be easier, but you need to be careful of how you do it. Instead of removing the pot, center it and secure the shaft with some super glue or something similar. You can center the pot by removing the gears plugging it into the receiver, and with the transmitter on, rotating the pot until the motor stops turning. Then you need to bore out the bottom of the output gear so it spins freely on the pot shaft. A drill bit or a dremel works good for this, just go slowly so you don't take off too much. If you did not have this problem, just take the pot out. In either case you need to replace it with something else (except if you did the center the pot/bore out the output gear thing). You can use two resistors (2.7k ohms is a good value) and solder them in where the pot came out. Solder the two together and connect this part to the wire from the center terminal from the pot. Solder the outside two wires to the other two connections of the resistors. Insulate the wires with some heat shrink tubing or electrical tape. You can also use a small "trimmer pot" available from Radio Shack (a value of 5k works well) and just solder it in place where the old one came out. Then center this one in the same way described above and fasten it in place. To see how this works for a Hitec HS-225MG check out my Morningstar build report here. Button the whole thing back up and you're done. All of these methods are somewhat inaccurate due to the fact that resistors can drift with temperature etc. so you may need to adjust your radio trims before driving to make the servos stop when the stick is centered. For any questions or specific help with your servo drop me an e-mail and I'll do what I can.
I have seen a lot of poor wiring jobs on robots, people usually explain that they are not good at wiring so that is why they are so sloppy. In an electric powered bot your wires are the arteries and veins that bring power to the various subsystems of your bot. Any breakage of these "lifelines" will cause your robot to fail. Good wiring habits will also make your life much easier when it comes to tracing problems, eliminating radio interference, and general maintenance. Here are a couple of guidelines to follow to ensure that you have the best wiring possible. First off try to plan in advance where your wires will go. It's easy to think that you will have enough room for wires, but that space in the bot fills up real quick, and decent wires will take up a lot more space than you think so plan accordingly. Good soldering skills are also needed for a good wiring job. Soldering is a learned art that can be learned by anyone, provided you practice. Always use an iron, I always use Weller, IMHO the best reasonably priced ones out there. Soldering guns may seem attractive, but will almost always give unsatisfactory results, especially for beginners. Always heat the joint so that the solder melts onto the wires, not onto the tip. Keep the tip clean, a wet kitchen sponge is great for this.
As for the wiring itself you want to make as few connections as possible. Remember KISS. The less connections the better. Use a high quality stranded wire for all power connections. I prefer the Deans Wet Noodle available at hobby stores or Team Delta . If you don't want to spend that much try your local auto sound store. Find some nice heavy speaker cable which you can usually find for under $1 a foot. For your connections crimp and solder all connectors onto the wire. The crimping makes a good mechanical connection and the soldering makes a good electrical connection. Almost all competitions require some sort of kill switch, so here is a good place to mention it. You can make an easy and cheap one out of a couple of connectors as shown in the Belladonna build report here.
To avoid making electrical noise that can cause radio problems there are several things you can do. First and foremost make sure there are capacitors on all your motors. A .1mfd - .01mfd capacitor is a good value. Solder one between the two brush terminals and one from each brush terminal to the motor case. Twisting your power wires together can also help reduce interference. Don't run power cables and signal cables (like your servo or speed control signal wires) together parallel to each other. Try and separate them and if they have to cross, try and do so at right angles.
This section is under some construction, check back for more tips as I manage to get them down.