"Hogs" on the 7th Rank!
Part 2
In Part 1, I discussed the basic concept of putting your rooks on the seventh rank. Here, I use this strategical resource to save myself in a losing game. Although the earlier part of the game was disappointing to me, I found some satisfaction from finding this plan. The basic elements leading me to my decision included a weak 7th rank by my opponent (pawns on this rank were not well defended), a way to get both of my rooks there (one was already there, and I could get the other one there easily), and a little bit of desparation (sometimes, adversity brings out the best in us)!
Castro,B (1409) - Stenclik,D (1630)
Marchand U1800 Rochester, NY (1), 07.04.2001
[Castro]
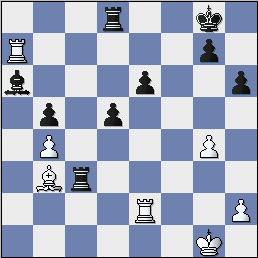
After the following moves: 1.e4 c5 2.d4 cxd4 3.c3 dxc3 4.Nxc3 e6 5.Nf3 Bb4 6.Bd2 Nc6 7.a3 Bc5 8.Bc4 Nf6 9.0-0 0-0 10.Bf4 a6 11.Rc1 b5 12.Ba2 Qb6 13.b4 Bd4 14.Nxd4 Qxd4 15.Bd6 Rd8 16.Qxd4 Nxd4 17.Rfd1 Nc6 18.e5 Ne8 19.Ne4 Nxd6 20.Nxd6 Nxe5 21.f4 Ng6 22.g3 Ne7 23.g4 a5 24.Rd2 axb4 25.axb4 Ba6 26.f5 h6 27.Rc7 Nc8 28.Nxc8 Raxc8 29.Ra7 Rc6 30.fxe6 fxe6 31.Bb3 d5 32.Re2 We reach the current position. 32...Rc3 Diagram
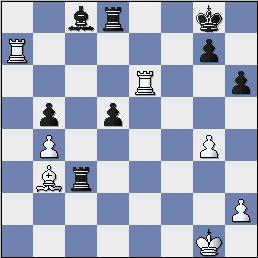
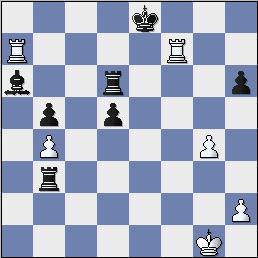
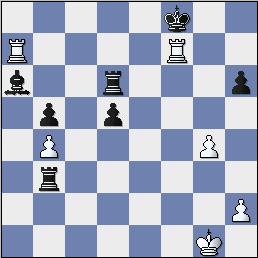
As you can see, White is in dire straits. He's a couple pawns down and Black is threatening his bishop. 33.Rxe6!? Sacrificing the bishop for a chance to get both of my rooks on the seventh rank. Already a couple pawns down, I was looking for the draw. This is a case where psychology plays a role. My opponent took much time on the following moves. He sensed the danger, but seeing that he had the opportunity to win material, he was hoping there would be a way out. If he found one, he could rest assured that his extra material would be decisive. When I played the move, I wasn't sure it would work out, and perhaps deep analysis would bear this out. However, as Tal said: "There is a great difference between years of analysis and minutes at the board." Besides it was my only clear plan. [ 33.Rxa6? Rxb3 And Black's extra pawns are too much for White. 34.Raxe6 Rxb4-+] 33...Rxb3 [ 33...Bc8 Diagram Was suggested by my opponent after the game. However, the same strategy works in that case.34.Ree7 Be6 with an attempt to trade down. 35.Ba2 Protecting the knight. ( 35.Rxg7+? Kf8 does not make progress.) 35...Re3 36.Rxg7+ Kf8 37.Rgb7 Bxg4 38.Rf7+ Ke8 39.Rh7=] 34.Ree7! Rd6 Attempting to give some room on the back rank for the king as well as planning to get the rook to g6 in case I don't take on g7 for some reason. 35.Rxg7+ Kf8 36.Rgf7+ Kg8 [ 36...Ke8? Diagram Loses on the spot.37.Rh7 Threatening mate with Rh8. To save the king, Black is forced to lost the exchange. 37...Rf3 38.Rh8+ Rf8 39.Ra8+ Rd8 ( 39...Ke7 40.Rhxf8 Bb7 41.Rae8+ Kd7 42.Rd8+ Kc6 43.Rxd6+ Kxd6 simplifying with a great advantage.) 40.Rxf8+ Kxf8 41.Rxd8+ Ke7 42.Rxd5+- with a huge material advantage.] 37.Rg7+ Kf8 38.Rgf7+ Diagram Here my opponent realized that he could make no progress, so a draw was agreed. Note how helpless Black's rooks and bishop are to help out the king. Although I had lost an initial advantage I had built up through the opening, I was able to find a drawing resource through the use of the "Hogs." 1/2-1/2
In the final installment of this article, I'll show you a master game in which the "Hogs" lead the way to victory.
Have you seen Part 1 of this series? If not, check it out!