"Hogs" on the 7th Rank!
Part 1
A discussion on ChessChat inspired me to write an instructional article about rooks on the 7th rank. Rooks on the 7th rank radiate much strength. These rooks restrict the king's movement and many times cramp other pieces which may otherwise reside on the 7th rank. If you have the opportunity to put both rooks on the 7th rank, it is most likely that you will win the game! These beasts often times feast on the opponent's pawns and pieces. Because of this, they are often referred to as "Pigs" or "Hogs."
The first example comes from one of my games on ICC. White has the material advantage of a knight for two pawns. However, Black ignores White's threats. Not only must you strive to get your rooks on the 7th rank when you can, you must prevent your opponent from doing so. Watch how easy it is for White to dominate the black position once he achieves his positional goal of putting both of his rooks on the 7th rank.
bscastro (1702) - licenser (1911) [C11]
ICC 15 5 Internet Chess Club, 05.03.2001
[Castro]
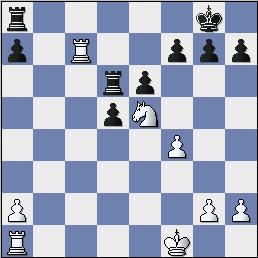
28.Rc7! Diagram
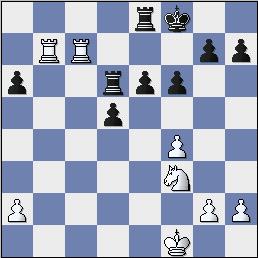
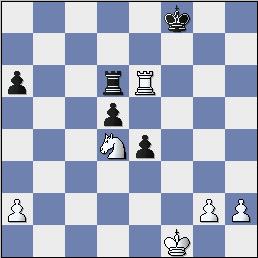
Putting a rook on the seventh rank is an incredible advantage. From here, the rook attacks all of the pawns still sitting there as well as restricting the king to the first rank. Rooks on the seventh rank are often referred to as "Pigs" or "Hogs." 28...f6 Kicking the knight from its post. I actually saw this coming. Notice how weak the 7th rank looks now. 29.Nf3 a6 30.Rac1 My intention here is Rc8+ and after ...Rxc8, Rxc8+. However, I should have considered a plan which is "twice" as good as a rook on the seventh. [ 30.Rb1! Threatens to put two rooks on the seventh! and there's not much Black can do about it. 30...h5 31.Rbb7! and Black's going to lose a lot of material or get checkmated.] 30...Kf8 Trying the get the king into the action. 31.Rb7! Finally I caught onto the proper plan. Note how helpless the Black rooks are. 31...Re8 Black looks for counterplay in the center. 32.Rcc7! Diagram The two rooks are quite imposing. They will not gobble up all pawns on this rank as well as trying to stir up a mating attack.32...e5 Trying to stir up some counterplay and use Black's only good aspect in this position, his central pawns. 33.Rf7+ Precise. Much better than Rxg7 right away because it comes with tempo. 33...Kg8 34.Rxg7+ Kh8 35.Rxh7+ Kg8 36.fxe5 I was not looking for a checkmate because usually, there would be not mate in this position with two rooks. However, I forgot about my knight! A lesson to take all of your pieces into account. I could have gone in for the kill, but at this shorter time control, the key was that I had a winning position, so my plans were to stifle counter play by simplifying the position. Although we want to find the best move, when you are winning, try to find moves which retain your advantage, even if they are not objectively the best. [ 36.Rbg7+ and I could have finished it off right there. 36...Kf8 37.Nh4 Getting my last piece into the action. Study games of the great attackers such as Morphy and you will find that they get all of their pieces into the attack. 37...Re7 38.Ng6+ Ke8 39.Rxe7+ Kd8 40.Rh8#] 36...fxe5 37.Rhe7 Again working to simplify the position. 37...Rxe7 38.Rxe7 e4 39.Nd4 Kf8 40.Re6 Diagram Black resigns as White looks to simplify into a winning endgame. Although White gains an advantage in the early middlegame, you can see the strength of the rooks on the 7th rank. 1-0
Click here if you want to view this game in its entirety.
In Part Two, I'll show you a position from one of my tournament games in which I sacrifice a piece to put my rooks on the 7th rank. Although I was down a piece and several pawns, the power of my rooks allowed me to draw the game.