
 |
 |
 |
 |
 |

|
|
|||||||||||
|
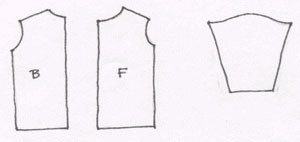
ARMING
COAT 1
|
|||||||||||
 |
|||||||||||
|
Figure
7
|
|||||||||||
|
ARMING
COAT 2
|
|||||||||||
| In the next version, I used an all cotton quilting batting which was sewn in as a whole piece, with the exception of the sleeves. Here batting was omitted in the inner elbow area allowing for greater freedom of movement. The batting was also left out in the underarm area for the imperative ventilation purposes. This took considerably less time to make. The pattern was essentially the same unfitted cotton twill garment with buckle closures. Although a usable garment, it did not have a period appearance. | |||||||||||
|
ARMING
COAT 3
|
|||||||||||
| The third stage was initially constructed in the same manner, with the same fabric content. However, I wanted the more fitted appearance and rather than using more fitted pattern pieces, I fitted the arming coat after it was made. My husband put the coat on inside out, and I pinned in approximately four "darts" around the waist. I sewed the darts on the inside, cut the excess fabric and then hand stitched seam binding to flatten out the dart seams. Two other changes on this garment were the introduction of "real" hems, rather than seam binding finished edges and buttons, rather than buckles. I chose to use metal buttons for closure for practical reasons. Metal buttons are readily available. The period examples I have referenced seem to have fabric covered wooden buttons, but I had my doubts about their durability. I also was hesitant to add more time to already lengthy process. Although the coat was more fitted, I was unsatisfied with the "look." It did not look like illustrations I had seen in period sources. | |||||||||||
|
ARMING
COAT 4
|
|||||||||||
 |
 |
||||||||||
|
Figure
8
|
|||||||||||
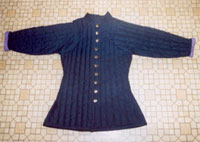
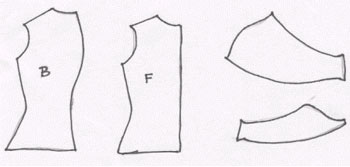
| The fourth stage was significantly different from the first three, in that I used a completely redrafted pattern. (photo below) The basic design was based on the Charles VI coat (Figure 1). Each body piece was now shaped to fit the torso (Figure 8). The sleeves were no longer straight, but cut wider at the elbow and tighter at the wrist. The sleeve silhouette was drawn from what I saw in the Charles VI coat. They are more deeply set into the body of the garment. When I measured for the sleeve lengths, I took several measurements based on various arm positions. I found the most important measurement was for the fully extended arm, as though a sword shot had just been delivered. This added inches to the back in order to accommodate the extended arm and caused an almost accordion effect in the back pieces. There is an excess of material in the back, when the wearer is at rest, but there is adequate "give" for when the wearer is engaged in a bout. The quilting in the coat, helps to minimize the "hump" effect that results from the excess material. If the fighter is wearing an external breastplate - the joining straps also help to minimize the "hump." This has been an important advancement. The fighter who received this arming coat (Lord Chrysogen) has commented that he has never felt restricted in his movement, and the coat does not move "up" on him, when he is fighting (as in previous versions). Although I felt good about the basic look of this coat, because of its more period look and usage, I was not happy with the sleeves. I was still using a seam under the arm, and they obviously needed a more sophisticated construction to get the correct Charles VI banana shape. | |||||||||||
|
ARMING
COAT 5
|
|||||||||||
 |
 |
||||||||||
|
Figure
9
|
Figure
10
|
||||||||||
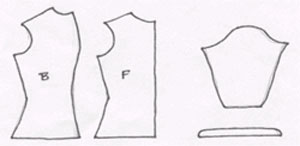
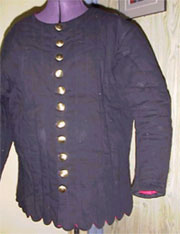
| This brings us to the fifth stage in my arming coat experience (Figure 9). I liked and kept the body silhouette (including the extra material in the back to accommodate full arm extension) although I did add dags to the hem. My husband had changed his arm harness and found the older, fuller sleeve to be inadequate for a proper fit. He suggested a closer fitting sleeve. So, I decided to venture into a different style of sleeve. It is a curved, two piece sleeve that follows the natural shape of one's arm. This was accomplished with a draping technique learned from my Laurel, Mistress Elizabeth Talbot. The pattern pieces are curved (Figure 10) and have seams on the sides (front and back), instead of under the arm. This type of sleeve allows the wearer greater movement in both lateral and medial directions. My husband also has commented that this sleeve offered a better armor fit, allowing for much less movement of the armor pieces attached to the coat. This was a resounding success. I was pleased. My husband was pleased. But of course, there were things that I wanted to change and test. | |||||||||||
|
ARMING
COAT 6
|
|||||||||||
| The most noticeable change in the sixth version was fabric content. This piece is made from a more period fabric choice, wool twill, instead of the previous cotton twills. It is still quilted with cotton batting, but it is lined with linen. Also different is the "floating lining". Usually, the lining is incorporated into the quilting stage of construction. This is a change made as an attempt to test which system seems to work best. As far as construction technique, I did find the floating lining more difficult to install. I'm sure a large part of that difficulty was the dags. I also found that the cotton batting was more apt to suffer damage since it was open to handling during construction. I did tack the lining down along the seams and of course it is attached at the armholes and the neck. There are additional tacking stitches along the dagged hem to help the dags retain their shape. The true test will be in the wearing of the garment in combat. For the most part, I am happy with the resulting arming coat, although I'm not convinced of the value of a floating lining. I find that the garment doesn't move as one contiguous entity. I also feel that there must be a better way to do dagges on a padded garment. | |||||||||||
|
ARMING
COAT 7
|
|||||||||||
 |
|||||||||||
| The seventh incarnation was made from cotton twill, a step back from wool if you will, because as with all my gambesons, this is meant to be used and the wearer was reluctant to wear wool on the field at War. This attitude disappointed me. Not, that I don't understand his point of view, but I was hoping to continue a upward movement, building on past experience and continuing to improve technique and more period material use. But I understand that function is as much a part of development as any other element. However, the owner does use the wool garment routinely as a jacket off the field on cooler evenings.In an attempt to justify my choice I could say that maybe cotton could have been used more often in period. I suppose that if I could find heavy linen twill or a finer worsted wool I could try that instead. | |||||||||||
| However, using linen to line the garment works wonderfully and IS a period technique. This makes me VERY happy. This element can be found in this one and will continue in all of my future gambesons. One change made with this example is a different style of batting. In past versions, I used Mountain Mist 100% cotton batting. This batting was a loosely fused sheet; it was easily torn and could be pulled from seams as needed. At the time, I saw this as an advantage. However, I was unable to find this same type of batting, and so I bought another type which has worked much better. I found Sew Perfect 100% cotton quilt batting. This type is almost like soft, pliable felt. Solid, even sheets make the garment smoother and more consistent in thickness. Also, while I was constructing this garment, I found that when I was finishing the seams, the batting had almost an adherent quality. The fibers of the batting "stuck" to the outer fabric. I felt that this quality added to the cohesive quality of the garment. | |||||||||||
| This gambeson also demonstrates a new technique in dealing with dag construction. I tried sewing the dagges before the garment was padded. They were sewn, trimmed, turned and pressed before the quilting was done. Batting was left out of the dagges themselves to help retain their flat profile and rounded shape. I think this worked well. I believe the dagges look best on this garment. | |||||||||||
| The quilting technique on this gambeson does not utilize the "floating" type of lining. In my last example, I found this lining to be bulky and messy. I really prefer the outer fabric, batting and lining all quilted together as one contiguous piece. I think the garment moves better and is a much better support for all the armor pieces for which this garment is the anchor. It's imperative to remember that this is a foundation garment for multiple armor pieces, which protect the various body parts. These armor bits have to stay in place or there is risk of injury not only from incoming weapon blows, but also from prolonged soft tissue fatigue due to poor fitting protection. | |||||||||||