Do not try to operate a radio directly from the generator without a storage battery. To do so will burn out the tubes. Always connect the "A" battery leads of the radio directly to the battery post. Never attach the "A" battery leads to the charger battery clips, because if the battery clips become corroded or fall off the battery post, the tubes would be burned out. Keep the battery posts clean, and be sure the clips make good contact.
While most radios have the negative "A" battery connections grounded, some have been built in which the positive side is grounded. In order to use the power plant with radios of this type, it will be necessary to reverse the polarity of the generator. Proceed as follows:
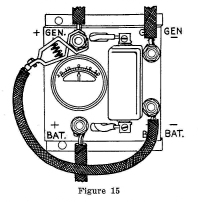
1) Connect the wire coming from the positive or insulated terminal of the main stem to the "Gen -" connection on the instrument panel.
2) Connect the wire from the negative or grounded terminal of the main stem to the "Gen +" connection of the instrument panel.
3) Polarize the generator by running it as a motor, in the same manner as Figure 11.
4) The instrument panel must be mounted on dry wood or otherwise insulated from ground.
A special instrument panel is available from the factory for charging 2-volt radio storage batteries. Since the generator is designed for 6 and 12 volt operation, charging will be at a lower rate than when the regular batteries are being charged. For full information write the factory.
Do not allow propeller to run in snow, sleet, sand or dust storms or when ice has formed on the propeller. In a 20 MPH wind the tips of the blades move about 200 MPH and any material in the air will quickly destroy the leading edges of the propeller. Do not allow anyone to throw sticks or pebbles into the propeller. It is made for contact with the air only.
Since the propeller runs at high speed, the smoothness of the finish will affect the effeciency a great deal. Once a year, or oftener, if necessary, give the propeller a coat of good spar varnish or porch and deck enamel. If the propeller is worn, due to sand, or sleet in the air, sand out the rough places. At the same time check the track and balance.
All propellers are carefully balanced at the factory. However, atmospheric conditions or propeller wear can affect the wood. An unbalanced propeller will produce excessive vibration. To balance the propeller, lay it across a three cornered file or other sharp edge on a line exactly through the center of the large hole in the hub section. Loosen the "tear-drop" balancing weight and move it where the best balance is obtained. Screw it to the face of the propeller in the new position. The weight shoud not be more than 18 or 20 inches from the center of the propeller, as the forces caused by rotation are very great. If necessary, drive a few small nails into the end of the light blade, being careful not to split the wood.
The generator is similar in construction to those used on automobiles. However, it is designed to operate at lower speeds, and many parts are not inter-changeable. The sealed ball bearings are factory packed with grease, and do not require oiling. Occasionally check the brushes for wear and see that the commutator is smooth. At the same time see that the brushholders are free on their studs. A drop of light oil on the brush holder hinges will help to keep them free. Occasionally oil the trunnion pin bearings to keep the "Slip-the-Wind" action smooth.
| << Previous Page | Return to Home Page | Next Page >> |