 |
| 7th Dark World Castle: Turtle Rock |
| to Walk-Through |
| to Misery Mire |
| to Ganon's Tower |
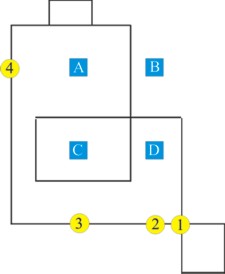
| Getting Into the Castle Before you get started, be sure you have the Fire Rod, the Ice Rod, the Cane of Somaria, and Blue or Green Potion. You will need them for the dungeon and boss. In Dark World, head over to what in Light World is the Witch's House. Continue past it until you are at the waterfall that, in Light World, leads to the Zora's Domain where you bought your flippers. You will find a sign that says not to throw anything in the circle of rocks. For the sake of irony, pick up the sign itself and hurl it in. After waking a grumpy fish, you'll receive Quake. Now go to the Bomb Shop which is located where your house is in Light World. Buy the Super Bomb for 100 Rupees and drag it along with you to the crack on the southwest corner of the Pyramid of Power. Go inside the hole and toss your Arrows and Sword in the pool to get some nice upgrades. Now warp to Light World and soar to location number 1. Head up to the Mountain Tower. From there, go east until you come upon a large, circular rock with three pegs on top. Hammer them counterclockwise, starting with the one on the right. Step on the warping tile that appears to go to Dark World. You will find yourself on the aptly named Turtle Rock. On the symbol that matches the magic shield, use Quake to open the entrance. Just a cool detail: tug on the right paw (do turtles have paws?) to get some rupees. Go on inside. Getting the Big Key This is a pretty cool dungeon: you'll spend a lot of time riding around. To see what I mean, pick up the right pot, use the Cane of Somaria on the question mark, then refill your magic with the pot on the left. Stand on the platform you created and go through the door. Make another platform here. Face the right and you will start moving along the track. Stop at the second door (it's the northernmost platform on the eastern door) and go in. You have to light all the torches for the door to open -- that's the easy part -- and get back to the northern door before they go out (that's the hard part). Using the Fire Rod to light the torches, go left at 1, light torches B and D at 2, light A and C at 3, and disembark at 4. Quickly go through the door. In the next room, go to the eastern and western walls to dodge the spiky rolling pins and snag a key, Dungeon Map, and some magic. Head out into the room with the tracks again. There's a full vial of magic on the northernmost platform on the west wall. Go through the westernmost door on the south wall. DO NOT FACE THE DOOR -- the eye above it will zap you! Grab the compass south of you, then, still facing south, hold your sword as the blade readies itself to swing around 360 degrees and walk backwards toward the door. Go through the westernmost door on the northern wall. Kill the orange worm to get a key and proceed. The balls on chains will lunge at you about every three or four seconds. Hit the switch with your boomerang, then push the northernmost block on the west side to the east to make a chest appear. Grab the key inside and go downstairs. Go to the southeast platform, hop in the slide, and go through the door. Take the eastern slide. In the next room, trap the pink magic-life-suckers on the north half of the room with the switch, kill the orange worm to get the key, and watch out for the eye above the door. Return via the door with the eye over it to the point in the room with the lava floor where you went in the eastern slide, on the way grabbing the Big Key. Field Trip and Getting the Mirror Shield This time, take the western slide. Go through the door. Kill the orange worms (watch out for the flying body parts of you use pots or something), then go south. In the T-shaped room, go west. Use the sword trick to avoid the laser eyes while bombing the crack on the southern wall. Go outside through the door you create. Before going back in the castle through the other door, use the Magic Mirror right in front of the eastern door on the ledge. Go in the Light World cave entrance. You know the trick with these guys. Use your new and improved Silver Arrows and you will be rewarded with Piece of Heart #15. Go back to the ledge in Dark World and go in the eastern door on the ledge. You can use your Cane of Somaria here if you want, but it's a waste of magic; just use your Hookshot to reach the treasure chest. Inside, you'll find the Mirror Shield, which allows you to repel the laser eyes. To the Boss Go north in this room, then north through the next room. Take the slide in front of you and go through the door. Don't waste your bombs on the cracks, but instead use a dash attack. If you're low on rupees and high on guts, go through the eastern crack, defeat the baddies, push the northern block out of the way and pull the western statue's tongue. If not, go through the northern hole. Put a bomb by the switch and hop between the orange pegs before it detonates. After opening the chest, hit the switch with your boomerang and go through the door. Once in B3, create platform with the Cane of Somaria. This room is really quite a maze. I don't really know how to tell you do get around, but here are 3 tips: hit the switch on the center platform, go through the door on the west side of the southern wall, and if you're about to get hit by a wall of fire, shoot your Hookshot out into nothingness (it freezes you but lets the fire keep going, leaving you unharmed; I think it's just a glitch, but it works with most enemies). In the next room, dash across the platform, being careful not to fall off the edge on the southern part of the room, and go through the southern door. Use your mirror shield and sword trick to block the laser eyes. The first three chests hold rupees, but the last one holds a key. If you are low on health, and even if you just have empty bottles, I highly recommend bombing the crack open on the southern wall, warping outside to Light World and snagging the fairies in the cave. Go back to the room with eyes but no chests lining the walls and go through the locked door on the west. By using the Boomerang on the switches, make your way to the northern wall and pass through the door. Make the platform before opening the pots -- be sure you're stocked up on hearts, faeries, and magic potion before proceeding to the next room, because you're about to face the boss. The Boss of Turtle Rock: Trinexx I like this guy (but not enough to let him by unscathed). He has three heads -- okay, I know you're not blind, just be patient -- a hot one, a cold one, and a neutral one. You defeat the first two by stunning them with a blast from the Ice Rod on the red head and a blast from the Fire Rod on the blue head, then smacking them with the sword while they are stunned The blue head spits out ice, the red head spits out fire, and the rock head will come lunging at you. You can tell when the first two are about to do this because they open their mouth. Just before the central head lunges, the tail will start wagging madly. I recommend going for the blue head first because the ice it spits out is really slippery and hard to run and fight on. Then go for the red head. Once these two have been defeated, the creature will transform into a snake-like monster. Hit the flashing segment of its body with your sword several times to get a full Heart Container and your first chat with Zelda in a while. |
 |
 |