|
|
Continuing the
tips for become hot, let´s go direct to the front muscles of a male
character.
At first, let´s remind everyone that real life is the best model for your
drawings. Look at yourself in
the mirror, and everyone else. In this case, buy any of bodybuilding magazine to
have see some radical or even extaordinary human musculature.
The BODY
 On
the left, the front's basic human musculature.
In this lesson we will see
the body divided by parties.
Below the head, there is a group of
neck muscles, below that the torso with pectoral muscles, abdominal (abs) and
spine.
In the arm, we have
the muscles of the biceps, forearm and shoulder. And finally the muscles of the leg.
On
the left, the front's basic human musculature.
In this lesson we will see
the body divided by parties.
Below the head, there is a group of
neck muscles, below that the torso with pectoral muscles, abdominal (abs) and
spine.
In the arm, we have
the muscles of the biceps, forearm and shoulder. And finally the muscles of the leg.

On the right, there is one of techniques to
draw muscles, which I think well worthwhile: it completely separates the muscle
groups, as if they were pieces of armor. Remember that
there ain´t an anatomically accurate division or a visible line that separates the
muscles They are a whole, where one ends the other begins, with skin overtop, so we can not draw
the lines together (see fig. 1 left)
 |
However, beyond the front muscles, when we draw a front body, other details
very can´t be forgotten, (remembering that
the outline should be smooth, not bypassing the entire muscle), which are
the salient bones and back muscles, as shown in Fig. 3.
You should draw the trapeze muscle, the side muscle (see below
for details fig.10), gluteal, lower spine and scapula (bone above the chest).
|
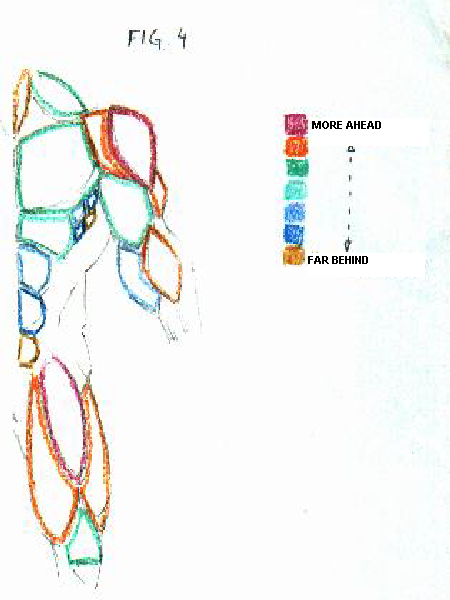
Here is a clearer picture of muscles.
Recalling: the muscles are a whole continuum,
however, there are muscles that its mass is in front of the
others (Fig. 4). Just take alook at the two orange-coloured muscles of the leg:
its format is a little irregular .
It´s because of the muscle
reddish located up both. Note that this figure, I also included the bone of the spine (light green, below the
chest, try to draw it with this form, or see fig. 2) and knee (dark green, below
the thigh) to locate them whether is below , or on top of other muscles.
Well, now we´ll treat the muscles, group by group, of the front male human.
Begining with:
The ARM
 Here are displayed in Figures 5, 6 and 7 profile of the
muscles of the shoulders, arms and forearm.
In
the first picture, the arm is extended, so the biceps (front muscle) is
distended and triceps (back muscle) is stretched: note how the sequence of motion
grows the biceps and scarces the triceps.
Remember the fig.
4 to see which muscles are
ahead.
The Biceps in the arm in profile, hide their tips
behind both the shoulder and the forearm as seen in fig.
4.
Here are displayed in Figures 5, 6 and 7 profile of the
muscles of the shoulders, arms and forearm.
In
the first picture, the arm is extended, so the biceps (front muscle) is
distended and triceps (back muscle) is stretched: note how the sequence of motion
grows the biceps and scarces the triceps.
Remember the fig.
4 to see which muscles are
ahead.
The Biceps in the arm in profile, hide their tips
behind both the shoulder and the forearm as seen in fig.
4.
TECHNIQUES:
-
The shoulder is
divided basically into three blocks of muscles.
Caso o
personagem o tensione aparecerão sobras das fibras musculares de sua massa
(ver lição sobre peitoral a seguir). If the character tenses the muscle, the surplus of its muscle fibers
will rise (see lesson on chest below).
-
All groups of the shoulder has the same starting
point, with the exception of the triceps that is between two of them.
-
The triceps has the format of a paralelogramo as will be seen
in the lesson on dorsal muscles.
The ligament of the triceps with the elbow is raised and should be drawn.
-
The elbow has fundamental importance in proportion to the arm and forearm.
Notice how I draw the three examples
and always put it in the same spot (see fig. 21 for details).
The bones of the forearm are ahead and should be drawn.
-
Note that
there are many muscles in the forearm (see fig.19 and 20).
-
Finally, the biceps has an oval format, but with
muscles stacked on it (see details in fig. 1, fig. 9 and fig
19).
PECTORAL MUSCLES

Here
is the pectoral muscle in action, attached to the bone of the spine, and related
to the muscles
of the spine (in group of four, next to the same bone) and in the shoulder.
Note, in FIG.
8 that the chest and shoulders keep close relationship in terms of muscle mass.
The
pectoral muscle and the shoulder are pratically the same an begins at the biceps. There is no line
delimiting them. Draw the lines as it is designed in the
chest (with some traces in that space).
It is a ways of drawing the shadow of the muscles in
action.
It begins at
the junction of the chest, shoulder and biceps. See muscle in action
in fig. 9.
It follows the
movement of the arm.
In this second
position, the shoulder is more hard, which leads the muscle to be a little
more defined. The larger the muscle tension, more
expressive to be the "lines of shadow."
These lines should follow the direction of
FIBER MUSCLE.
Review anatomy books to learn more about the muscles and the muscle fibers,
and see also the journals of bodybuilding, where you'll see some pictures of
the chest fully stretched with several fibers appearing under the skin.
In FIG.
10, note some details: first, the pectoral muscle
tends to run out of muscle mass at the bottom.
Second, the arm
is turned inwards, to have a movement that is possible, showing the triceps, muscle back
of the neck (see next lesson).
Third, the
lateral muscle and the muscles of the spine follows the arm.
Finally, the
shoulder is in front of the trapeze (see next lesson).
TECHNICAL: The pectoral muscle has the shape of a rectangle with rounded tips,
but it has certain volume at the bottom, this is raised and is drawn with a
curve to the inside (Fig. 8).
Second, in the centre of the
scapula, between the two breasts, there is the a format of "V" that holds the muscles of the
neck (fig.
14 below).
ABDOMINAL MUSCLES (ABS)
 Here are two
situations, to draw the abs.
Here in both figures that their tension depends on the position in which the
body is (looking up or down).
Remember that, in principle,
the abdominal muscles are used to bring the body to the front. If you bring the chest
toward the legs, there will be more tension when the body is shrunk as in
Fig.
12 and higher distension when the body is stretched or even
lined back.
Here are two
situations, to draw the abs.
Here in both figures that their tension depends on the position in which the
body is (looking up or down).
Remember that, in principle,
the abdominal muscles are used to bring the body to the front. If you bring the chest
toward the legs, there will be more tension when the body is shrunk as in
Fig.
12 and higher distension when the body is stretched or even
lined back.
TECHNIQUES: See fig.
13 to see how the abs should be drawn in most cases
and note the use of two separate lines to the side of the muscle
(the technique serves to draw the majority of muscles that
have a larger mass, or certain VOLUME), that will give the feeling of
volume and depth to the muscle.
A more curvilinear line in the midst also brings this
notion.
 Second, note the details that
distinguish the bodies of fig.
11 and 12:
Second, note the details that
distinguish the bodies of fig.
11 and 12:
-
In FIG.
11, the muscles are larger because they are held, but seem to have
less mass because it is more widespread within the muscle group, and the
opposite occurs in fig. 12.
-
Repare
onde o peitoral encontra com o omoplata: na fig. Note where the chest
meets the scapula: in fig. 11
its curve line is out, while
in Fig. 12.
the curve is drawn inside, this means that you are seeing
the shoulder of the person over the top.
-
Finally, note that in fig.
12, o
peitoral, por estar menos esticado fica com a massa concentrada na sua parte
inferior, e esta saliência fica cobrindo parte da espinha e outros músculos.
12, the pectoral muscle is less stretched, and its mass is concentrated at its
bottom, and this project a cover to the spine and other muscles.
For another position of the
abdominal see fig.
12 of the First
Lesson.
NECK

The neck
should be drawn in a manner, some extent, simplified in terms of quantity of
muscles (Fig. 14), with the support of two muscles of the head, right and left,
which begin below the ear and go until the merge the of left and right
chest, the "v" already mentioned, and with the trapeze muscle behind the neck (see
next lesson, back muscles).
See fig.
15, com
um movimento lateral do pescoço, onde um músculo estica-se mais (linha mais
forte) eo outro tensiona (linha mais fraca). 15, with a
lateral movement of the neck, where a muscle stretch itself more (stronger
line) and the other tenses line (weaker). TECHNICAL:
Design always that mark in "V" between the breasts.
Draw small line indicating the
existence of the jumped throat.
Note below the
trapeze and beside the muscles, there are small risks giving the idea of a skin stretched
and tensioned: these are the "jumped veins" (as I call).
In FIG.
16, we have the most common
examples of its drawing.
Try to do them in other parts of the body, such as the
inside of the forearm,
the front of the shoulder and below the biceps. But there are designers who prefer to draw the
entire vein, and not use these shadows that is my suggestion.
They do, then the outline
of the two sides of the vein.
I don´tt think that is a well sketch.

LEGS

Here are the front leg muscles.
See fig.
4 of the First
Lesson to remember which muscles are ahead to the others.
Try
to understand what muscle is responsible for which motion of the leg.
TÉCNICAS: Para a perna não há muito mistério , what you
see is what you get, ou seja, estes (fig. 17) são os músculos a serem
desenhados na perna de uma pessoa forte. Note that the front of
shin is, to draw, just one muscle that is outside the shin next to the
bone leaving directly from the knee, and even this does not have much muscle
mass, often not being drawn. TECHNIQUES: For the leg there
is not much mystery, what you see is what you get. In Fig.
17 are the muscles in the leg designed to be a strong person.
Among the groin and the
muscle note that there are several muscles, that shoul be drawn like muscle
fibers, one ont top of the other..
See fig.
21 at
the end of the lesson to understand the design of
the knee and elbow.
FOREARM
 The
front of the forearm (Fig. 19) are basically two sets of muscles that
makes the wrist close
and the forearm twist.
See fig.
4 to know what muscle
is ahead, although this figure shows which of them should be drawn tottaly.
TECHNICAL: take the fig.
20
where we can see behind the
forearm and despite that, two front muscles are still appearing, marked by the
letters "x" and "y".
Finally, look in front of the
forearm that I design with two or three striped close to the pulse of the
ligaments on the muscles.
The
front of the forearm (Fig. 19) are basically two sets of muscles that
makes the wrist close
and the forearm twist.
See fig.
4 to know what muscle
is ahead, although this figure shows which of them should be drawn tottaly.
TECHNICAL: take the fig.
20
where we can see behind the
forearm and despite that, two front muscles are still appearing, marked by the
letters "x" and "y".
Finally, look in front of the
forearm that I design with two or three striped close to the pulse of the
ligaments on the muscles.
Here in
FIG.
21 is how should be drawn
the knee and elbow.
I started imagining this piece of
metal (the first drawn) folded in half to get the idea. In the middel is the
knee, and in the rigth the elbow.

We come then to the end of the Second Lesson
E-mail me with your questions and requests
Or send your drawn for our gallery