Remember: always practice

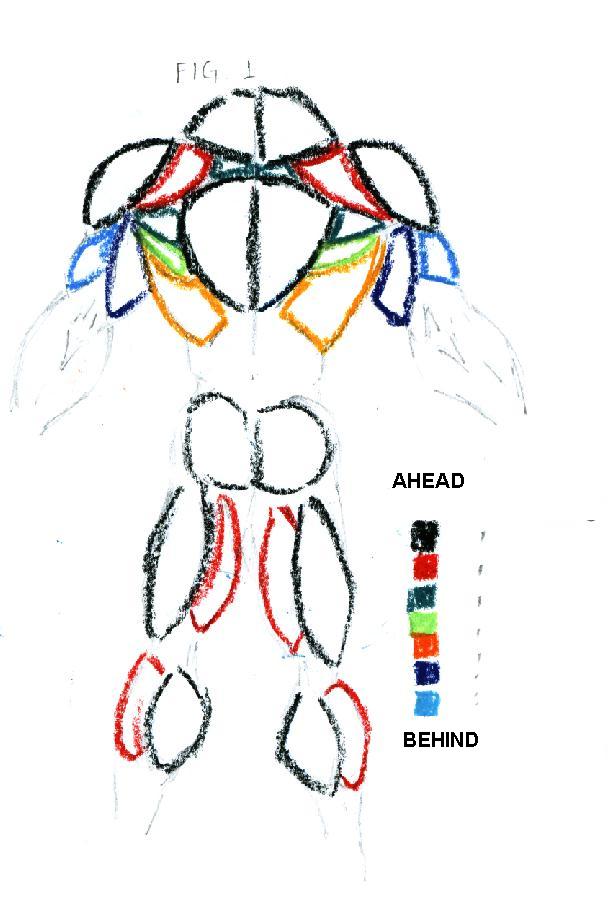
Look in FIG. 2 as muscles overlap each other. Inthe middle of the back, there aren´t
muscles (spine), and in both sides there are those long muscles (each side) responsible for bringing the arms back. On his side (light green
and dark) we have other muscles responsible for pulling the arm and back down.
And more on the side (orange) the dorsal muscles that appear on the design
front.
Remember: always practice
The triceps is divided into two muscles, one seen in a dark blue and other seen in
light blue. But notice on the drawings below that the dark blue oval (in fig. 1
and 2 is hidden by the body) and the light blue seems a parallelogram and has
raised a ligament that connects it almost to the elbow.
Furthermore, note
that the shoulder appears in two muscles, black and red, and note that the
muscles of the leg are all oval and in pairs
Remember the lesson 2, about the
MUSCLE FIBERS, when drawing a muscle with great tension.
To have a clearer idea in fiber, some designers see the FANTASTIC FOUR mag, and look for
designs of HUMAN TORCH when in flames.
In this drawings we have some moves made by the arm of the character, whereas in fig. 3 we have placed the figure
normally, with the arm slightly looking forwards, while the back muscles
are in front of the triceps. In FIG. 4, there is the arm back movement. Note 3 things:
1-the forearm, in the closest view, is greater, 2 - that the muscles of the back
are tended, 3 - that the triceps is ahead of the back
And 4 - that, humanly, this is the farthest point that an arm comes back, facing forward (see
fig. 7, for another movement).

The FIG. 5, on the other hand, the arm is moving forward. See the distension exerted by muscles that may require the inclusion of muscle fibers.
 |
The FIG. 6 is a continuation of the movement
started in fig. 3, through fig. 5 and resulting in this: the character trying to
change a light bulb. There is the distension of the lower muscles and lower shoulder muscles
and tension of the triceps and higher shoulder muscles, and in this case, the
biceps appears. In the lesson dedicated to the face and head, we´ll discuss the back angle.
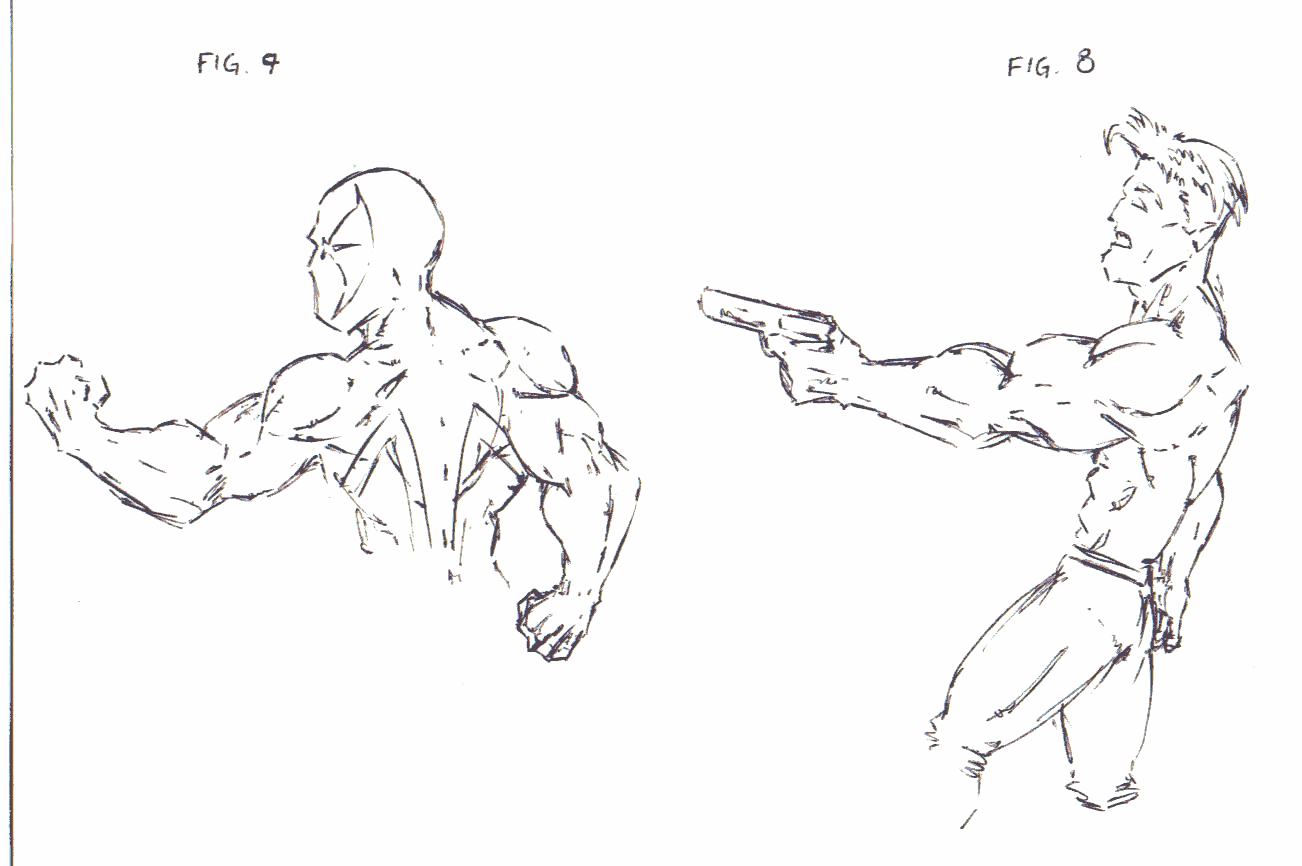
In FIG. 7 is that we have arm twisted back as if he were arrested, or taking something hidden. Note the difference within the figure. 4, as the elbow is bent and facing the body. See that the triceps, and even a portion of the biceps, is on the back. |
 |
It is worth remembering the lesson 2:
We see above ways of handling the body.
Important: the movement can not be impossible to be done, as a huge twist of the
abs, or turn a knee far of what is possible. A BETTER WAY OF DRAWING A MOVEMENT
ITS OBSERVING IT. VIEW YOURSELF IN THE MIRROR, LOOK AT OTHER PERSON.
THIS LESSON SERVES FOR ALL TYPES PICTURES. Do not forget to respect the
proportion of the body. Do not be ashamed to look in the mirror or ask someone
to make a move in "slow motion" so you can choose a position.
Finally, we have below some examples of movements or scenes
involving a character seen in the back. Note that in the character in the right (fig. 9)
there is a projection on the back. It refers to the
existing bone in this region which should also be drawn. Besides that, notice the
triceps in front of the back muscles in the other picture.
End of the Third Lesson.