Author: Hiran Ekanayake
Date: 04 December 2005
I am curious to learn this area verymuch. However, I couldn't implement anything on my own until last week. It was my first microcontroller project. I had to face lot of troubles to make my first attempt a success. At last, I have something to show and share!
Please, excause me! I would be mentioning everyting as they applied to me (I am in Sri Lanka!)
My aims and objectives were,
- Use the PIC microcontroller PIC16F84 as the base (its cheap and simple)
- Develop a device programmer (burner) to program the microcontroller from a computer
- Develop a demonstration board to see how a program is running by the microcontroller
- See how a serial communication can be established between a microcontroller and a computer
I think this [R004001] is a good resource for a beginner, as it was my instructor. Read this [R004007] also.
First, you have to purchase the following items. I am mentioning item prices of some of the items as they were month ago at Colombo.
Item |
Price |
| PIC Microcontroller 16F84A |
Rs. 300/= |
| DB9 Female Connector |
Rs. 30/= |
| 18-pins IC Base |
Rs. 6/= |
| Ribbon Cable (10 lines) |
Rs. 30/= per 1 Meter |
| Push-button Switch |
Rs. 15/= |
| 4 MHz crystal (2-pins) |
Rs. 20/= |
Developping the Microcontroller Programmer
This [R004002] is the one I am implementing, which is a modified version of JDM programmer. Original JDM programmer and its variants can be found from [R004003]. If you are famalier with Linux use this [R004004] (I didn't test it).
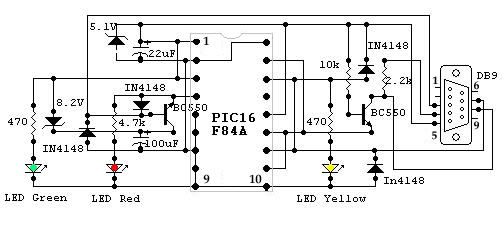
Fig00400101: Microcontroller programmer
I spent about Rs. 150/= (excluding the microcontroller) to build this.
Developping the Microcontroller Programmer
I implemented the same demonstration board given in [R004001]. However, I did some modifications after I was unable to find some of the items from the shops. I couldn't find a DIP switch, ZIF soocket or headers. So, I replaced the ZIF socket with another 18-pins IC base. Later, I discovered that my crystal oscillator is not working. So, I replaced that functionality with a RC oscillator (See how the calculation is done from R004006). Figure 00400102 is the modified schematic.

Fig00400102: Microcontroller demonstration board
I spent about Rs. 50/= (excluding the microcontroller) for this module.
Power Supply Unit
In addition you will need a stabilized power supply, and its circuit arrangement is given in figure 00400103 (cost < Rs. 50/=). You can provide the input voltage from a power pack (cost < Rs. 150/=). 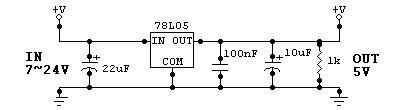
Fig00400103: LM7805 voltage stabilizer
Next, we will see how you program the microcontroller!
Program the Microcontroller References |