| Hatching Eggs |
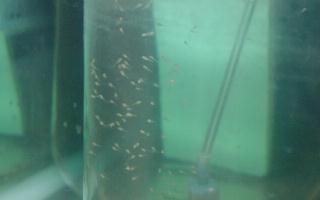
| Before I pull the eggs from the parents I prepare the hatching container. I use a 1-gal jar to hatch my eggs in. I disinfect my jar by rinsing it out with hot tap water. It is good to do this in case there is any bacteria in the jar since the last spawn. I then fill the jar a little more than 3/4 full with fresh tap water that is the same temperature as the parent's tank. No dechlorinator is added. Eight drops of methylene blue are added to the water and stirred with a paint stick. The water should be a medium blue color. I mention the color because there are different brands of methylene blue. I ran accross one brand that only required 2 drops to get the same color blue. The methylene blue acts as a light inhibitor and helps to protect the eggs from fungus. There are other egg hatching solutions that also work like acriflavin and malachite green. I have had a lot of success with the methylene blue so I have no desire to switch. The next step is to simply put your hand in the parents tank and remove the slate and put it in the hatching jar. Your hand may be attacked by the parents when trying to remove the eggs. Don't let this startle you, they can't even come close to hurting you. When you place the slate in the jar, face the egg side down. Next add an airstone and position it so that the bubbles are flowing near the eggs. This mimics the fanning that the parents would normaly provide. I try to limit the bubbles to 2 or 3 gentle streams air. Too strong of a current can cause the eggs to fall of prematurely and could cause damage if they are floating around banging into the slate or glass. The recommended temperature range for hatching eggs is 80' to 84'. I prefer 82'. After 24 hours you will notice some white eggs. These are not fertilized and will not hatch. Some people pick these off and try to remove them. I usually don't bother because I seem to inflict more damage to the good eggs than I remove bad. After the second day you will notice that the eggs have hatched and have begun to wiggle. After they have wiggled themselves off of the slate, usually day 2 or 3, I gently shake off any remaining wigglers off the slate and remove it from the hatching container. The reason for removing the slate is to reduce the amount of bacteria caused by the unfertilized eggs still attached and any bacteria on the slate itself. At this point I do a water change. I syphon half the water out of the hatching jar useing airline tubing. I then add the same amount of fresh tap water at the same temperature adding a dechlorinator. I use airline tubing to syphon the new water back into the hatching jar. This is the only water change I perform. You will notice that many of the fry will be clumped together in little piles struggling to free themselves. Some breeders use a baster to gently blast them apart. I don't bother simply because they just seem to get stuck together again in a short time. Around day 6 you will see an ocasional fry swimming erratically in short little bursts. By day 7 a little cloud of fry will rise up as in the picture. At this point they are considered free swimming. |
 |
| Home ] Hatchery [Gallery P1 [ Gallery P2 [ Water Quality [ Equipment [ Breeding [ Hatching Eggs [ Raising Fry [ Foods [ Brine Shrimp [Trouble Shooting [FAQ [Special Projects [ Sources&Links] |
 |
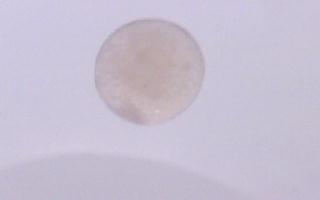
| 20 Hour Egg X60 |
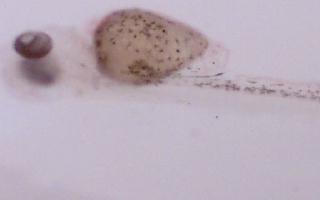
| Just Hatched 2 Day Wigglers X60 |
 |
 |
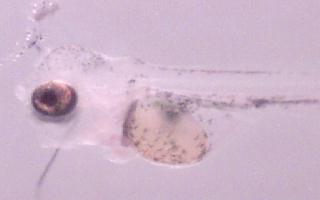
| 4 day wiggler |
 |
After they have been swimming for a couple of hours I give them a small feeding of freshly hatched brine shrimp while still in the hatching jar. After 2 hours I move them to my shoebox (rasing fry section) or another tank. I attatch a glass airstone to airline tubing and syphon the water through it to remove the water in the hatching container. This is to protect the fry from being accidentally sucked out. The remaining water and fry are then gently dumped into their new home. I keep water from the tank in a baster to flush out any fry that get stuck on the glass. |
 |