Okay, so you've just made a fancy new skin. You've got the skin itself, you've written up the read-me, and now you just need a portrait. A what? A portrait, dammit! You know, the little image of the character that appears in the lower-left corner when you play the game. You better put a portrait in there or the game with insert a bland image that has nothing to do with your skin.
Well, alright. First, the technical details about portraits:
Dimensions: 64x128 pixels
Extension: Targa (.tga)
File size: All .tga portraits are 24K
Keep those details in mind and you can whip up portraits for anything from Martian Manhunter to Don Knotts (yes, even Don Knotts!).
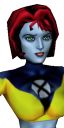 Static Skin Shot
Now, for example, let's say you need a portrait for X-Force's U-Go Girl. I'll be using AfghanAnt's excellent skin for example, hope he doesn't mind.
The image to the left is what I call a "static skin shot", which just means it was a print-screen grab of the skin as seen in the Character Tool. These are fine, as I've said before, but some people prefer comic art, and that's what I'm here for.
By the way, static skin shots are unavoidable if you're crafting skins for characters of your own creation, unless you've got some artistic talent and a scanner. In this case, static skin shots are fine, but be sure to do something with all that white space. Open the portrait with PhotoShop Pro and insert some textured colored background, or something.
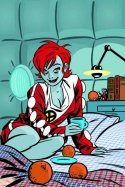 Source Art
To get what I call the "custom art shot", first find some source art. This can come from just about anywhere; comics, posters, even photos of television screens. Check out my Resources page for some of the more common places I search for art. Keep in mind to find a nice, straight-on image of your subject, preferably one without word balloons, captions, etc. that could get cut-off and dangle off to the side.
I've chosen the cover of X-Force #124 (to the right; click for larger image). On the cover we see Edie, apparently doped up and all come-hither, and the bags under her eyes are mirrored by AfghanAnt's detailed facial work in his skin.
Just a side note of little consequence, but with titles like the relaunched X-Force, or X-Statix, there is a definitive artist with whom the title is linked, in this case Mike Allred. I created about thirty X-Force/X-Statix portraits, all using Allred's art (well, except for this example, but don't dwell on that). This doesn't really matter, but it adds a little continuity. Think about it. I'm not just crazy.
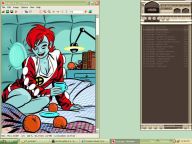 A Portrait Of The Character As A Portrait
For as much as I went on and on and on up there, you'd think this next part was difficult. But no.
We have the source art, so next just open it with your favorite image editor. I prefer IrfranView 'cause it's very stripped-down and quick to learn. In fact, just set your image associations (especially .tga) to this program and you'll skip the hassle of larger programs loading, like PhotoShop Pro or PaintShop Pro.
 Anyway, now that we've opened the source art (left), use the select option to highlight the section of the image you'd like to crop for use as the portrait. Be sure to select a section that would be width-height proportionate, just to prevent any odd stretching or smooshing. And be sure the width before resizing is greater than 64 pixels and the height greater than 128 pixels, otherwise the image will be stretched and smudged and just look like crap.
When you've got the image selected and cropped, just use the program's resize option to, well, resize the image. Be sure to select "maintain aspect ratio" or something like that, just to preserve the proportions.
And that should be about it. Easy, eh! Just save the file as "portrait.tga" and slip it into the correct folder. Voila!