********* Using Split
Object Function *********
Wilcom ES has a feature that allows you to break a single object into several segments. Your Wilcom user manual describes how to use the tool and when it can be useful. We have found other uses for it we wanted to share with you.
Advantages:
* Break a single embroidery object into several segments for easier editing when necessary.
* Can reduce the need to delete and re-digitize a whole segment.
* Useful when combined with automatic features like Point & Stitch or AutoTrace.
* Is a useful tool to add to your bag of timesaving tricks.
Split Object
Tip:
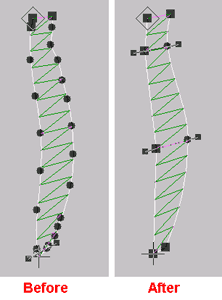
When using Point and Stitch or other automated object generation tools, you may encounter objects with extra nodes or sharp points at the ends of columns.
You can quickly remove the sharp point and reduce the number of nodes in the object, by using the Split object tool.
* Travel to one of the last stitches in the column (you must be at least one stitch from the end of the object to split it).
* Use split Object by clicking Edit-->Split Object.
* Be aware that splitting the object just one stitch from the end will leave a single manual stitch that you may want to delete.
The split object process cuts off the end of the sharp area and actually reduces the nodes considerably making it easier to reshape or edit an object. This process will also convert a column from complex fill with stitch angles to an input A object.
Note: Any time you use the split object tool, be sure and turn off pull compensation, short stitches, underlay and other stitch effects for best results before splitting the object. Add the stitch effects to the objects once they have been split. You embroidery objects will match up better and they will be easier to edit.
Screen shot of window:
(Note if you have HTML turned off in your mail and only accept text messages, you will not see the image, you can open your software as specified above to see the checkboxes).
We hope you find this tip helpful as you work with your Wilcom software.

