sampler made with DMC embroidery floss, click on image to enlarge
Almost 10 years ago, I picked up a 1940's sewing encyclopedia at the Salvation Army for about $.50. It had such a wealth of information in it, from sewing garments to embellishing them with embroidery and lace. One of the chapters was on tatting. The laces that were pictured were so beautiful, I knew I had to try and make them. I picked up a tatting shuttle from my local department store and a ball of crochet cotton and started to get to work. Following the directions in the book, I couldn't get them to work, so the book and the shuttle were put away and forgotten. Several years later, I cam across the book and the shuttle and decided to have another go at it. It worked! I'm still a novice, but I have made some really pretty laces using this easy to learn technique.
Supplies:
The shuttle is what you use to hold the thread while you are tatting. They come in a variety of shapes and sizes. The metal shuttle pictured on the left is one of the most common types you will find. It has a removable metal bobbin and a metal hook on the end for joining picots. It measures about 3" long by 1" wide. There is also a plastic version available that doesn't have the hook or the removable bobbin. If you use that type, you will need a small steel crochet hook to use for joining. This size shuttle is most appropriate for use with threads no thicker than size 10 crochet cotton. You can use heavier threads, but you will have to join threads more often to complete your lace or motif. You can also get some beautiful wooden shuttles on line. These generally do not have a removable bobbin and are a little larger than the shuttle shown. They have the advantage of being able to hold more thread and accommodate thread with beads on it for making beaded lace.
Threads:
You can tat with practically any thread. The sampler shown at the top of the page was made with DMC embroidery floss. I have also used DMC Pearl Cotton in several sizes and size 10 crochet cotton. Both of these threads work very well for practice, although the lighter weight pearl cottons are good because their sheen helps your stitches move a bit easier. I've only worked a few times with DMC tatting thread and I haven't developed the knack yet to work with such a fine thread. I find that the crochet cotton makes a nice size lace, is relatively easy to work with, and is very inexpensive.
Technique:
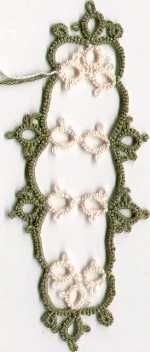
The lace is formed by creating knots on a central core and then tightening the core to create a ring. Each whole stitch is broken down into two half-stitches, the knots going in different directions. By leaving a space between the two half-stitches in a whole stitch, you create a little loop or picot. You can also do a ring with all half-stitches which are called josephine stitches. By making whole stitches on a core that's not in a ring, you can make a chain. This isn't meant to provide directions on how to tat, just a breif description of the process. Your best bet is to check out some books from your local county library and go from there. The motif pictured below uses all of the above mentioned techniques.
motif done with size 10 crochet cotton, click on image to enlarge
Check out my links page to find some places on-line where I have found supplies and patterns.
Home My Persona Garb Tablet Weaving Tatting Embroidery Links JAS Terrain