Embroidery
Embroidery is another one of those skills that can take an afternoon to learn and a life time to master. Usually, I do cross stitch and needlepoint, but since neither was really used in the 12th century, I had to relearn how to do crewel work. For the most part, the stitches are very simple. For outlining objects, split stitch, stem stitch, back stitch, and chain stitch were used. For filling in, couching or laid work, split stitch, and chain stitch were used. Also there is evidence that gobelin stitch, a type of satin stitch, was used. Silk, wool, linen, and meltal threads were used in a ride range of colors (especially the silk). Alas, I have not done extensive research on this topic since I'm just starting out and have not yet had to do any documentation, but I did go through some books at my local library that had pictures of medieval embroideries and a listing of the types of stitches and what type of fibers were used.
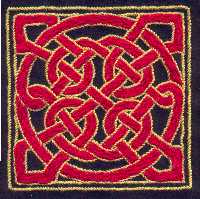
The most unfamiliar stitch to me was couching and laid work. This was used to have as much of the thread on the top of the ground fabric as possible, especially when you are working with gold or silver. Perhaps the most well known surviving piece of embroidery using this stitch is the Bayeux Tapestry, depicting the Norman conquest. Below, is my first attempt at couching. I used DMC pearl cotton (what was available at the time) on black wool (very nice to sew on). Click on the image to magnify.
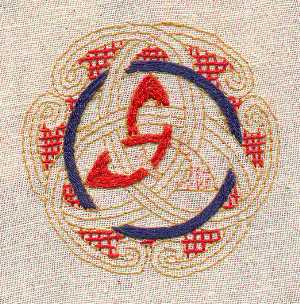
I used a design from one of my books of Celtic knot work, scanned it and printed it onto tracing paper. Then I used sewing thread to back stitch the design onto my fabric, sewing through the paper and fabric, then tearing it away when I was done. I'm still not quite sure I've done the couching correctly, but it does give a nice effect in creating an "endless" knot. I did the outline in stem stitch, and if you look at the magnified version, you can see where I messed up on turning one of the corners of the design. I made it into a dice bag for my husband. Below is the piece I'm currently working on (along with ten other projects it seems). Again, click on the image to magnify.
With this one, I chose the design from a pendant that my husband gave me for Christmas last year. I chose a loosely woven cotton muslin and I'm not very happy with it, as it doesn't support the stitching as well as the dense wool did. You can see that I ripped out the stitches in the central motif several times because I wasn't happy with the way it was turning out. I started out using DMC floss because the color selection was much greater (my local store is abysmal in keeping things like this in stock), but I didn't like the look of it. I switched back to the pearl cotton and used a single strand of embroidery floss as an anchor. It provided a nice, smooth finish, but I'm leaning towards the look of the first piece. You can also see the stitching lines from the pattern transfer, which is the same method I described above.
Soon, I will be making the trim for my garb to attend my first event. As the work is completed, I'll be posting the pictures, so check back in the beginning of February.
Home My Persona Garb Tablet Weaving Tatting Embroidery Links JAS Terrain