Replacing the factory hard drive with a bigger and better one!
-Overview: The xbox's hard drive can be replaced since it is a normal pc harddrive. You want to replace the hard drive with one that has these kinds of specs:
ATA/100, 5400 or 7200 RPM
READ!!
Requirements:
Evolution X Dashboard version 1.8.3285 - the backup feature in this version works without bugs
Brand New Harddrive (never used)
xISO - makes xbox iso files
Nero Burn - burns xbox iso files to cd-rw or dvd
Evox D6 EjectFix Bios - flashed on the matrix
Step 1. Backing up the your factory hard drive onto your PC
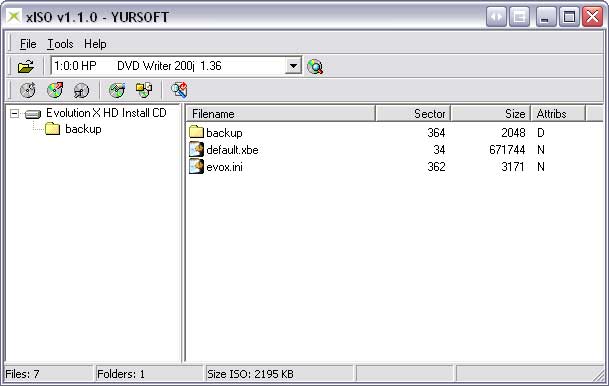
First we will want to do a backup with the evolution x dashboard. Go into the System Utils Folder, then choose Backup.
This will create a new folder, Backup, in the C: folder of the xbox. Make sure there are these files there. Click to see pic
Now ee want to make sure we do a full backup of the factory xbox's harddrive. We want to copy the C folder and the E folder on the XBOX. FTP into your xbox with FlashFXP and copy those two folders to your PC's hard drive.
Once you finish copying the files. We can create a custom HD install CD. I made a evox.ini file to do this: Click here to download it. Just rename it to: evox.ini. and adjust the network settings to what you had setup before.
Then Copy the Evolution X Dashboard file (default.xbe) we made the boot cd from and paste it to a new folder. Copy the new evox.ini file that contains the HD Format commands and also the Backup folder from the xbox's C: folder into that same folder. So we'll have a folder that looks like this:
Then create an xISO image and burn it to a cd-rw that works in your xbox.
Step 2. Disassembling your XBOX and replacing the hard drive.
This part is not too hard. Open up your xbox like before. Disconnect all the cables from the harddrive. Remove the harddrive tray and unscrew the harddrive from the tray.
MAKE SURE YOUR NEW HARDDRIVE'S JUMPER SETTINGS ARE AS PRIMARY/MASTER.
Then just put the new harddrive in and put your xbox together.
Step 3. Booting from the HD Boot cd-rw and installing the Hard Drive through evolution x dashboard.
After you get your xbox together. Boot up the new cd-rw we made. It should bring up the evolution x dashboard and look like this (if you used the .ini file i made and posted)
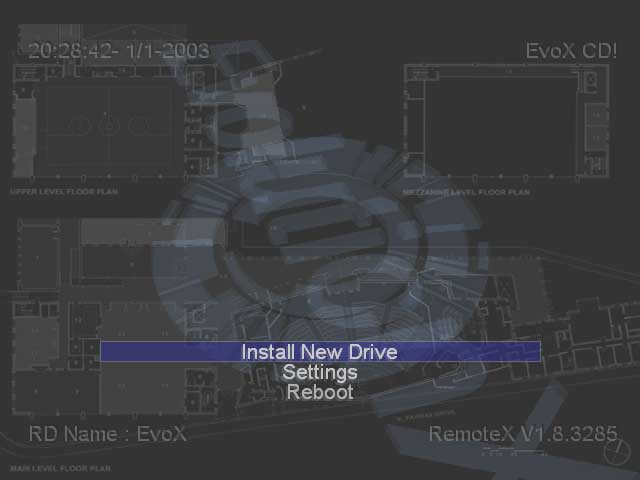
Click on Install New Drive and let your xbox do its thing.
Once it finishes.
Boot the first evolution x dashboard cd-rw we made. We'll just need to reinstall the c and e folders we backed up.
Step 4. Reinstalling the C and E folders to the new xbox hard drive.
Open FlashFXP and connect to your xbox. Once you get connected, we'll want to copy the C folder and the E folder we backed up earlier. Once you finish copying the files we'll talk about the new F: Folder we can use!
We'll need to edit your evolution x dashbaord settings or the evox.ini file on the xbox so it uses the F Drive.
USE F Drive = YES
The F Drive is the largest drive on your xbox. Its the best place to save your games and programs and music to. Its very same method as we did with the factory drive, except we put the folders on the F: Folder on the xbox
Click here to see how that was done.
We need to have the evox.ini autoadd items from the F:\Games and F:\Apps. You can then just use the F: Drive to save your games and other stuff to. Just delete the Apps and Games folder in the E Folder on the xbox (leave the other folders alone). Then copy the backup Apps and Games folder into the F: Folder on the xbox.
Now you can save anywhere from 10 to 50 games (depending on the size of your new hard drive)!!