|
Checking Out Photo Fixes, Part 2
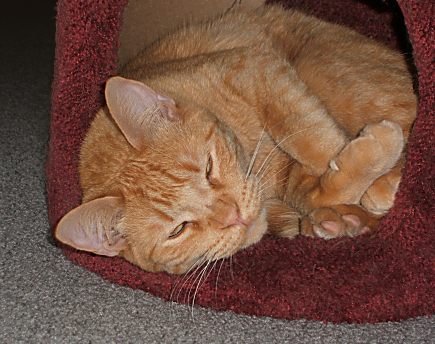
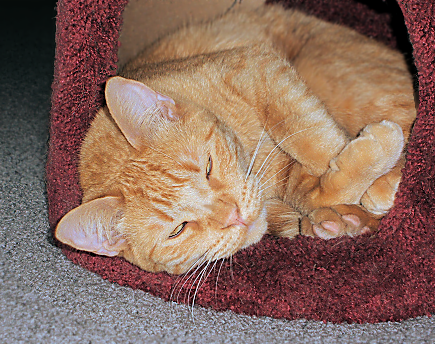
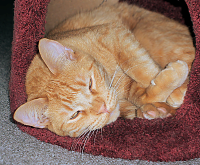
This time I can start with the incidentals-have-been-fixed version of Sunny's picture and see what Smart Photo Fix can do to it.
|
|
|
(Click here to see the final version.)
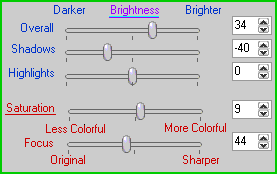
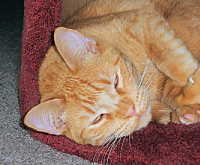
THE SMARTFIX CONTROLS AT "SUGGEST SETTING"
|
I felt that these settings produced an acceptable picture (below left), slightly too bright overall, the highlights a bit more than slightly.
|
|
|
|

|
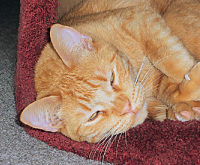
| (1) The suggested-settings result.
|
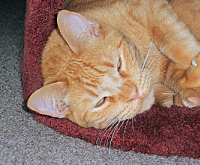
(2) Darkened highlights by 15; any more and they became noticeably gray.
|
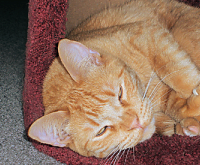
(3) Increased overall brightness by 24 and darkened highlights by 10.
|
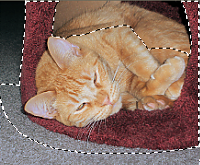
(4) Increased overall brightness by only 10, darkened highlights by 10, restored shadows to 0.
|
Smartfix darkened the shadows by 40 because, I think, of the 'rule' that says that the deepest shadow in a photographic print must be black ('almost black' is not good enough). In the series above, I was increasingly satisfied by the results, but those highlights were still a bit too light, I thought, even in the third picture. So I said, "I don't care about the darkest areas; it's okay if they're a little light if that gets the highlights the way I want them." I was wrong. Here's where understanding the histogram would help: obviously—from the general muddiness of the tones in the fourth picture—the range of darkness-to-brightness in this image exceeds those five f-stops that a digital image can reproduce. Reading the histogram knowledgeably would have told me that. Then I would have known; I would not have tried to break the black blacks rule but instead would have concentrated on those troublesome highlights (as I think I was doing, intuitively, on the previous page). So the failure of the fourth image taught me more than just "obey the rule." I hope I'm understanding the lesson.
See, the image can't be properly reproduced by a one-step or even a graduated fix. A more extreme thing has to be done to it. The highlights in the fourth picture are almost okay but the middle tones of orange are getting muddy. In the earlier pictures, the shadows are okay. I think a more knowledgeable person than I would say "Make two layers and blend them by [the appropriate blend mode]," while I say "Which blend mode, and how?"
|
|
|
|
|
|
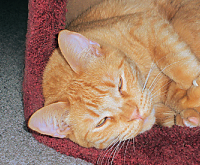
| (5) Kept the changes that produced #3, reduced saturation from +9 to 0, kept the suggested focus increase. This is getting interesting!
|
(6) Leave saturation at 0, change focus to 30. This control sharpens everything; focusing wouldn't! (I don't want that interior cardboard sharp.)
|
(7) Same as #6; the selection shows what I want to leave in sharp focus to approximate a larger f-stop setting on a real lens.
|
(8) No SmartFix settings changed. Now the parts outside the selection area are blurred (Gaussian, r=.45) incrementally. Almost done.
|
I'm really pleased by what SmartFix produced in #5; I decreased the saturation there because Sunny is orange enough. In #6, I decrease the "focus"; it's not really focus but sharpening; digital sharpening works largely by increasing contrast, particularly by inserting light pixels next to darker ones—and the result can be as ugly as JPG artifacts! Also, I'm still conscious of the light fur near his eyes.
In this picture, there's also the cheap cardboard interior of the cat-tower (see how Sunny's sharpened back-hairs draw attention to it); and there's no reason for the carpet-loops everywhere to be as clearly defined as his whiskers. If this weren't a flash picture (which is an imitation of what ideal natural light would let us see) only the plane that I try to approximate by the selection area would be in sharp focus (and even with that, I couldn't keep myself from rounding it at the lower left). So I decided to torture myself by inverting that selection and then feathering it by several pixels—the torture is in the always-necessary-for-me repeated attempts to pre-visualize where and how the feathering will extend—to soften the things that would have been out of focus had I taken the picture with my old Nikon and its 105-mm f/2.5 portrait lens in natural light.
Doing it, I discovered an improvement on my invert-and-feather-selection-torture-myself routine; this time it was painless! —because I made the selection and immediately inverted it, and then I feathered by two or three pixels. This way I don't have to guess wildly about where the feathering is going to be because the inverted selection is the one I'm actually going to be altering. Before (in torturous mode), I had made the selection, feathered or otherwise modified it, and then inverted that modified selection; this little change in procedure makes a big difference, and to have come upon it would justify everything I relate on this page even if all the fixes had turned out disastrously.
Realistically and practically, #5 and #6 are quite satisfactory; SmartFix did a good job, and I don't need to continue. But #8 is better.
| And this is better yet. I have to show it at this size so that the clarity is apparent. I do hate that cardboard, though.
|
|
|
(Click here to compare with the original.)
To arrive at this final version, I retouched #8 further. To darken the too-bright fur around Sunny's eyes, I made a selection as I had before; this time I created a new layer with the selection active, used the airbrush tool set at about 30% to spray three hues of fur-orange into the selection, then decreased the opacity of that layer till it looked okay. Made a 2nd selection of the dark fur at the corners of his eyes and used the HSL tool to lighten it. Took care of the tuft of almost white fur near his dewclaw (and extended the effort to a similar patch on his toe). Cloned some too-dark and too-bright groups of pixels here and there.
Reached the point of diminishing returns.
|
| I wouldn't have worked on this picture to the extent I did were it not a Self-Learning-Programme project. It's not that good a photograph, though it would be at least five times better had Sunny's pupils been visible. Quite possibly because the image isn't that good, I concentrated more on the SmartFix features than I would have, added to my meager store of knowledge about gamma correction and histograms, and became pretty familiar with what SmartFix does and how it does it. I'm really happy I decided to join the Self-Learning Programme this year.
|
|
|