 |
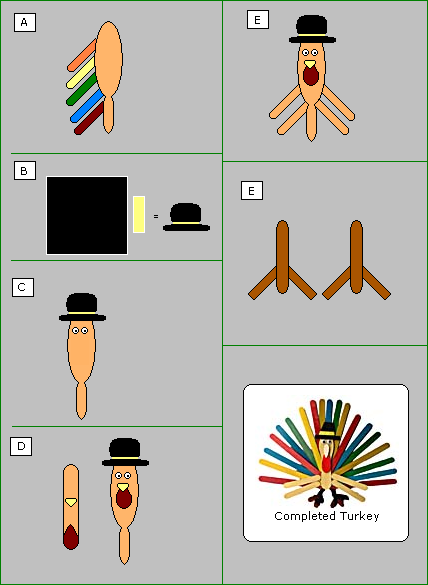
| Terry the Turkey (MEDIUM) You will need: about 15-20 painted/pre-colored sticks, 6 plain sticks, 1 craft spoon, red and brown paint, construction paper, glue gun and glue sticks. Instructions: A If you don't have colored sticks, paint them whatever colors you want. Now glue the dry sticks around a wooden spoon. You are done with Terry's tail feathers. B Cut out a pilgrim hat shape out of black contruction paper and glue on a colored strip across it. Any color you want. Glue that to the top of the wooden spoon. C Glue on wiggly eyes right underneath the hat. D Out of a stick, cut out a small tear drop shape. This is the beak. Now cut a larger one out. Paint this red. This is the waddle. Glue them down as shown in the completed picture. E Cut four sticks down by 1/4 and round the edge. Glue these onto the feathers as shown. These are his wings. F Cut one stick in half. Round both pieces edges. Now cut a new stick into fourths. Cut and glue as shown. Now you have a perfect Thanksgiving centerpiece! |
| Fall Projects |
| Winter Projects |
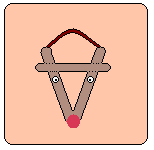
| Rudolph The Reindeer (X-tremely EASY) You will need: 4 craft sticks, 1 small red pom pom, 2 small wiggly eyes, glue gun and sticks. Paint sticks if you want. If you do so, allow paint to dry. A Glue the first two sticks in the shape of a loose "V". B Glue the third stick, so that you could close it like a triangle, but make it about an inch farther down. Glue another stick on the opposite site in the exact same spot. This will make it look like he has antlers and ears. C Glue the wiggly eyes just a little under the third stick. D Glue the red pom pom to the tip of the "V" for his shiny nose. If you want to make Rudolph an ornament, cut and glue a piece of string of ribbon or wool to the back. You can make a girl by tying a bow and attaching it to the head. These are sure to add fun to any tree. |
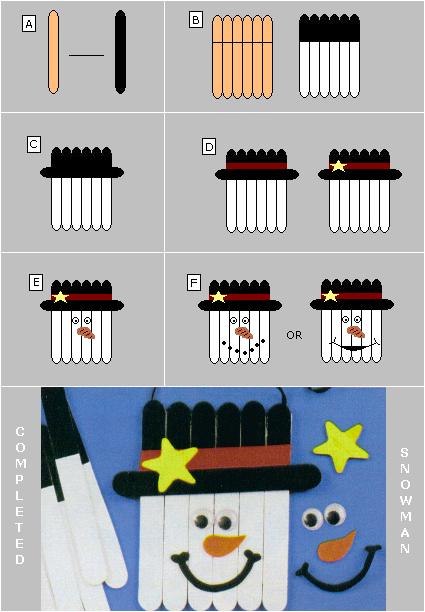
| Snowman Banner (MEDIUM) You will need: 7 craft sticks, white and black acyrilic paint, 2 wiggly eyes, 4 colors of construction/foam paper (black /orange / yellow /red), glue sticks and gun. A Paint 1 stick completely black. Now grab the other 6 sticks. B Paint them a smaller half black and a larger half white. Let dry. C Now place the sticks black side up. Glue the all black stick across the bottom half of the other 6 sticks. You have started the hat. D Cut a red strip of construction paper and glue it across the top of the stick you just glued. Cut out a star out of yellow const. paper and glue that across the red rim. The hat is finished! E Now grab the wiggly eyes and glue them a little under the hat. Cut the snowman's carrot nose out of orange const. paper and glue it close to the eyes. F Then make the mouth out of a strip of black. Make it however you want. You could also make coal pieces as the mouth. You are finished! This project looks great when glued to a basket, or hanging from a hook on the wall. It can also be a great ornament. |
| Picture Frame (EASY) You will need: 6 sticks, glue sticks and gun, bottle of school glue, picture or print out of picture to fit the frame Optional: Acrylic paint, any color, for painting the sticks. Instructions: 1 Build a square shaped frame by putting two sticks together on each side, but leave the rounded edges out about a half an inch. Hot glue them together where they touch. Make sure your picture fits this. 2 If you wish, paint the sticks to go with your picture. Let that dry. 3 Place the picture up against the back and use school glue (if you wish) to attach the picture to the rim of the inside. Attach two sticks across the back in an "X" to hold the picture in place. It that doesn't hold put a piece of cardboard (could be just cereal box kind). 4 Attach a piece of ribbon, or yarn and tie it so you can hang it on the wall. You could decorate it with buttons, stickers, dried flowers, leaves and grass, puzzle pieces, etc. |
| Spring Projects |