


How to Install Your Chevy Distributor
A distributor can actually be dropped into a block in virtually any orientation
and made to function by re-arranging the spark plug wires to match the
installation. You will see this approach to distributor installation quite
frequently, and it is a sure-fire tip-off that the engine builder/distributor
installer didn’t have a clue about how to do the job right.
GM always installed the distributor in a specific orientation, and always used
the same distributor cap “tower” for the #1 spark plug. By following this
procedure, your distributor will be installed in the correct factory position
for a professional appearance.
1. Bring the engine up to Top Dead Center on the Compression Stroke and align
the timing mark on the harmonic balancer with the 8-degree mark on the timing
chain cover (or wherever you want the engine to fire. 8 Degrees is a good
starting point for an initial start-up, but you can set it anywhere from 6 to 12
degrees before top center).
To Find Top Dead Center on the Compression Stroke with the engine in the car:
a. Remove the #1 spark plug
b. Disconnect the coil wire from the distributor cap and ground it
c. Have a helper plug the #1 spark plug hole with a finger.
d. With the starter, slowly “bump” the engine over until the helper feels
air being forced by his finger.
You are now coming up on the compression stroke. Align the timing marks as noted
above.
To Find Top Dead Center on the Compression Stroke with the engine out of the
car:
a. Remove the valve cover on the driver’s side of the engine to expose the
valves for cylinder #1.
b. Rotate the crankshaft until the timing mark approaches top dead center.
Observe the exhaust valve.
c. If the exhaust valve is moving as you are approaching top dead center, you
are on the exhaust stroke.
You need to rotate the crankshaft one more time.
d. If neither valve is moving as you approach top dead center, you are on the
compression stroke.
Align the timing marks as noted above.
2. Install the rotor to the distributor.
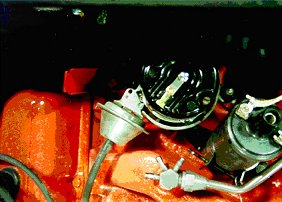
3. Hold the distributor body in the orientation show in figure 1 relative to the
engine/block and drop the distributor straight down into the block. Pay no
attention to rotor orientation at this time. If the rotor is aligned with the
oil pump driveshaft, the distributor will drop all the way down and seat. If the
rotor does NOT line up, the distributor will not drop all the way down.
4. If the distributor does NOT drop all the way down (chances are best that it
won’t), pull the distributor up out of the block just enough to disengage the
rotor from the camshaft gear, and turn the rotor a little bit. Drop it down
again. Repeat this until the distributor drops all the way down and the rotor
engages with the oil pump.
5. The distributor will now be all the way into the block, but the rotor will
not be properly aligned. You can now pull the distributor up until the cam gear
disengages, turn the rotor JUST A HAIR (half a cam tooth), and drop it straight
back down again. The rotor will now move one tooth over, and the chamfer on the
oil pump shaft will allow the oil pump to line back up. The distributor will
drop all the way back in again, with the rotor moved over one tooth. (If it
doesn’t work, try rotating the rotor the opposite direction.) Repeat this
operation (I call it “walking the distributor”) by lifting the distributor
up, slightly moving the rotor, and dropping it back in until you’ve
“walked” the rotor around to its correct position as shown in the figure
below. Once you get the technique down, you can do this very quickly – much
quicker than trying to align the oil pump driveshaft with a screwdriver while
looking down the hole. The screwdriver technique also requires that you pull the
distributor ALL THE WAY OUT to fiddle around with the screwdriver several times
until you get it right. So try my “walking” technique: it’s quick and
accurate.
6. Once you have “walked” the rotor into position, you should be able to
obtain the orientation of the distributor body and the rotor as shown in Figure
1. Install the distributor hold-down clamp and bolt. Snug it, but leave it loose
enough that you can rotate the distributor smoothly.
7. Attach an Ohm-Meter (continuity tester) between the distributor primary lead
wire (the wire coming out of the bottom of the distributor body) and ground (any
point on the engine). Rotate the distributor body SLIGHTLY clockwise from the
orientation shown in Figure 1 until you read continuity (points are closed –
giving continuity to ground). Now, SLOWLY rotate the distributor body
counter-clockwise until the points JUST break open (loss of continuity on the
ohm meter). The instant the points break open is the ignition firing point.
Tighten your distributor hold-down bolt at this point. Your distributor body and
rotor should now be aligned like Figure 1 (or VERY close).
8. Slip your distributor cap onto the distributor. Notice which “tower” is
the #1 plug wire. With a felt marker, place a little mark on the distributor
body at the #1 tower position. Pull the cap back off, and verify that the rotor
is pointing to this mark (or VERY close). If it’s not, you’re most likely
off by a tooth. Repeat the installation steps.
9. If everything is aligned (and it will be if you followed these steps),
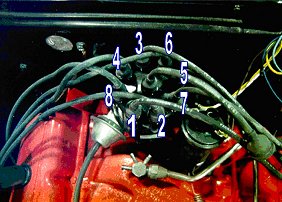
install the cap and install the plug wires as shown in figure 2.
10. Start the engine. It will fire and run immediately if the above steps have
been followed.
11. Set the dwell to 30 – 31 degrees (always set dwell before setting timing.
Changing the dwell changes the timing).
Figure 1: Distributor & Rotor Correctly Installed
Figure 2: Correct Spark plug Wire Order and Placement
at #1 Firing Position
How to Set the Timing (non-HEI)
When you think about it, setting the timing at idle speed makes no sense at all:
You don’t operate your car at idle, and timing changes as the rpm changes.
Fact is, the timing spec at idle speed is provided as a simple way for most
people to set the timing, and is not a good procedure for optimum performance.
Small block Chevys (and most other GM performance V8 engines) perform best when
the total timing (full centrifugal advance plus the initial timing setting with
vacuum advance disconnected) is all in by 2,500 – 2,800 rpm and is set to 36
– 38 degrees. If you have an adjustable timing light, this is very easy to
check. If you don’t, you need to scribe a 36-degree mark on your harmonic
balancer. Here’s how:
Measure the circumference of your harmonic balancer using a sewing tape measure
(or other flexible tape measure). Get it as accurate as you can. Take this
measurement and divide by 10. The number you get is the distance to 36 degrees.
Measure this distance CLOCKWISE from your existing harmonic balancer timing mark
and place a clear mark on the balancer.
Remove your distributor cap and rotor. Remove the 2 centrifugal advance springs.
Install the rotor and the cap (without the springs). Disconnect the vacuum
advance.
Start the engine. It may kick back a little due to the advance coming in
immediately without the springs. If you’re using an adjustable timing light,
set the light to 36 degrees advanced. Now rev the engine just a little while
observing the timing marks with the light. It shouldn’t take much rpm to peg
out the advance without the springs installed. With an adjustable light set at
36 degrees, align the stock timing marks with “0” when the timing is
“pegged out.” With the non-adjustable light, align your new 36-degree mark
with “0.” Rev the engine a little to make sure the timing will not advance
any further. Shut it down.
Pop the cap and rotor and re-install the springs. Put everything back together,
but leave the vacuum disconnected. Start it up. For future reference, make a
note of the timing setting at idle. This is your new curb idle timing spec. Now
give the engine a few quick rev’s past 3,000 rpm and verify that the full
timing (36 degrees) is coming in. If it’s not, you need to change to a softer
set of springs until you get full 36-degree advance before 3000 rpm. (NOTE: A
stock set of springs will usually not allow full centrifugal advance to come in
before redline rpm. If you have stock springs installed, don’t rev the engine
beyond its limits to try to force full advance in.)
Shut it down and hook up the vacuum. Now do a road test.
The 36-degree 2500 rpm advance curve is optimum for performance, but may require
premium fuel. Lug the car around, and punch the throttle at low rpm while
listening for detonation (“engine knock”). If you’re getting any audible
knock, you MUST retard the timing. Retard the timing in 2-degree increments
until engine knock stops. Engine knock will seriously damage engine components
if not corrected. If you get no knock, you may see slightly improved performance
at 38 degrees total timing. This is particularly true if you’re running at
high altitude.
If you have no engine knock under acceleration, but the car “chugs” or
“jerks” at cruising speed (light throttle application), you are getting too
much vacuum advance on top of the mechanical advance. You may need to change out
the vacuum advance diaphragm with an adjustable unit available from aftermarket
sources. Adjust these units so that you get the most vacuum advance possible
without any “chugging” or “jerking” at cruise speed.
Your timing is now set for best possible performance. Make note of the new
setting, and use this for your future tune-up work.
Lars
Grimsrud
SVE Automotive Restoration
Musclecar, Collector & Exotic Auto Repair & Restoration
Broomfield, CO
Special Thanks!!

If you, or your club would like to submit a technical article or tip, please email us at [email protected]
 |
 |
 |
 |
 |
 |