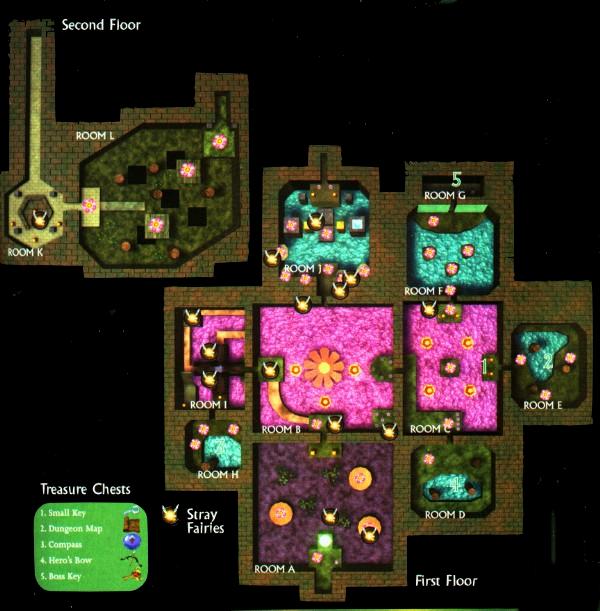
This room is the easiest room to get by and collect the fairies. To get fairy #1, simple put on the Great Fairy's Mask to attract it. Now put on the Deku Mask. To get Fairy #2, go to the platform to the right and open the treasure chest. Now glide to the edge to the North, or just straight up. When you get to the edge at the northern most part, watch out for the Giant Skultulas. If you get knocked off, just go back to the south end and retry.
Step 2: Room B
When you step through you are immediatly attacked by a Deku Baba. Destroy this and go down the ramp to the left. Now destroy this Deku Baba and you see a treasure chest form back at the entrance you came in. Open this and you get Fairy #3. Go back down the ramp and turn into Deku Link (if you changed to normal link). Hop across the flowers on the water to get to the other side. Look to the right and you see pots. Go over and break the pots. A fairy should pop out. Now you have 4 fairies. Go back to the platform and go through the door.
Step 3: Room C
As Deku Link, use the flowers to hop onto the Deku Flower in the center. glide to the North end of the chamber (there's a treasure chest here). Get the Small Key, go to the East side of the chamber, or the left side from where you're facing, and enter the door.
Step 4: Room E
When you enter this room, the door locks behind you and iron bars lock it tight. You are stuck in here with three Snappers. They are relatively easy to defeat. You can beat them in two ways. One, throw bombs at the to flip them over and slash them with your sword. The way I like to beat them by is to turn into Deku Link. Get one's attention (be near a deku flower), and when it's right over you, launch. This will flip it over. Now turn into normal Link and slash it with your sword. Do this three times, and you get the Dungeon Map. This map is only for the Woodfall Dungeon.
Step 5: Room B
Head back through Room C to Room B and open the locked door on the west side.
Step 6: Room I
This room may seem long, but it is actually quite easy to manuever through. Run to the block in the middle of the room. Tatl points out that it is light and moving it is not a problem. Stand next to it, and push A to grab it. Hold A to push it forward until you can make it all the way through to the right. Follow it to where the Giant Skultula hangs. Defeat it to gain fairy #5. Fairy #6 is up in a beehive on the ceiling. Shoot down the two beehives and run to the fairy. Continue down to catwalk until you reach where the block is again. Push it back two squares. You need to get to the door at the south end. To do this, light a Deku stick back at the torch in the northwest corner near where the Giant Skultula was. Light the deku stick and run and light the torch nearest to the door. The gate opens, and you can now enter. Hint: Another fairy can be found under the catwalk. Come back when you do something to the water.
Step 7: Room H
You are stuck once again. This time you face a pair of dragonflies. They are very easy. Wait for them to come to you. When they attack you with their electric shock, block it and hit them with your sword twice to get rid of one. Repeat this step to the other one and you get the Compass. Now you can see many of the dungeon's hidden things on the map.
Step 8: Room I
Now, you need to light yet another deku stick to get rid of cobwebs at the top of the stairs and over some jumps. Enter through the hallway.
Step 9: Room K
After passing the alcove containing the pair of deku babas, Tatl warns you that danger is near. Continue on and you are assaulted by black boes. Just keep slashing your sword and you will defeat them all. Continue on into the room and more come on. Defeat them all and you find a treasure chest containing fairy #7. Now use a deku stick to light all of the unlit torches in the room and you unlock the next door to the next room.
Step 10: Room L
You have to glide very carefully in this room. Turn into Deku Link and launch to the flower moving forward and back from you. Do not fall down or you will have to start over. Now launch to the second flower, being even more careful as you are closer to the dragonflies. Then launch to the edge, and continue through the hallway.
Step 11: Room B
You are back in Room B. This time upstairs. Step on the floor switch near the eastern exit. This causes two ladders to form down the pillars. Follow the balcony to the northern platform where fairy #8 is trapped in a bubble. Just pop it with your sword. In the northwest corner is a switch. Glide over to it using the deku flower to activate the switch. This causes a treasure chest to form. Open it to get fairy #9. Now turn into Deku Link and hop down, and use the flowers to hop to the platform where the ladders have formed. Climb up the ladders and exit through the eastern exit.