The pop tester
WARNING and DISCLAIMER
Pop testers, including commercially available ones, are potentially lethal . The high pressure spray of fuel coming from the nozzle, or a pinhole in your pipe / welding, will easily penetrate your skin and can lead to tissue necrosis, blood poisoning, blindness, amputation of appendages, even an early departure from this existence (death). A pipe or hose bursting under pressure can cause severe injury or death.
If you're going to build one, or buy one, be careful and follow good safety practices.
Keep your hands, and all other parts of yourself, well away from the nozzle and all pressurized parts of the tester while under pressure .
Never, ever make any adjustments while the unit is pressurized. Let the pressure off first.
Wear safety goggles or better a full face shield. I also wear some heavy leather (welding) gloves for a bit of extra insurance.
Make a safety shield to go around the tester, or at least the nozzle you are testing. I removed it for these pictures, but I use a piece of plexiglass that is between me and all pressurized parts of the tester and nozzle.
Use only in a well ventilated area, away from any source of ignition.
The spray coming from the injector is more combustible than the fuel in an open container (that is why it is on your engine !). Breathing petroleum / solvent fumes is a health hazard, wear a respirator unless you have good ventilation. You don't want a case of 'chemical pneumonia'.
You need to securely clamp or fasten it to something substantial enough to hold it steady. Unlike using a jack, you don't have the weight of a vehicle to hold this thing in place while you're pumping the handle.
Consider buying some special test fluid, like Fusus or Viscor. They are less hazardous than diesel but you still need to observe all safety precautions.
Get a manual, or at least find the proper specs and test procedures, for YOUR injectors before testing them.
Work only in a clean, well ventilated area, with sufficient lighting.
Ok, you've been warned . If you hurt yourself or anyone else, burn down your garage, or cause any other damage or injury, I am not responsible ....no angry or threatening notes, letters,calls or visits from you, your spouse, kids, family, friends, neighbors, employer or lawyer. If you attempt any of this, you do so entirely at your own risk .friendly note or drop by for coffee (or send
some small token of appreciation :) just because you think I'm a handsome, friendly and clever lad, feel free to do so.
What is a pop tester?
Also called a nozzle tester, injector tester,etc.
It's a device to test and adjust high pressure mechanical fuel injectors, usually those on diesel engines.
The common name comes from the 'pop' sound made when the nozzle opens under pressure.
Please note, the tester being discussed here is only suitable for the older
style injectors that are completely mechanical. Many newer diesels are using injectors that are partially electric (solenoids) and operating at much higher pressures. Those are beyond the scope of this piece.
Why build one yourself?
The commercial ones are expensive and a bit hard to find, though you can often find them on e-bay and a few other on-line sources. Expect to pay (us)$300 to $1000 for one. You can build one for $50 - $60 that is capable of testing most of the older style (mechanical)injectors.
Save the expense and inconvenience of sending injectors out to be tested and rebuilt. Test them yourself, adjusting opening pressure as necessary, or determine if they need cleaning or rebuilding. Old malfunctioning nozzles can sometimes be reclaimed by careful cleaning. You can buy just the parts you need to replace, typically the nozzle assembly, and rebuild them yourself.
For example, rebuilt injectors for the dexta currently run around $75 each plus shipping cost and your old injector(s) as a 'core' exchange. New injector nozzles can be purchased for $25 - $30 ea. With a tester to set the opening pressure, you can rebuild them yourself at a considerable savings.
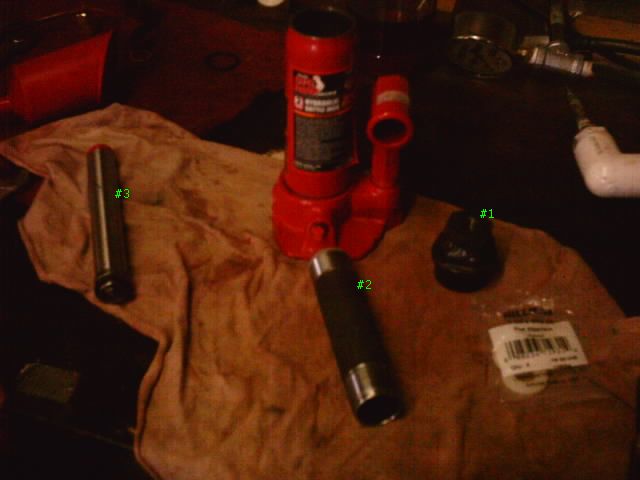
The tester partially disassembled. Here you can see some of the internal parts of this thing.
#1 is the top nut off jack, with a hydraulic fitting welded to it.
#2 is the pressure chamber of the jack.
#3 is the lifting rod from the jack.(will be discarded). In the center is the the bottle jack, with the outer body installed.
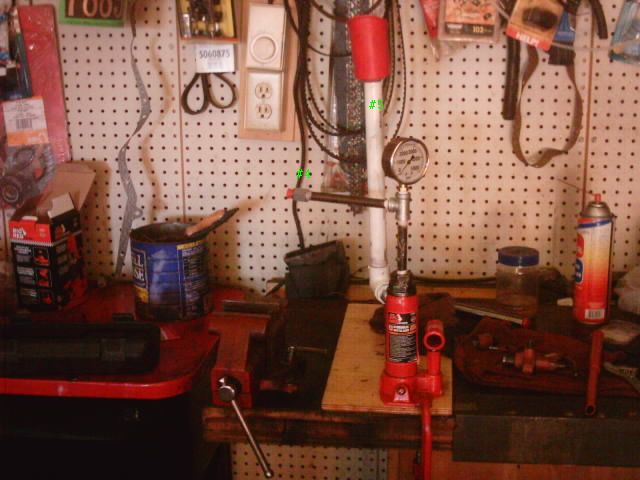
The tester fully assembled and clamped to the workbench. In this picture, there is no injector or injector line attached. #4, (just left of the jack) at the end of the black pipe, is the adapter where the injector line attaches. Here it is closed by a small orange dust cap. #5, the white pvc pipe, is where you replenish the test fluid /fuel. The red funnel at the top of the fill pipe contains a filter. (this is sold to fill gasoline lanterns and cook stoves)
So how did I build it?
Materials:
A bottle jack. I bought a 2 ton one from Northern Tool. cost $10.
A pressure gage, made for hydraulics. I bought a liquid filled one, 5000 psi, for $12 at Northern Tool.
I used a hydraulic bushing from Northern Tool (cost < $2) to make up the fitting that allows the pressure pipe to fasten to the top of the jack. It was 3/4 male and 1/4 female pipe thread. More on this below.
Some pipe and fittings. Pvc is fine for the fill pipe / reservoir, it is never under any pressure. I used carbon steel pipe from the hardware store for the pressure pipe (look for seamless pipe). It has a higher pressure rating than brass or stainless. Do not use plastic pipe for any of the pressure piping.
An adapter to get from pipe thread to whatever you need for your injection line. For the dexta, I needed a male 12mm 1.5 (pitch) thread. I also bought a 14mm 1.5 adapter because it is another common size on diesel injection lines. Cost was $10 ea, plus shipping.
1/8 pipe tap, hand tools, epoxy and/or a welder.
Disassemble the bottle jack.
Start by removing the little rubber fill plug on the side. Pour the oil out into a clean container, seal and save it to re-fill your other jack when it gets low.
Now remove the top nut. It's probably very tight, so hold the jack with something (ie: in a vise) and use a large wrench or long handle on your socket. Remove the center (lift) rod and set aside, you won't be using it. Pour out the rest of the oil that didn't come out before.
Remove the outer body / cylinder from the jack. It's just a light tap fit in the base....give it a tap to loosen it. Save the seal at the bottom to reuse.
Find the hole in the outer body where the rubber plug was. Tap it to accept pipe thread. I used 1/8. This is where you will attach your fill pipe later.
Now for the fun part. Look at the top nut. It has an o-ring inside to seal around the lift rod. Discard it. Now you've got figure out how to get that hydraulic bushing fitted to this nut. I turned down the 3/4 male threads enough to just slip it inside the nut from the jack, where the lift rod passes through, and then welded it up. This is why I bought a hydraulic bushing vs using a std pipe fitting. It was a good grade of steel, easy to weld. You could probably drill and tap the hole in the nut and thread in a fitting instead.
One more thing to take care of. These jacks will have some means of allowing any fluid that gets by the bottom seal on the lift rod back in to the reservoir. This also acts as a vent to prevent the rod from locking, and may serve to prevent overpressure/overextension of the lift rod in some jacks.This may be a small hole near the top of the pressure chamber. This one had a bypass cut into the threads on the top nut. Look at your pressure chamber and top nut and figure out what this is. You will have to seal all this up so the (jack) tester will build pressure without the lift rod in it. I used some high strength epoxy (JB WELD) when I re-assembled everything. Yours may be something that can be welded if desired.
Put it all together.
Ok, so you've got this far..almost there. If you're welding a fitting to the top nut, or drilling and threading, do that now. Next clean everything well, remove all traces of dirt, metal swarf, weld slag, etc. Clean it again to make sure. Don't want to get trash in an injector.
Screw the pressure chamber back into the base if you removed it or loosened it any. It needs to be tight to seal. Slip the outer body back on to the base, don't forget the seal.
Put that top nut back on, using epoxy to seal the threads. Put a good tug on the wrench, it needs to be tight. Now let it set long enough for the epoxy to cure.
Put the rest of it together. Should be self explanatory from the pictures.
Use tape on the threads, but be careful to wrap it so tape won't get into the
fuel/fluid when you use it. Don't want it stopping up an injector.
Notes & comments.
I used 1/4 pipe for the pressure lines, you could use 1/8. No need to use anything larger (look at your injector line, it has a small id). Besides, the smaller pipe sizes have higher pressure ratings.fittingsandadapters.com . Cost was approx $10 ea, plus $10 shipping..$30 total. You may be able to get them local, or build them yourself if you have the right tools. Total cost to build was approx $60, not including gas to get to town and my time. I used a 2 ton jack. It's plenty big enough for the Dexta injectors..they open at 2200 to 2350 psi (150 to 160 atmospheres). Most older mechanical style injectors operate at similar pressures. Use a bigger jack if you already have one spare, but no need to buy bigger than you need.
About cleaning nozzles ...The internal parts of the nozzle are very high precision machined and individually lapped and polished. Do not mix parts between assemblies.The holes in the nozzle are also very high precision machined. DO NOT use steel brushes,(including the brass plated over steel type brush) on any part of the nozzle assembly, even the outside surfaces. Very soft brass brushes are ok, an old toothbrush is fine and you probably already have one lying about. Many of the brass and nylon bottle type brushes have a steel wire center. It may damage critical surfaces. I recommend you just soak in clean solvent and flush with some aerosol parts cleaner. This should remove all the gunk and carbon. Both acetone and MEK are readily available and will dissolve carbon and fuel residues. Both are also volatile and extremely flammable. Find some clean containers that you can close up to soak parts in. Do not stick wire into the nozzle holes to unstop them UNLESS you know (from shop manual) which size wire to use and have a pin vise to hold the wire at the proper extension / length. Do not soak the main injector body in the same solvent pan as the nozzles...the paint will flake off and may stop up the nozzles. Trying to re-polish or lap the nozzles is usually just an exercise in futility. If you can see wear/ damage/scratches in any of the moving / mating parts, they probably will have to be replaced. If you want to try polishing them, use jewelers rouge ....nothing coarser. Rinse thoroughly and remove all traces of the polish.
You must clean nozzle assemblies thoroughly before re-assembling them, rinse in clean solvent...brake parts cleaner in an aerosol can is good for this. After cleaning, dip or spray nozzles with some clean light oil or fuel to prevent corrosion and provide some needed lubrication. Particles of carbon, rust or dirt will clog injectors or scratch mating surfaces. Filter your fuel/test fluid when you pour it in the tester. Lint from shop rags can clog things up also. Find some clean lint free cloths/towels to lay out parts on.
BE SAFE
Some links you might be interested in