 The Geocities File Manager page
How to post pictures on this website
It's really easy if you're patient. Geocities has provided mucho space for lots of photos. (And family members can change anything on anypage, _including the guestbook_ on this website at anytime.)
GETTING STARTED: First you'll need to scan the photo and turn it into a JPEG format, which is the standard file format for photos on the internet. It should be 72 dpi, the same resolution as your monitor, and no bigger than 6" x 9" , less than 200k (kilobytes). You can do this or get it done at most modern photocopy shops.Filenames must contain no blank spaces and the last 4 spaces of its file name must read .jpg so that it displays correctly.
You'll upload this jpg file to the Christ Family folder on the computer ( the server ) at geocities.com, using the Geocities File Manager. Secondly, you'll add some html text on the Christ Family page on which you want the photo to appear, also using the Geocities File Manager.
GETTING STARTED ONLINE: Go to the Geocities File Manager page. The password page comes up first.Wait for it to load completely. Scroll down and type the requested info in the 2 blank text entry fields. Our Yahoo! Geocities member name is: christfamily (Case sensitive) . Password, you know. Click okay button.
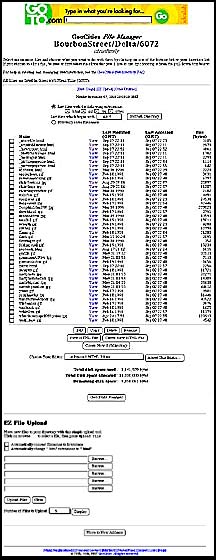
The next page, GeocitiesFileManager, when completely finished loading, will contain all the files that make this website appear. The files with .html suffixes are the actual pages, all the rest are images. ( I put an _ underscore in front of the html files so that (almost) all the pages would appear together) Underneath the list of files is the EZupload area for uploading your jpg image files. Here is one version of the Yahoo!/GeoCities File Manager webpage:
The Geocities File Manager page
1) UPLOAD THE JPG: First, we'll upload your jpg file from where it sits on your computer to the Christ Family folder on the geocities computer.
With the File Manager page displaying, scroll down to the EZ Upload section, where you can upload 5 files simultaneously.
In the first upload section, use the browse button and locate the jpg file on your harddrive by searching through your desktop until you reach it. Click done. When the page reloads, this file will appear alphabetically in the list of all Christ Family files.
2) EDIT THE HTML All the commands you'll need to add new pictures are already typed so you don't have to re-type complicated code (or screw it up). Simply clone existing html text with the COPY command, PASTE it below the original, edit a couple of filenames and voila...c'est tout.
The first page that appears on this and most websites is called index.html, a gateway page with all the buttons, from which you call up all the other pages. But you can edit any of the pages in any order. To add a photo, _picturesPageTwo.html would be a good place.
With the File Manager page displaying, place an X in the checkbox to the left of the file _picturesPageTwo.html , then scroll down until you see the "edit" button and click it.
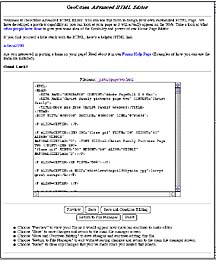
When the next page loads completely, there will be an inset window with the name of the file at the top (ie: _PicturesPageTwo.html) and all of the html coding/text will display underneath in the inset space. This is where you change this document to make your picture appear.
 Advanced HTML Editor page
Use your browser scroll bars to center the inset window in the browser window so you can see it all. Then use the scroll bars on the inset window and scroll down through the html text. Look for the section that makes the bottom/latest photo appear - it will look something like this -
<P ALIGN=CENTER> <A HREF= "joebigair.jpg">joe nails big air on a long board</A></P>
3) Select all this text and copy it. Put your cursor below this text and hit the return button a few times to make some working room. This won't add spaces to the actual page.
4) Paste the copied text into the new space underneath the previous text, so you now have two identical paragraphs, the later being the text you will now edit. Now change the specific image file names to your own image. In the example above, the actual image file is called joebigair.jpg and rests between two quotation marks. Change this to be the identical name of your jpg image.The hyperlink text on the page is joe nails big air on a long board. Change this to read what you want the text link to your photo to read.
Now click the "done" or "use this html" button or whatever its called.
When the _picturesPageTwo.html page has refreshed/reloaded, your hyperlink text will appear under the previous text and clicking it will open your photo.
Congratulations !
Larry 1/30/04
IntroPage | Pix Page | Matt Photos | AboutUs | Email Addresses | Messages | Sign Guestbook | View Guestbook | HowToPost | GeoFileManager