| HOME |
| DirectDrive - The Hows And Whys |
| DirectDrive - Owning a DD |
| DirectDrive - Museum |
| DirectDrive - Tech-Talk |
| DirectDrive - Tonearms |
Nowadays the only way to get a direct-drive turntable is buying it second-hand. Most of the machines now are 20 to 30 years old. Some of them were well used units doing 24hrs a day duty at radio-stations. With the compact-disc arrival in the 80's many of these players lost their job and ended in clubs or on the junk-yard. So today it's getting more and more difficult to find a good model and make it run really good.
Buying
Service
Building a plinth
DirectDrive like Akito Kaneta
Setup
Tuning
Spare Parts
Buying
Where do you get such a machine? 15 years ago it was no big deal buying a Technics, an EMT
or a Denon from your local pro-audio-shop or radio-station. In the 80s almost every
record-studio had some direct-drive player around, with most of them sold cheap in the 90's.
Most of my machines were bought that way. Enter the 21st century some machines are really
getting hard to find, some have actually become very rare at least here in Europe or the US.
Of course you can try to find your dream on the WWW like at EBay but
keep in mind that most machines sold there haven't got better during the years, so beware!
Prices for those machines quite often have risen like a rocket, old EMT's, Denon's or Technics
command huge prices now.
When buying such a machine take care of the following
- Is it complete, does everything work?
- Does the platter move horizontally? Can you move the spindle?
- Do you hear wow or flutter? Does it run too fast/slow
- Optical condition
- Tonearms, Carts
- Audio Technica ATP-Series
- Denon DA-Series
- Lustre GST-801
- SME 3009/S2
- Technics EPA-500
- Fidelity Research FR64s / FR64fx
- Grace GA704/714
- SAEC WE-series
- SME 3012/R
- Technics EPA-100
If parts are missing, today it's almost impossible to get spare-parts. Parts like strobe-lights, spindles, special nuts and bolts, lights and switches are sometimes very hard to find. Check out all lights and knobs work and do what they supposed to do. Keep in mind that even getting a manual or a service-manual for some players is a major challenge.
If the platter moves horizontally or even excentrically keep your hands off! The main-bearing is gone and in most cases there is absolutely no way for repairing it.
Wow and flutter is simply not existent on a good direct-drive deck. If nonetheless you detect wow and flutter or speed fluctuations the motor or motor-regualtion has faded away. Again spare-parts for hall-generators or quarz-regulations are very hard to get hold of these days. On some JVC's and almost all Denon's the difference-signal is generated by reading a magnetic-ring inside the platter. If there is something wrong with this magnetic-ring - and quite often it is indeed - you have no chance to repair the unit. Sometimes though only the magnetic-head is disaligned (the effect is that the platter will run way too fast), so this might turn out as some kind of bargain. But again - be very careful!
Very often you can better the cosmetics of your deck by yourself. With some marks though you have to decide by yourself whether you can live with that. An EMT from a german broadcasting-station was always well looked after technically by special service-people, but optically it might look horrible, technically it will work like new. If a wooden plinth is in bad condition quite often this does not matter at all if you can change it. Most plinths are not of great use for listening to music and you should build your own anyway.
Quite often you'll get offered a complete record-player coming with tonearm and cart. If the tonearm is in good condition and if you like that tonearm you can add some money for it. Most separate tonearms of the 70's however will play in the range of hmmmm a Rega RB-300, some even worse (sadly almost all tonearms supplied by the company that made the deck may fall under this category) Keeping this in mind pay around 100 to 150,- Dollars more for a
BTW: EMTs are a different animal. It makes no sense in putting up a different arm or cart on these. Consider that when you buy an EMT.
Service
Service for most Direct-Drive decks is no big deal at all. 3 or 4 drops of oil a year (read the manual) for the main-bearing and an occasional cleanup is enough. Forget about cleaning the main-bearing If you don't have a service-manual you really should know what you're doing. Keep in mind that main-bearing means motor-shaft and think about it for 5 minutes... Most of the time the risk to damage the bearing is bigger than the possible positive result. EMT main-bearings for example require no service at all.
Building a plinth
A good plinth for your deck is a must, it should be dense, heavy so it will damp the deck's resonances.
Back in the 70s few cared about that so most plinths from that time may look good but sonically they're
a medium desaster. But for most Denons, Technics or Sony decks you can easily fix this by removing the
motor from the original plinth and build a better one. Take the original as a template for your own
massive construction...
Materials for plinths are:
- MDF
- Corian
- Birch-plywood
- Hardwood like mahagony, cherry, maple
- Marble, Stone, Obsidian
MDF plinths have their own sonic fingerprint as MDF tends to damp higher frequencies more than lower frequencies - so quite often the result is kind of dull and "closed in" sounding. MDF may give good results when combined with other materials like some sort of metal. A MDF-Alu sandwich combines the advantages of both materials but it's hard to work with and very expensive. However MDF is quite cheap and easy to work with.
Corian is a material developed by Dupont France for kitchen-benches. It's a composite that comes in an almost granite-looking surface and consists aluminium flakes. The more aluminium (bigger flakes) is in corian the better for your plinth. Sonically for many people corian seems to be the ticket. For my taste plinths made out of Corian tend to sound a bit too laid back, sometimes even a little lifeless. Drawbacks are the finish (not my taste...), high price, and the fact that corian is only available in quite thin sheets.
Birch-plywood is a standard-material for building a good quite neutral sounding plinth. It's not cheap, but sonically quite ideal, easy to work with and easy to get at your local lumber yard. Birch-plywood can be veneered or painted so the result will please your eyes (and that of your wife) too.
These are woods musical instruments are built from. Mahagony seems to sound more pronounced in the bass whereas maple is more brilliant. You can get excellent results with hardwood plinths if you chose a wood that fits to the sonics of your deck (your system, your taste...). The major drawback is the fact that it's not that easy to get pieces that big and they're very expensive.
Stone and marble has minimal damping-properties but it is very dense and has high weight. The sonics of stone-plinths are not to my taste. Obsidian (artificial stone) is a little better here. Anyway - expensive, and you need a specialist that builds one for you.
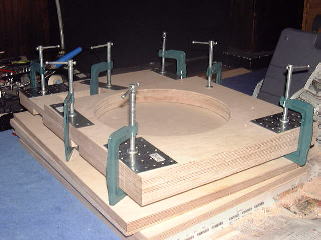
A short description of building a massive plinth made out of ply:
Get 20mm (0,75") thick sheets of birchply at your local lumberyard who might cut it to the right dimensions. Usually your plinth will be at minimum that thick as your deck (80-120mm / 3"-4") so you know how many sheets you need. The thicker your plinth will be the heavier it is and heavy is never wrong. Width and depth of your plinth is defined by the size of your deck, and the tonearm you want to mount on the deck (9", 10", 12"). Round the centre (armbearing) of your arm you should calculate a circle of at least 70mm (4") diameter so you're able to fix the arm easily. Leave at least 30mm (1,25") of wood to all necessary cutouts. Now cut out the top-shelf according to your deck - a template is very good to have - with your jig-saw. Then put in your deck to see whether everything fits and mark the distance of the effective tonearm-length measured from the spindle on the shelf. This is the centre of the tonearm-hole. You should leave at least 50mm (2") wood between the tonearm-hole and the cutout for the turntable. That means you might run into problems with some decks like the Technics SP-10 if you use a short (9") arm, the arm centre then has to move to the front. By the way if you want to mount an SME3009 with a Technics SP-10 the SME-cutout hole must face straight-forward. Now cut out the arm-hole in the top-shelf with a diameter between 20-35mm (0,75"-1,4") depending on your arm.
Now take the top-shelf as a template for the other shelves. Keep in mind that the tonearm-hole on all other shelves should have a diameter of at least 70mm (4") that you're able to mount the nut to the tonearm's shaft afterwards. Keep in mind too, that many decks need less air goin downwards, so the deck's cutout can (and should) be smaller the lower you get. And keep in mind that with decks like the SP-10 where the nuts are tightened from the underside of the deck you have to leave space for the nuts, as you might want to be able to screw them after you're finished. It's quite good for the last one or two shelves to be left without a cutout as that puts even more weight to your plinth but remember that you might need to remove them if you want to change your tonearm or the deck itself - so don't glew them screw them... The other shelves are glued together, then after sanding the whole thing your plinth is ready for veneering or painting.
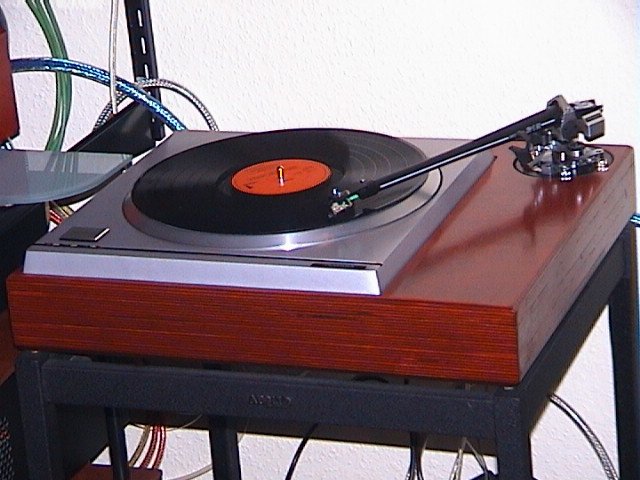
Here's one of my SP-10s ready with an SME IV.
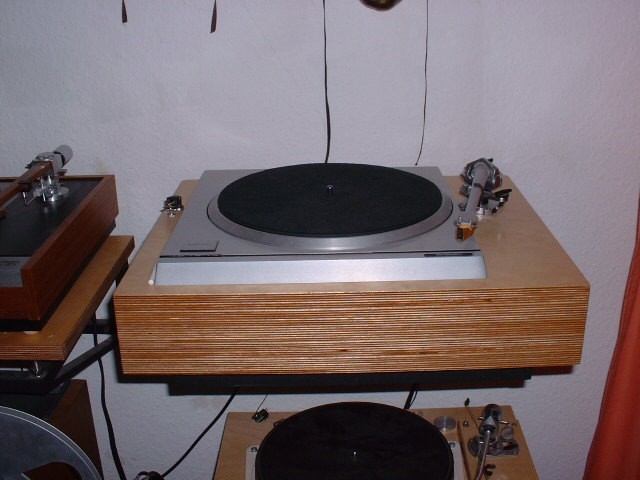
Here you see another Technics SP-10 with SME 312 arm. The - satisfied - owner of the deck sended me the photos after completing his work.
On the Kaneta-Page you can see a different approach for building a plinth for a stripped off Technics SP-10.
Turntable Setup
Now your plinth is more or less sonically dead, but you have to isolate it against floor-noise. For me wall-shelves work wonders here but keep in mind that such a deck is quite heavy... There do exist lots of special turntable-tables from futuristical spiked-metal monsters to concrete blocks. With a heavy plinth you can experiment to put the plinth directly on the spikes of your wall-shelf or turntable-table or you can make use of different feet for your plinth:
- Rubber isolators
- Woodcones
- Spikes
- Air-Damping
were quite common and available from for example Audio Technica. Sonics will get warmer and softer but precision attack and dynamics might suffer a bit. Isolation against floor-noise is not very substantial.
Half balls out of hardwood. They tend to combine the advantages of spikes dynamically but without their drawbacks in tonality. You can experiment with the material under the cones too as their resonances (depending on material and mass) will affect the sonics too.
Metal spikes under your plinth will make your deck play very precise, open with fast transients but quite often have the drawback of sounding a little harsh. The material on which the spikes rest should be dense and heavy - do your own experiments here.
These feet are available for industrial purposes, but they're not cheap (50-60 bucks per foot). Sonically they are very good and available at RS-Components.
Keep in mind that your taste matters here but avoid to place your turntable near the speakers or in room corners where room-modes and resonances have their maximum.
Tuning
There's nothing good in this world what a tweaker can't do better, isn't it. Of course that's true for
Direct-Drive decks too. But don't forget to listen to the deck at least for 8 weeks or so, to know the
sound of your deck before you start tweaking as otherwise you cannot judge wether your tweaks work in
the right direction.
Common tweaks for Direct-Drive turntables are:
- Record-clamps / -weights
- Platter-mat
- Outsourcing - stripping the deck
- Electronics
- The mains
With a record-clamp first check out if it works with your turntable as you may find with quite a lot of spindles of these vintage-decks a record-clamp won't work at all. The same applies for weights, remember that it is very important that the weight is exactly centric. Weights put a load on the main bearing and might cause bearing-noise or put stress on your motor as all regulations try to reach speed within a short time during startup of the platter. A weak motor might even blow. Using a rubber mat dust-particles might get pressed in your records. I don't use weights and clamps.
With many vintage machines you will find that after removing the original rubber mat from the platter it
will ring like a bell. The stock rubber mats did a good job in damping this platter ring but quite often
you will find sone rings on them so that the record is not supported very well.
A good - and cheap - tweak is to put a thin felt-mat (Linn) upon the stock rubber-mat.
On my SP-10s I use a thin cork-mat with a felt-mat (Linn) upon it.
Hard mats made out of glass or acryle should be avoided with a ringin' platter. Puttin' these upon the
stock rubber-mats makes them next to useless.
However there are still a lot of damping-mats around which work very good with these decks. The Audioquest
Sorbothane-mat, special mats made out of leather or combined felt-leather (the same material is used for
the roofs of convertibles) all worked good. The dutch Record-Interface-Mat a sandwich construction is used
by Mr. Van den Hul on his SP10, the expensive Verdier mat made out of rubber and lead works wonders if
your motor can stand the extra weight.
With most other mats you may find the stock rubber-mat working better.
Outsourcing is a more radical tweak. Outsourcing means that you put all electronics out of the deck into an
external housing. The result will be that - depending on the deck of course - it will run much smoother.
Start with the power supply if it's not external yet and you reach app. 50% of the potential of outsourcing.
Most quarzes work much better without the magnetic fields and mechanical vibrations of the power supply.
If your turntable has a brake and if you don't need it, away with it it causes resonances too. Stripping the
deck you can go that far that only the motor and the platter is left.
Stripping a deck works by minimizing electrical, mechanical and magnetical influences caused by the electronics
of your deck. Removing the often ringing chassis however means that you need to built a new switching panel.
Often you will find that the whole work is not worth the sonic benefits but some people swear by it.
Mr Akito Kaneta seemed to dislike the original chassis of his SP-10 too. You can see a Kaneta-SP-10 on the Kaneta-Pages.
There are several possibilities to tweak the electronics in your deck. Disconnecting the strobe-circuit from the motor-regulation is a common tweak for the SP-10. You can also star-earth all boards, or build up a complete new regulation. But the results here are not comparable to the others described above.
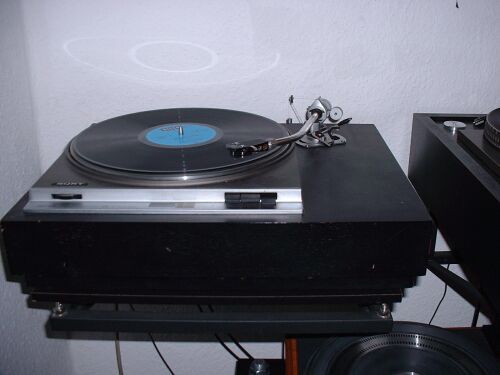
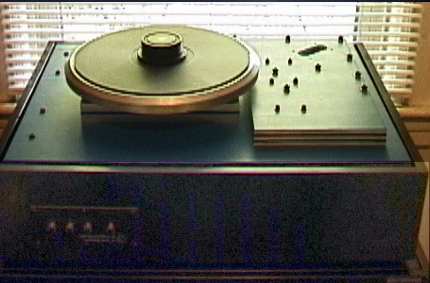
With some of the older DirectDrive turntables the mains turn out to be the enemy number one. Most early Servo-Circuits depend on quite a constant and clean mains-voltage. Start by using a good shielded mains cable and try out mains-filters. Decks like the Sony 2250 pictured above will thank you by really playing in another league.