IO Commander
Controlling your Model Railroad from a PC.
Rev. June 99
Switching
Hardware :
Three different interfaces have been developed
Version 1
One 8 bit parallell port are connected to 8 drivers on a PCB to controll 4 two-way switches
with dual solenoids. (Slow motion switch machines is not directly supported)
Version 1 was built mostly for testing. I have been using it for approx.
1 year without problems with Fleishmann N-scale switches. I will not use it in the future
mainly because it only supports four switches for each parallell port. Another potential
problem is that it does not have hardware protection against burnt switch solenoids.
It only depends on correct functioning software to protect the switches.
This is not adeqate on larger layouts. I will use Version 1 for Uncoupling tracks and
magnetic relays in the future. I will document it sometime in the future for building drivers
for uncoupling tracks. Update : I have installed one card and wired it to 8 uncoupling tracks
(Fleishman and Roco). No problems so fare.
Version 2
One 8 bit parallell port are used to controll up to 127 switches. Version 2 consist of
two different PCb's. A decoder Card with switch protection current limiter and a driver
card with support for 8 switches. You need to add one driver card for every eight switch
Status December 1996
Decoder card
It has been built and tested
Part list is available
PCB layout is available
Building instructions are available
Connection schema - Driver card Version 2
Driver card
It has been designet and PCB has been printed - ref. Version 3 driver card.
Version 3
updated March 1998
I have modified Version 2. Driver card is identical, but I have added some circuits at the
decoder card. Both are still usable for version 2 and 3.
With version 3 wiring, each driver card supports ut to 16 switches. The big drawback is that
version 3 probably requires rewiring of your layout.
Version 2 are wired conventionaly with two wires from drivercard to every switch and one
common ground(return) wire.
Version 3 however requires a different wiring:
Two wires from the new decoder card and ONE wire from the driver card (Instead of common return)
This actually reduces the number of wires since you are able to use a two wire common bus
from decoder card to all your switches and only one wire for each switch.
Changes Wireing March 1998
I have made some small changes to the wireing between decoder card and driver card
(but not changes on the cards). This will reduce leakage from the condensator and increase
power for switching.
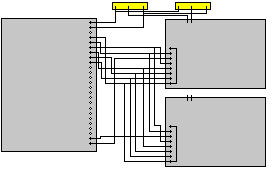
This picture shows one decoder card to the left, the first two drivercards to the right,
and the first two switches at the top.
Changes components March 1998
With my setup using 16.85 Volt AC as powersource, I will get 15.18 Volt DC
/ 1 Ampere to the switch relays. This seems ok for Roco and Fleichman switches. I have not
tried it with Peco yet, but expects problems with them (Roco and Fleichman has a resistance of
aprox 20 Ohm, Peco is 5 Ohm). I have therefore replaced the BD135 power transistors on the
driver card with BD143 Darlington Power transistors - (they have a different pin layout - I had
to place them in the oposit direction (heat sink the other way). I probably have to do the same
on the drivercards that will be connected to Peco Switches
Experience
So far I have installed one decoder card, and one driver card on my layout. I did have some
problems because of a litle bit weaker signal compared to my old system. I had to clean the
contact breaker inside some of my older switches (mostly ten year old Fleischman switches).
I also did some modifications both on decoder card and driver card (included in building
instructions
Building Instructions - Driver card Version 3
Building Instructions - Decoder card Version 3
Software :
Availability
I have uploaded some of my software drivers. All of them are working, but the user interface
are crude. Download
iococt97.zip
and unzip them into an empty directory.
First task is to find the adress of you Parallell Port
(My 8255 Homepage will give you some backgroud information of printer Ports and building
instructions for a simple Parallell Port LED tester)
There are six programs to help you with that:
iomdaini.com - This program will initiate the MDA port for output and send 00000000 out.
iomdatst.com - This program will initiate the MDA port for output and send 11111111 out.
iopp2ini.com - This program will initiate 2nd port for output and send 00000000 out.
iopp2tst.com - This program will initiate 2nd port for output and send 11111111 out.
iopp3ini.com - This program will initiate 3rd port for output and send 00000000 out.
iopp3tst.com - This program will initiate 3rd port for output and send 11111111 out.
Start by connecting a Parallel Port tester to your selected parallel port
Parallel Port information - and tester
run iopp2tst, if the light gets on - run iopp2ini and see that they goes off.
if this didn't work try:
run iomdatst, if the light gets on - run iomdaini and see that they goes off.
if that didn't work eighter try:
run iopp3tst, if the light gets on - run iopp3ini and see that they goes off.
You should now have found your parallel port adress.
Next step is to test software.
Initial buffer test
install a dummy version of io by starting iobuf
You have now installed a TSR program that are able to receive commands but ut will not
do anything with it. It will tell you where it has been installed, and If you would like
to know where the buffer is installed, run ioiacat.
ioterm95 as a simple command interpreter for iOcommander. start ioterm95 and you will
get an empty line with no prompt. type - in capital letters:
TSR WRITE TEST
EXIT
You should now be back on your ms-dos prompt.
current version only accepts capital letters and does not give syntax errors.
You have now sent a command to iocommander, but iocommander is not started.
You will have to use iocrfib (IO Commander Read From INPUT buffer) to see if
it has been received.
If you was successful the respons is
RFB-000: WRITE TEST
if not you will receive a message:
RFB-001: BUFFER IS EMPTY
You are now ready to start IOEXEC.
I have suplied you with three versions of this program:
ioexec0.com - A dummy version that does not sends commands to Printer Port.
ioexec1.com - A version with switch driver version 1
ioexec2.com - A version with switch driver version 2
ioexec3.com - A version with switch driver version 3
Connect Parallell port LED tester
Connect Switch interface card and
Start version 2 or 3 depending of your switch interface version
Start ioterm95
if you have you parallel port adress MDA - type
CONFIG 63 3
CONFIG 52 188
if you are connected to PP2 - type
CONFIG 63 3
CONFIG 52 120
if you are connected to PP3 - type
CONFIG 63 2
CONFIG 52 120
Start switching software module by typing
REM SWITCH CARD NUMBERS
CONFIG 50 1
REM CONTROLLER TYPE
CONFIG 51 3
REM NO OF SWITCHES
CONFIG 59 8
CONFIG 18 2
try switch 1 by typing
TSR SWITCH 1 1
TSR SWITCH 1 0
you should see signals on your LED's.
If successful replace Parallel Port LED tester with Switch Interface decoder and driver,
and try switching with
TSR SWITCH 1 1
TSR SWITCH 1 0
You are now able to exit ioterm95 by typing EXIT, You do not need to use CONFIG
Next time you starts ioterm95 because IOTERM continues running until you turn of your
computer ( or starts IOCLOCK or IOBUF)
If it does not work.
Have you typed everything in capital letters ?
Did you remember to start SWITCH commands with TSR ?
Have you done any mistakes ? Try to restart by typing IOEXEC and repeat CONFIG commands
Have you run out of memory ? You have probable restarted one or more of the TSR programs
many times - try to reboot - you need less that 640k to run this programs.
IOEXEC and IOCLOCK can not be run on the same time instead use IOEXEC and start clock
by typing
CONFIG 23 1
Setting up your environment
you need two files.
init.ioc
ioterm95 always looks for init.ioc in current directory when starting. init.ioc can contain
commands.
Sample init.ioc for port 2:
REM SWITCH CARD NUMBERS
CONFIG 50 1
REM CONTROLLER TYPE
CONFIG 51 3
REM NO OF SWITCHES
CONFIG 59 8
REM OUTPUT ADRESS FOR PP2
CONFIG 63 3
CONFIG 52 120
REM START IOCEXEC
CONFIG 18 2
REM START IOCLOCK
CONFIG 23 1
batch program for starting IOC
IOEXEC
IOTERM97
Switch Driver 4
This new driver can be configured to support driver type 0,1,2 and 3. It is linked
with ioexec 1.5
iocjun99.zip
Technical descriptions
(Source code is currently not available)
Switching is implemented as an include file to IOEXEC.ASM
A Software driver is included by SWITCH_TI.ASM
This driver is available in different versions :
swchdrv00.asm
This driver simulates switching.
swchdrv01.asm
This driver support Switch card hardware version 0 and 1
swchdrvXX.asm
This is planned to support newer versions of Switch cards
Users Guide - IOEXEC. SWITCHING
DRAFT
Switching is done by putting a command into IOEXEC input buffer:
SWITCH
The current version support switch number 1 thru 9 and position 1 or 0.
example :
SWITCH 1 0
SWITCH 2 1
SWITCH 9 0
Warning INPUT controll is very crude. It will report errors if Position isn't 0 or 1.
Missing position will be defaulted to 0. This might change in the future.
It will also report errors if switch number is non existent. All letters must be uppercase,
both switch no and position is one position and each must be prefixed with one and only one
space. A future version will change the format to a two position (possibly three) switch
number .
Update March 1998
Newer version ofIOEXEC
does work with SWITCH numbers at least up to 99 - The old ones probably
also works. I have not built newer versions of IOEXEC with support for Driver type 1 and 2,
hovewer I am able to mail you one if you need it. I plan to make the next version of IOEXEC
with support for all switch driver types
Using IOTERM
IOTERM does not support SWITCH directly. You must use the command TSR SWITCH n x
A future command might support SWITCH directly.
This page hosted by
 get your own Free Home Page