Pine BasketThe Heart of Almanor
 Home
Gourds
How to Make a Pine Basket
Row 3
Other Starts
Wood Burning
Gourd w/pine needle rim
Dyeing
My Home & Family
Home
Gourds
How to Make a Pine Basket
Row 3
Other Starts
Wood Burning
Gourd w/pine needle rim
Dyeing
My Home & Family
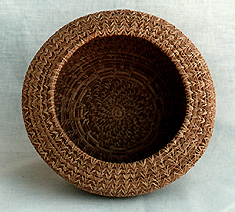
Pine Needle Baskets
The Heart of Almanor
Baskets by Debbie Norton
2784 Heartland Acres
There are many ways to start a basket
Teneriffe
(A wire-covered ring, usually with weaving in the center)
Knot start
(Just like it sounds--a start made from a knot.)
Nut Slice start
(This is done on a black walnut slice.)
Figure Eight
(This is the one we will use. See photos below.
Oval start
(This is one of the easiest to do.)
Donut Start
(Very much like the figure eight).
There are probably 20 different ways to start. These are the most popular
Supply's needed:
Scissors
Pine needles, washed and dried and "seasoned"
Raffia, or upholstery thread, or waxed linen
Needle (I use an 18 sharp)
A cup or bowl of water if Raffia is used.
Good lighting
And Time
Seasoned Needles and other terms for now are explained at the bottom of the page.
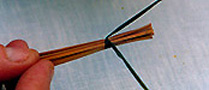
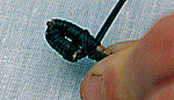
You will need 7 to 12 needles to start off. Cut off the black end ( Cap.) This makes the ends even. You will want to wet down your raffia and split it down till it is about 1/4 of an inch wide. Many people insist the raffia stays flat. I like to twist mine. Just twist till it starts to twist against itself. This makes it stronger, just like thread, yarn, and rope. The twist makes it less likely to wear thin in one place. Tie a knot with raffia--do not cut the raffia tail off. Wrap to the end of the needles, wrapping over the tail of raffia. This is usually the cut blunt end. Wrapped area should be 1 inch or less.
 Now carefully bend the needles in half. Use the raffia tail as a handle. It acts as an extension to the needles, and helps you hold the two groups together.
 Do a couple of wraps over the raffia tail. Hold it tight and wrap tight. If it is loose, do the whole thing over, please. It should not be loose against the needles. This is the end of the first row.
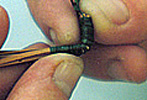
 How to do the figure eight (8). See how the eight crosses in the center? That is what needs to happen here. As you start around the blunt end of the needles, begin to stitch in the center, crossing under the unwrapped needles every third time wrapped. OK, let's say a Wrap looks like a 0 and the figure eight looks like the number 8. Then the sequence would look like this. 0 0 8 *0 0 8 *repeating.
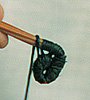 The needles in your hand are called the bundle. See how the raffia crosses under the bundle. Then is stitched into the center of the first row each time you do a figure eight. The Wraps are done just around the bundle. Again, it will be wrap, wrap, figure eight, wrap, wrap, figure eight. Getting the start is the hardest part of the basket. When you do a figure eight, it pulls the two rows together and makes them strong.
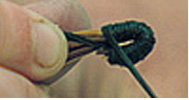
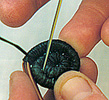
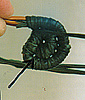 See the arrow--that was the end of the first row and the beginning of the second row. Look carefully. See that there are no long stiches spanning the distance between row one and row two. If there is a long stich, then you missed going under the bundle when you did your figure eight. You may want to add a few needles to the bundle now, too. How? Just poke them into the center of the bundle and hold them there while you do a couple of wraps. Please keep adding needles every few stitches--it is important to keep the size of the bundle the same as the start.
 You should be running out of raffia by now. To start a new string, put the needle in the center of the bundle and pull through. Add the new one the same way--take the tails and wrap over it along with the needles. Adding raffia in this way is only done on a wrap area. It is done differently once we get to the open core work. Add needles again, please. Once we get done with the second row, you can rest your hands.
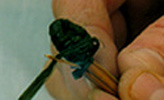
 The end of the needle is on the beginning of the second row. The end of the wrap is the end of the second row If yours looks like this, you are done with the hard stuff. You should be able to count from the center hole to the outer edge, two rows from all sides. Rest your hands and do some neck stretches and shoulder rolls.
To cut down the load time, we have another page.
�
top of page
What are seasoned needles?
? Well, to season, many people will soak the needles in near boiling water, or soak
overnight. If the needles get too hot, a white resin will rise to the surface. The
needles will be sticky to the touch. By doing this and/or soaking over night, your
needles will absorb too much water. Once you work dries, it can be loose and not as strong.
So, to season needles. I recommend you simply wrap them in a kitchen towel, run warm
water on them (10 seconds is enough). Now let them set for overnight or 8 hours.
Wrap in the wet towel. Tthey will take up as much water as is needed. You will be
working with dry needles as soon as your basket gets to be three inches across . Yes, I
said dry needles. Any dry needle will bend that much more easily and, again, you want to
avoid shrinkage.
So what is Raffia, and where do I get it? Raffia grows on the Raffia Palm. I highly
recommend you do NOT buy it from a craft store. Or, buy the fireproof stuff wrapped
in plastic. In 28 years of making baskets, the best raffia I have ever purchased
has always came from The Caning Shop. No, I don't get any kick backs. It is just a fact.
It is the nicest, strongest stuff I've found. It's natural and light in color. It holds up to time better than the treated stuff. top of page
� 1997 [email protected]
This home page <�> Copyright 1998, by Debbie Norton.
Photography by Greg Norton of Creative Images by Greg
Photos <�> Copyright 1998, by Greg Norton
This page hosted by

Get your own Free Home Page