Sim Show Tutorial
This tutorial is to help familiarize you with using Sim Show and it's uses. "Sim Show" is used to help preview the skins you've made for your sims.
If you don't already have "Sim Show" you can download it here at the Sims website, just go to "get cool stuff", then "make cool stuff". Another place you can download it at is here at the Sims Resource in the programs area. Remember when you download "Sim Show" you have to install it in the "maxis" folder. If you save it in another folder or directory then the game will crash when you open it.
Once you've downloaded and installed "Sim Show" go to the "maxis" folder and open the program. If you need to find where the "maxis" folder is, then go to "my computer", then "c:", then "program files", then "maxis", in the "maxis" folder is where you'll find the "Sim Show" folder.
You need to be a little familiar with the name of the files for the skins. For example "B003FAFit_01.cmx", if you don't know what that means then go to my other tutorial here to know about the file names. Once you know a little about the file names then using "Sim Show" will be easier. When you first open the "Sim Show" folder you'll see the "Sim Show" icon, a "game data" folder, and the "read me" file. For now just click on the "sim show" icon. Here's what Sim show looks like when you first open it:
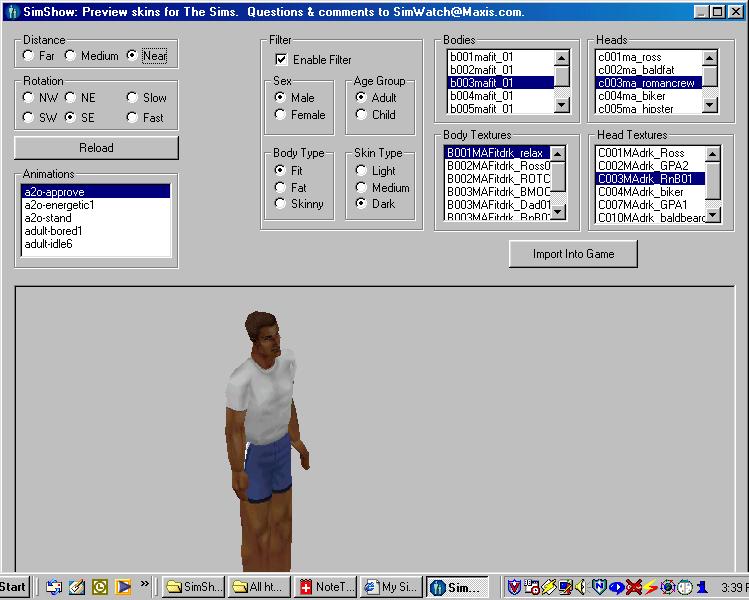
First of all my files that I have in "Sim show" might be a bit different from yours because I have added more files. But everything works the same way, so don't worry. Before you make a skin for your sim you need to know what body mesh to use. If you're going to redo a head file then you need to know what heads go together. You'll see what I mean in a minute or so. First if your making a skin the main areas you'll use are the "bodies" and "body textures" area. In the "bodies" area are the meshes. In the "body textures" area are the skins (bitmap images) that go with the selected mesh. Go ahead and mess around with different "bodies" and different "body textures". This will let you see that some meshes are made for shorts, some are made for long sleeve shirts, etc. If you're altering a head file then you'll mainly be using the "heads" and "head textures" areas. The items in the "heads" area are the head meshes, while the "head textures" are the bitmap images of heads. If you click on different "heads" and different "head textures" you'll notice some are very weird together. So when that happens you need to choose a head mesh that will go with the head bitmap image.
Later when you've loaded your skin or head you can use the "rotations" to make the sim turn or make them move slowly or fast while staying in the same spot. In the "animations" area you can see how the skins will fit when they do different movements. Also while you're chosing your head or skin also remember to check mark the circle for the sex (male or female), the age (adult or child), and the skin color (light, medium, dark). Now just choose a mesh that you like from the "bodies" area. Or if you're doing a head then choose a mesh head that you like. Now write down the mesh skin or head number and the sex, the skin color, and the age. This is what you need to remember when you're done doing your skin or head image file. If you have this window open along with the skinning or head tutorial then later in those tutorials you'll know why you need to know this information.
Now all you have to do is go to your painting program, one that supports layering. If you don't know how to skin or alter heads then go back to the tutorial list and choose one then come back here after your done altering the skin or head.
Now when you're done doing the image for your head or skin then put the file into the "textures" folder which is found in the "game data" folder, that's in the "sim show" folder. This is where all the image files (all are bitmap file types) are located. If you have a created a custom mesh that is not in "Sim Show" then you put the custom made mesh into the "cmx 3" folder instead of the "textures" folder and your bitmap image into the "textures" folder.
Now you can open up "sim show" and choose the sex, the age, the skin type and then choose your file out of the list to preview the skin or head you've just made. Make sure the seams on the clothes meet up right and make sure everything else looks good. If it's not good then go back to your painting program and redo it, then put it back into "sim show" and keep doing this until you get it how you like it. Now once it's to your liking then click on the "import into game" button. Now your skin will be in the game for you to use! :)
That's it your done :) But if you've noticed some of the skins and meshes that are in the game are not in "sim show". But if you go to my downloads area, there you'll be able to download a file that contains all of the skins and meshes in the game so you can use them in "Sim show". Once you've downloaded it then remember to read the "read me" file that Richard Ward had included.
If anything on this tutorial is not clearly explained then let me know by going to my suggestion form. Or if you have any questions or comments too. Thanks :)
Last updated on July 14, 2001