 |
|
Parker 61 Barrel and Connector Replacement.
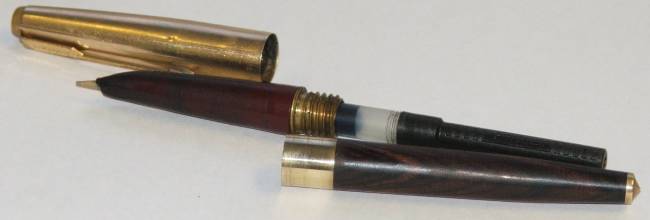
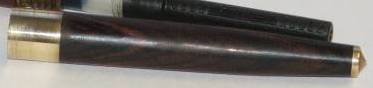
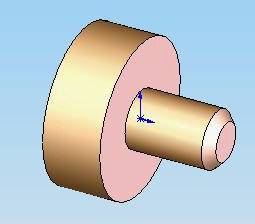
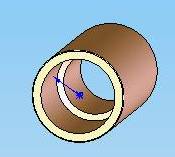
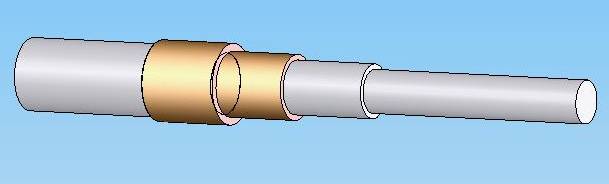
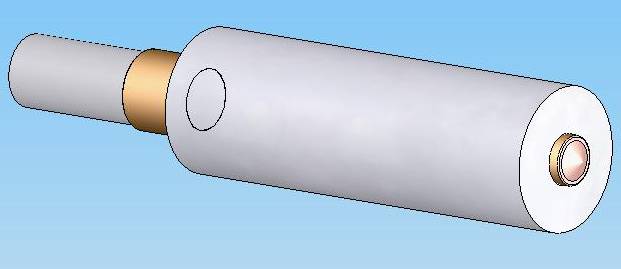
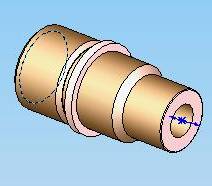
This article is about how to replace the barrel and connector on a Parker 61 fountain pen. The pen in the photo below has the barrel and connector to the design in this article. As you can see, the standard Parker cartridge convertor fits.
Background
In the late 1970's (1978 or 1979) my mother gave me a beautiful Parker fountain pen. This pen had been 'lost' in a stationer's shop for many years, to the extent that it still had a price tag on it displaying the pre-decimal price of 6 Pounds, 6 Shillings. The UK decimalised on 15 January 1971, so the pen was 'New, Old Stock'. Anyway, neither the shop nor my mother knew what the pen was, or what it was worth, so the shop keeper converted the price into decimal pounds & the pen became mine.
The pen took me through school and college, and was my main pen until 2004 when the barrel finally cracked and I couldn't use it. I put it to one side when I was given a repair quote of £79 for it. Ow! This called for a cheaper pen to be used in replacement. So, I moved over to Parker Vector pens, and wore them out at a rate of about one every six months or so.
It suddenly dawned on me just how much I was spending on these ghastly Parker Vector pens. The Vector does not write nicely, and isn't a patch on my old pen. In June 2007 I did some research to find what my old pen was. It turned out to be a Burgundy Parker 61 Custom with cartridge convertor. The pen is now a 'Vintage/ Collector's Pen' and comes with a replacement price of around £55. A new equivalent is the Parker 100, their flagship pen, at over £130. The replacement price is too much for me, so this project was born. I was going to make a new barrel. Within minutes, the project grew as I discovered that the barrel had a triple start thread on it, and I couldn't copy that easily (external threads, yes, but an internal triple start thread is a bit much), so the connector holding the hood to the barrel had to be replaced too.
The Project
The project described leads you through the making of a barrel and connector as I did it. The barrel shown takes the 2007 model Parker pump action cartridge convertor. The previous pump action cartridge converter (2000 - 2006) fits too. The stainless steel 'vacumatic' style cartridge and the Parker cartridges will not fit they both need more room. For those who want to limit the project to a cartridge conversion for a Capilliary Parker 61, you will only need to make a connector. The whole project is on this page and may be jumped to by clicking on the links below:-
Tools
Materials
Making the Barrel
Diameter Gauges
Barrel Jewel/Tassie First Machining
Barrel Blank
Barrel Threaded Insert First Machining
Barrel Mandrel
Barrel Threaded Insert Second Machining
Adhesive
Finishing Jewel/Tassie
Shaping the Barrel
Making the Connector
Tooling
Cartridge Insert
Connector Initial Machining
Connector Tooling
Connector Final Machining
Soldering
Much of what is done in this project is precision work. Tolerances of +/- 0.1mm are on the upper side of what you should be prepared to accept. I made everything at least twice while finalising the design and getting everything to work. One part, the brass threaded insert in the barrel, I had to make three times. This project relies on the accuracy of the tooling you make just as much as on the accuracy of the pen parts themselves. Take as much care with the tooling as with the pen parts.
Note also, that many of the finished thicknesses are very small, so do not force anything.
Tools
The following tools are needed:-
For the barrel
1) Vernier Caliper.
2) Micrometer.
3) Metalworking Lathe.
4) M10 Taps or lathe gears to cut a 16 tpi triple start internal thread.
5) 600 grade wet & dry paper.
6) Drills, 9mm, 7.5mm, 6mm, 3mm.
7) Tailstock chuck.
8) Centre Punch.
9) Parting Tool.
10) "Profile.exe" program from Marv Klotz's site.
For the connector
1) Vernier Caliper.
2) Micrometer.
3) Metalworking Lathe.
4) Lathe gears to cut a 34 threads per inch thread.
5) Plumber's blow torch.
6) Drills, 7.5mm, 5mm, 4mm, 2.8mm.
7) M10 Die or lathe gears to cut a 16 tpi triple start thread
8) For the connector tooling M10 tap or lathe gears to cut a 16 tpi triple start internal thread
9) Tailstock dieholder.
10) Tailstock chuck.
11) Parting Tool.
Back to Index
Materials.
You will need the following materials:-
For the barrel
1) About 50mm of 12mm brass bar + chucking length.
2) About 100mm of good quality hardwood rod, at least 12mm diameter. I used purpleheart.
3) Epoxy Adhesive
4) Sanding Sealer
5) Wax Polish
For the connector
1) About 25mm of 12mm brass bar + chucking length.
2) About 15mm of 4mm brass bar + chucking length.
3) Plumber's solder, 3mm length.
For the barrel tooling
1) About 120mm of 10mm dia steel bar.
2) 10mm of 20mm diameter steel bar + chucking length.
For the connector tooling
1) About 20mm of 10mm dia steel bar.
2) About 20mm of 20mm dia steel bar.
Back to Index
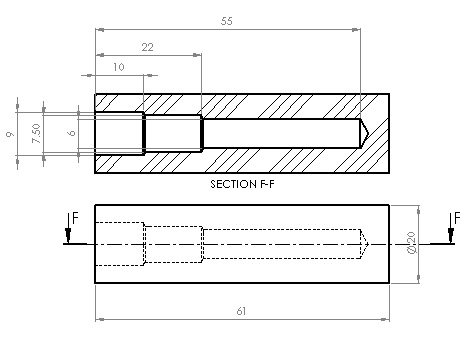
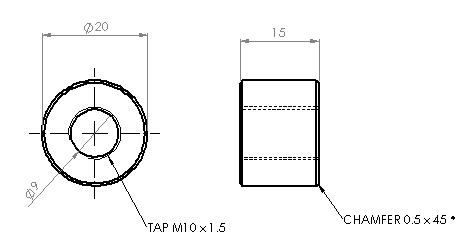
Making the Barrel
This is what we're trying to make:-
Diameter Gauges
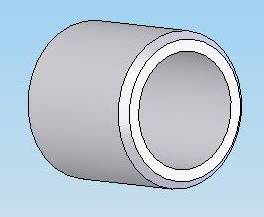
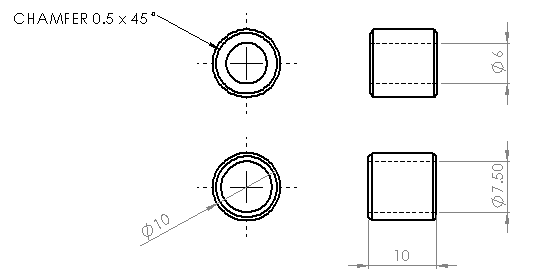
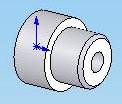
The first thing you need to do is to make a number of drill diameter gauges. Part three off 10mm lengths from the 10mm dia steel bar and drill 7.5mm, 6mm and 3mm holes, one in each gauge. Also do the same with a 10mm length of 20mm dia steel bar, drilling a 9mm diameter hole through it this time. These gauges are used to determine whether the mandrels etc are the correct diameter. Your drills may be a bit worn, so turning the mandrel to 7.50mm diameter may mean that it won't go into a hole drilled by your 7.5mm (nominal) drill, because it's now actually only 7.45mm due to wear. The 7.5mm gauge is shown below in a trimetric view, with drawings of three gauges below that. The 3mm gauge (not drawn) is made on the same lines as the other three.
Back to Index
Barrel Jewel/Tassie
Now is the time to partly make the Jewel/Tassie that goes in the end of the barrel. Chuck a piece of brass at least 8mm diameter, and turn a 4 to 4.5mm long peg on the end, with a peg diameter of 3mm. Check the diameter of the peg with the 3mm diameter gauge made above, and reduce the diameter by 0.05mm every cut until it fits. Now, part off the unfinished Jewel/Tassie with 3mm of unturned bar attached to the peg. This is shown below:-
Back to Index
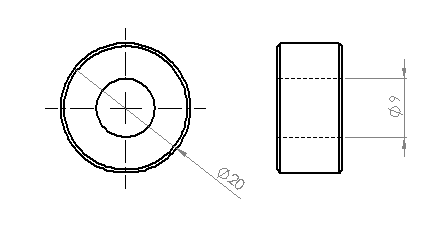
Barrel Blank
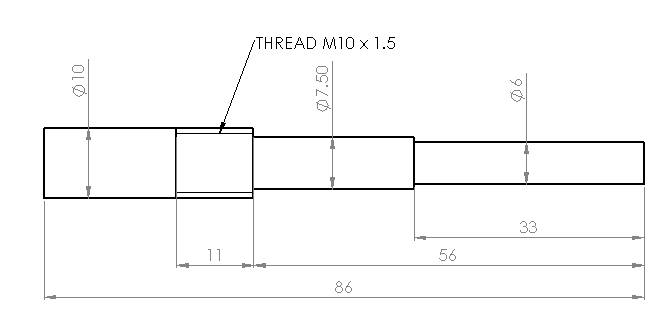
We have got to the stage where the wooden barrel blank is made and drilled. I made mine 20mm diameter on the outside, as that was convenient from the size of the timber I was using, the size of the chuck I have on my lathe and the fact that further machining of the Jewel/Tassie is needed. The size is not really important except that it must exceed 12mm. So, turn down the outside of the timber to a size that is convenient, and face off the tailstock end. Drill three different size holes in it with the tailstock chuck, 9mm diameter for a depth of 10mm, 7.5mm for a total depth of 22mm and 6mm for a depth of 55mm. These depths are the depth of the parallel section of the drilled hole. I assume that you have the usual 118 degree angle on your drill bits. Part off the barrel when it's complete at a length of just over 61mm.
Back to Index
Barrel Threaded Insert
Here you have to make a decision. The Parker 61 barrel (on the cartridge convertor variants) has a triple start 16 tpi thread. Do you want to copy this? It is not easy to make an internal thread of this type. If you do, there will be no need to make the connector. It's all up to you.
Personally, I didn't feel capable of making the thread, which forced me to make the connector as well. If you choose to match the Parker thread, follow the procedure outlined below but substitute the Parker thread on the Barrel Threaded Insert and the Barrel Mandrel.
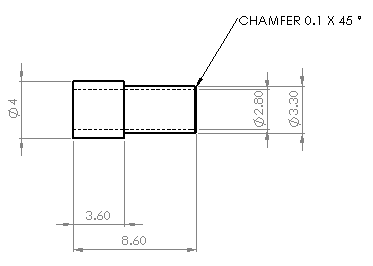
We are ready to part machine the Barrel Threaded Insert. On this design there is a wide band of brass visible at the connector. This is a 'design feature' I had to put in due to the coarse thread I was using and the very small diameter of the Parker 61 barrel. The outside is only 11.14mm, while the thread is M10, has an external diameter slightly in excess of 10mm at the crests of the tapped grooves. This doesn't leave much room to put both brass and a timber covering. On my first attempt I had 0.3mm of timber and about 0.25mm of brass. Well, the timber tore off on the penultimate profile cut (Arrgh) and the brass unzipped into a spiral spring when I removed it from the mandrel. I was less than happy!
Chuck a length of 12mm or 1/2" diameter brass. Drill a 7.5mm hole 22mm deep into the brass with the tailstock chuck. Now drill a 10mm deep hole with a 9mm diameter drill. This 9mm diameter hole is tapped M10 as far as the taps will go. Use taper, second and plug taps to reduce the tapping force as much as possible. Use cutting paste. Finally part of at a length of 21mm. Having completed this, we've gone as far as we can with this part before making the mandrel.
Back to Index
Barrel Mandrel
The Barrel Mandrel has been left fairly late, because once it goes into the chuck, it doesn't come out until the barrel is finished. That sounds scary!
Saw off a length of 10mm steel, at least 86mm long. Chuck it with at least 70mm protruding from the chuck. Tighten the chuck as tight as it will go and metaphorically throw away the key. Face off the tailstock end. Turn a length of 56mm down until the 7.5mm diameter gauge runs along the reduced mandrel diameter. Take care with whip, and only take cuts with a maximum of 0.25mm depth with each cut, reducing to 1/10th that on the final cuts. Once complete, reduce the end 33mm to a diameter of 6mm, checking with the 6mm diameter gauge. Finally, thread 11mm of the 10mm diameter section with an M10 die using a tailstock dieholder.
Back to Index
Barrel Threaded Insert
Fit the part machined barrel threaded insert on the mandrel and screw it up as far as it will go. It will not be removed from the mandrel until the barrel is complete.
Turn the outside diameter of the threaded insert to 11.14mm in very small increments. As you approach 11.14mm ensure that the quality of the surface is as good as you can get. Part of this surface is the finished surface of the pen. When complete, turn the 10mm furthest from the tailstock down to 9mm (well, until the 9mm diameter gauge just fits over it). If cutting dry (and I always do), don't touch the 9mm diameter section - that way you won't have to degrease it.
Back to Index
Adhesive
Using the epoxy adhesive sparingly on the 9mm diameter section of the threaded insert, glue the timber barrel to the barrel threaded insert. Leave for 24 hours for the epoxy to harden fully even if it's 5 minute epoxy. You've gone too far to be sloppy now.
Face the outside of the timber to a diameter exceeding 11.14mm and note this dimension. Face the timber off at the tailstock end so that the length of the timber is exactly 61mm. Drill a 3mm hole into the mandrel void. Using more epoxy, glue the part machined Jewel/Tassie into the end of the timber. Leave for 24 hours for the epoxy to harden fully.
Back to Index
Finishing the Jewel/Tassie
The final machining on the jewel/tassie can now be completed. Turn it down to the dimensions shown in the drawing.
Back to Index
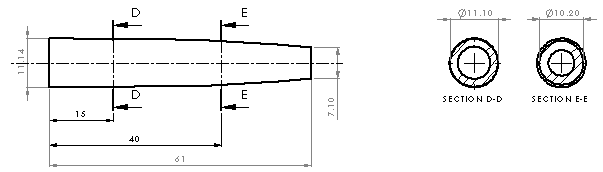
Shaping the Barrel
The shaping of the timber barrel can now be carried out. The accurate 'Parker 61' shape is done with a parting tool and Marv Klotz's very clever 'Profiler' program. No skill at turning wood is required (just as well in my case, as I have no skills in woodturning whatsoever). Four key dimensions are entered into Marv's program and it gives you the diameter and depth of cut at each incremental turning step from the tailstock. As you work through the cutting list, the barrel slowly emerges like magic from the solid barrel blank.
Download Marv's program here, and unpack it from its .zip file. (or if the link doesn't work, go here for the whole page and look for 'Profile')
Read the instructions that come with the program!
Read the instructions that come with the program again!
Highlight the text below, copy it and paste into 'Notebook'. Save the resulting text file as 'Profile.dat' in the same directory as you saved the Profile.exe.
Data for PROFILE.EXE
Parker 61 Barrel
The measurements below are in mm. A 1mm axial feed is assumed.
This must be less than the width of the parting tool.
A parting tool width of at least 1mm is assumed.
A stock diameter of 20mm (ds=20) is assumed. Put in your value noted under 'Adhesive'.
anything above the line below is ignored
STARTOFDATA
ds=20 ;stock diameter
toolt=1 ;tool type (1 = square tipped, 0 = round tipped)
wt=1 ;tool tip width (ttype=1) or diameter (ttype=0)
dxd=1 ;axial stock cutting increment
scalex = 1 ;x axis scale factor
scaler = 1 ;radius scale factor
;x is measured positive from end of stock (which is defined as x=0)
;r is RADIUS (not diameter) of stock at point x
;if using diameter values is easier for you, divide the value used for scaler
;by two.
;x,r values
0,3.55 ;right hand end of stock
21,5.1
46,5.55 ;
71,5.75 ;
;if spline fit not specified, linear interpolation is used
sseg=0,4 ;spline fit interpolation between 0th and 5th data points
;above the line below a comment requires a leading semicolon
ENDOFDATA
this comment is below the line and has no semicolon
Run the program. The cutting list will now be called 'Profile.out'. Print the cutting list and take it to your lathe. The cutting list will look as below (based on a 20mm diameter initial rod). The values below may be used without modification if you make the barrel blank 20mm diameter - then there's no need to download the program. If you do this though, you'll be in the dark about how the program works - something I don't advise as it's completely nutty to use a tool you don't understand.
stock diameter = 20.000
tool width = 1.000
axial cutting increment = 1.000
start with left side of tool against end of stock
c=compound rest setting (axial feed)
d=diameter of resulting cut
doc=depth of cut
i c d doc
1 0.000 7.100 6.450
2 1.000 7.248 6.376
3 2.000 7.395 6.302
4 3.000 7.543 6.229
5 4.000 7.690 6.155
6 5.000 7.838 6.081
7 6.000 7.986 6.007
8 7.000 8.133 5.933
9 8.000 8.281 5.860
10 9.000 8.429 5.786
11 10.000 8.576 5.712
12 11.000 8.724 5.638
13 12.000 8.871 5.564
14 13.000 9.019 5.490
15 14.000 9.167 5.417
16 15.000 9.314 5.343
17 16.000 9.462 5.269
18 17.000 9.610 5.195
19 18.000 9.757 5.121
20 19.000 9.905 5.048
21 20.000 10.052 4.974
22 21.000 10.200 4.900
23 22.000 10.236 4.882
24 23.000 10.272 4.864
25 24.000 10.308 4.846
26 25.000 10.344 4.828
27 26.000 10.380 4.810
28 27.000 10.416 4.792
29 28.000 10.452 4.774
30 29.000 10.488 4.756
31 30.000 10.524 4.738
32 31.000 10.560 4.720
33 32.000 10.596 4.702
34 33.000 10.632 4.684
35 34.000 10.668 4.666
36 35.000 10.704 4.648
37 36.000 10.740 4.630
38 37.000 10.776 4.612
39 38.000 10.812 4.594
40 39.000 10.848 4.576
41 40.000 10.884 4.558
42 41.000 10.920 4.540
43 42.000 10.956 4.522
44 43.000 10.992 4.504
45 44.000 11.028 4.486
46 45.000 11.064 4.468
47 46.000 11.100 4.450
48 47.000 11.116 4.442
49 48.000 11.132 4.434
50 49.000 11.148 4.426
51 50.000 11.164 4.418
52 51.000 11.180 4.410
53 52.000 11.196 4.402
54 53.000 11.212 4.394
55 54.000 11.228 4.386
56 55.000 11.244 4.378
57 56.000 11.260 4.370
58 57.000 11.276 4.362
59 58.000 11.292 4.354
60 59.000 11.308 4.346
61 60.000 11.324 4.338
62 61.000 11.340 4.330
63 62.000 11.356 4.322
64 63.000 11.372 4.314
65 64.000 11.388 4.306
66 65.000 11.404 4.298
67 66.000 11.420 4.290
68 67.000 11.436 4.282
69 68.000 11.452 4.274
70 69.000 11.468 4.266
71 70.000 11.484 4.258
72 71.000 11.500 4.250
Follow each cut specified in the list by:-
1) Set left hand edge of parting tool tool to right hand edge of barrel blank.
2) Cut with parting tool to depth of cut specified in cut 1 (6.45mm).
3) Withdraw parting tool.
4) Adjusting the axial feed by 1mm towards headstock.
5) Cutting to the specified depth with the parting tool.
6) Repeat steps 4 & 5 until complete.
Once complete the barrel will have a series of little steps in it, which can be sanded away using the 600 grade wet & dry paper. Polish/varnish the barrel as you wish.
To get the barrel off the mandrel you may need to use some force. If you do, use pliers and a soft grip around the brass section of the threaded insert (this way the mandrel will help to provide support. Use as little force as possible - the brass is barely more than 0.5mm thick in places, so a pair of pliers can damage it easily.
You now have a facsimile Parker 61 barrel with an M10 thread.
Back to Index
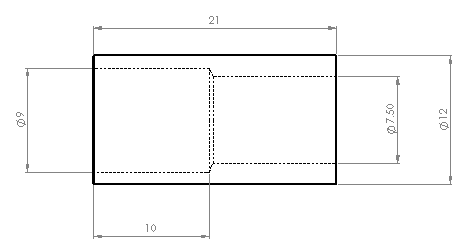
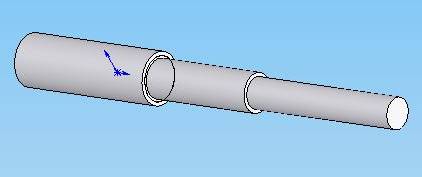
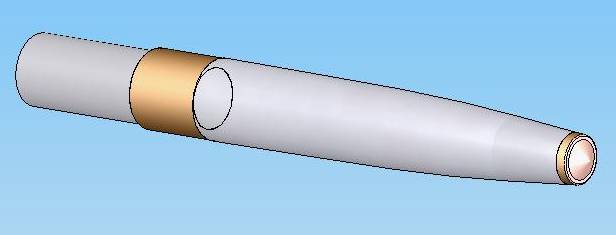
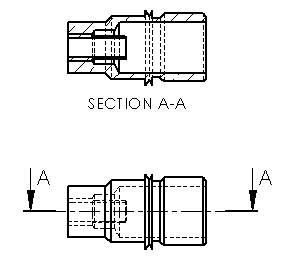
Making the Connector
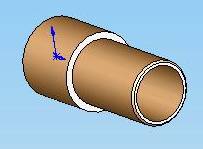
This is what we're trying to make:-
Tooling
Drill a 4mm diameter hole into a 10mm length of 10mm diameter steel bar, as shown in the Diameter Gauges section of making the barrel. A picture of the 7.5mm gauge is repeated below:-
Now make an alignment tool by drilling a 2.8mm hole through the centre of a 10mm diameter bar. Reduce the diameter over approximately 5mm length until the 7.5mm diameter gauge, made while making the barrel, fits over it. Chamfer the end of the 7.5mm section and part off to a total length of around 10mm.
Back to Index
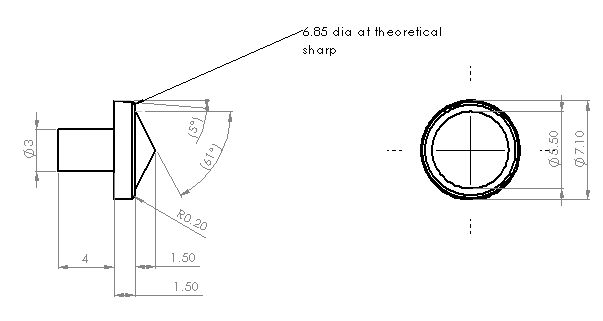
Cartridge Insert
Chuck a piece of brass at least 4mm in diameter. Drill a hole at least 8.6mm deep into the end with a 2.8mm diameter drill. Carefully turn 8.6mm of the end of the bar down until the 4mm gauge just passes over it. Now with extremely fine cuts, turn the first 5mm down to 3.3mm diameter. Test the size after every cut when you reach 3.5mm diameter with a Parker cartridge convertor. Be careful, the wall thickness is down to 0.25mm and it will not take much to damage it. Use some care pushing the convertor on to the insert, but use a normal level of force - if the fit is too sloppy it won't seal & you'll get inky fingers when using the pen. Finally chamfer the end and part off at a length of 8.6mm. BE CAREFUL when parting off. The piece is both tiny and fragile, it can easily get lost or damaged.
Back to Index
Connector Initial Machining
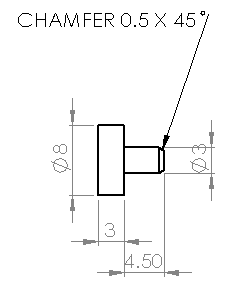
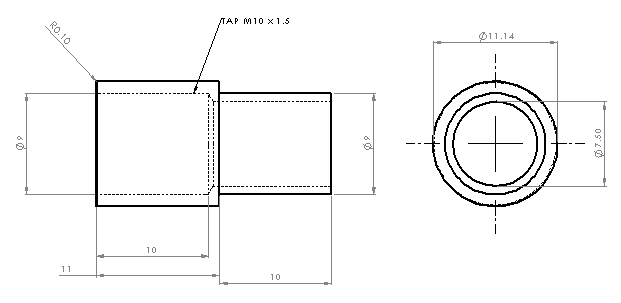
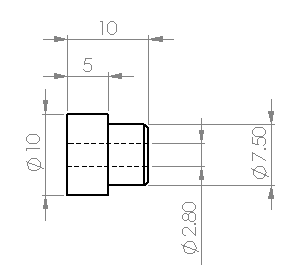
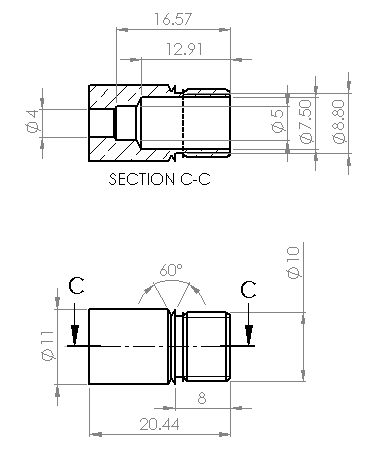
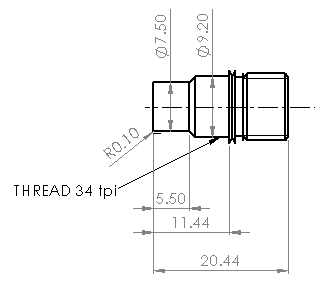
The machining on the connector comes in two parts because it's necessary to machine from each end. First thing, chuck a piece of 1/2" or 12mm diameter brass so that at least 25mm protrudes from the chuck. Face off and turn 25mm of the end of the bar down to 11mm. Drill a 22mm deep hole with a 4mm drill. Drill a 16.6mm deep hole with a 5mm diameter drill, and a 12.95mm deep hole with a 7.5mm diameter drill. Once again, the quoted depths are the depth of the parallel section of the holes. Now turn the first 8mm of the connector down to 10mm diameter, and using a tailstock die holder, thread the outside of the connector with an M10 thread. Turn the die around and cut as far as it will go again. Finally plunge the parting tool into the end of the thread closest to the chuck, reducing the diameter to 8.8mm. This is to remove the section of thread not cut properly by the die. As an optional decorative feature, create a 60 degree vee notch 8.5mm from the end of the connector with a plunge cut. The depth of the plunge is 0.8mm. The Vee mimics the clutch ring feature on the Parker 61 between the barrel and hood. Part off to a length of 20.45mm maximum, as short as 20.3mm is OK.
Back to Index
Connector Tooling
The final piece of tooling to make is the bit of tooling to hold the part machined connector. Part off a 15mm length of 20mm diameter steel. Chuck the short billet and don't remove it from the lathe until the connector machining is complete. Drill a 9mm diameter hole through the middle, and tap M10 (or whatever thread is on your barrel).
Back to Index
Connector Final Machining
Right, we're now going to finish the machining on the connector. Screw the M10 thread of the connector into the Connector Tooling until it'll go no further. Make it as tight as you can by hand. DO NOT remove the tooling from the lathe to do it. When machining, keep an eye on the connector for it coming loose - don't permit it to.
Reduce the diameter to 9.2mm over a length of 11.22mm. Then reduce the diameter to 7.5mm over a length of 5.5mm. Chamfer the step between the diameters at 45 degrees.
Now thread the 9.2mm diameter section with a 60 degree lathe tool, gearing the lathe for 34 threads per inch (34 tpi). Cut a small amount at a time and ensure a good thread form. Once complete you can use the parting tool to plunge into the end of the thread closest to the chuck, reducing the diameter to 8.8mm. This is to remove the section of thread that may not be cut properly into the shoulder.
Before removing the connector from the tooling, try to screw the hood on to the connector. It should work. If not, try increasing the length of the 7.5mm diameter section in 0.5mm increments, trying the hood on the connector each time.
Back to Index
Soldering
We're on the last operation. Yes!
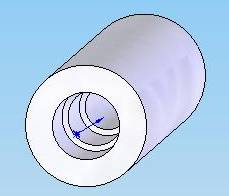
Remove the connector from the connector tooling. Place it on its end with the barrel thread uppermost on a stainless steel or aluminium surface. Put soldering flux around the cartridge insert and position the cartridge insert (large end bottom most) in the middle of the 4mm diameter hole at the bottom of the connector. Drop a 3mm length of plumbers solder between the top of the cartrige insert and connector. Put the alignment tool in the top of the connector and feed the shank of your 2.8mm drill through the alignment tool and into the hole down the middle of the cartridge insert. Using a blow torch, heat the whole assembly until the solder melts and solders the cartridge insert to the connector.

Allow to cool, then remove the tooling and admire your work.
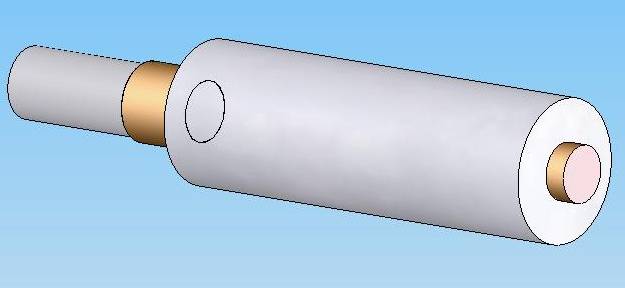
The hood now can screw on to the new connector. Seal the thread with shellac or plumbers mate. Fit the Cartridge Convertor and screw on your new Barrel. You now have a working pen again!
Back to Index
The Hood on my pen is stained with ink in the thousands of micro-cracks in the plastic. The next task is to replace the hood. I have yet to do that, but think I'll use a varient of lost wax casting to make an aluminium hood.
All models & drawings created using 'SolidWorks' 3D modeller & CAD package.
|

Hits since 8 August 2007
|
| |
© Aug 2007 Richard Williams
| | |
