 Home |
 Media |
 Files |
 NES |
 Game Boy |
 SNES |
 VCS |
 DooM |
 Links |
 About |
 Master System |
 Game Gear |
 Genesis |
 5200 |
 Recipes |
 Neo Geo |
 3DO |
 TG16 |
 7800 |
||
 Saturn |
 PSX |
 DMG Home |
 Accessories |
 DMG Tech |
VERTICAL LINE REPAIR


|
||

|
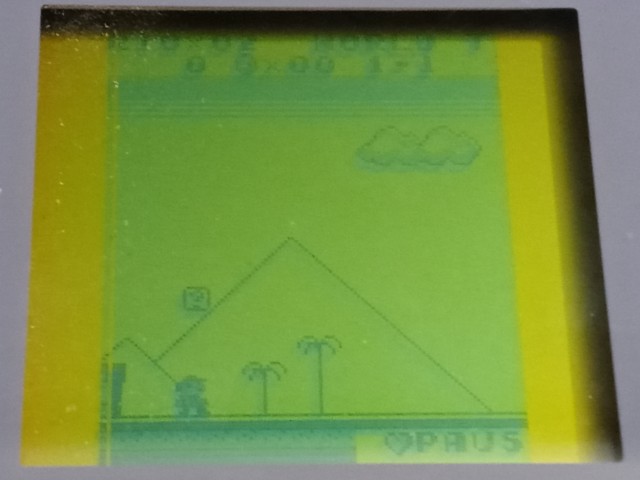
Equipment Required Tri-wing screwdriver Phillips head screwdriver Soldering iron After years and years of using your Game Boy, you may find that there are blank lines in the screen that briefly go away if you press the Game Boy's casing below the screen. This is due to Nintendo using poor soldering techniques to attach the ribbon cable, instead of the locking sockets that many computer manufacturers use. Don't throw it out or sell it! We can rebuild it. We have the technology. If you are not confident with operating a soldering iron, the seek the aid of someone who has some experience. While the iron is not inherently dangerous, it is hot, and can melt plastic as well as burn skin if you are careless. |
|
| DISASSEMBLY | ||

|
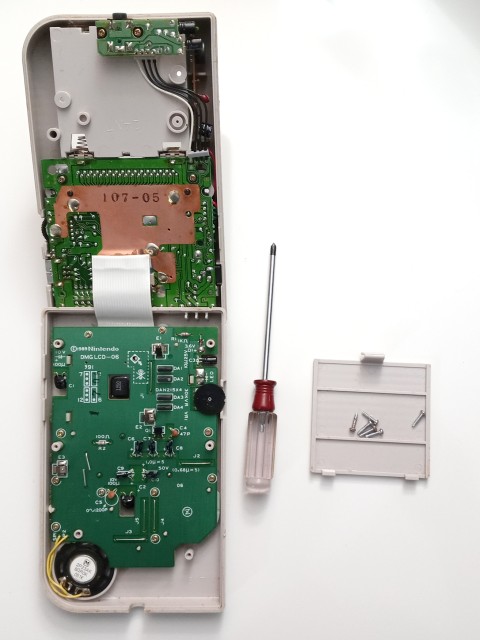
Firstly, use your tri-wing screwdriver to remove the six security screws holding the casing together. Now carefully open the Game Boy while using the top end of it as a hinge point. There is a ribbon cable holding the two halves together. You can safely leave this cable connected to the rear portion of the Game Boy to monitor repair progress, live. Now remove the ten circled screws from the board on the screen half of the Game Boy, and make note of any screws that are of different length from the rest. If there is one, it will likely be the screw near the internal speaker. Be sure to put it back into this same hole during reassembly later. |
|

|
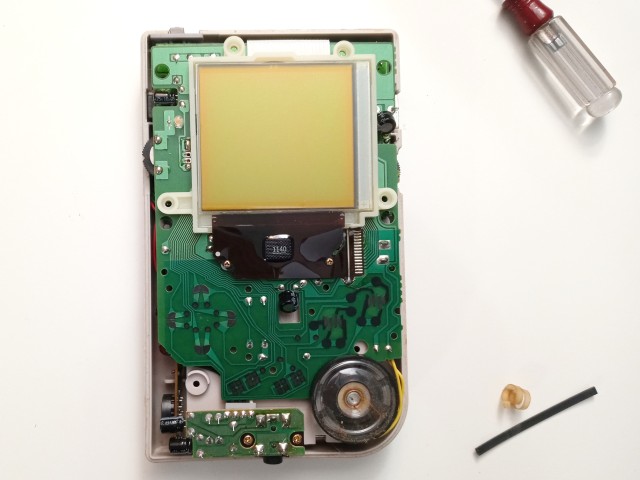
Now with gradually increasing pressure, remove the board from the casing. There will be some dried-up adhesive holding the screen assembly to the casing to keep dust from getting under the screen protector. Do not use epoxy or super glue to re-adhere these parts later. If you have double sided tape, or thin adhesive foam, or even rubber cement, this will be fine. If your screen protector plate detaches, rubber cement will re-adhere it without issue, and won't prevent you from removing it in the future, should you need to re-flow the solder again, or even replace the screen if necessary. |
|
| CLEANING (OPTIONAL) | ||

|
Now that you have access to the contact pads and the speaker, take a moment to clean them, perhaps with a cotton swab dabbed in isopropyl alcohol. You may also service the conductor pads in the membranes. Lightly roughing their surfaces with an emery board, nail file, or a fine grit scrap of sandpaper, then clean both the pads on the board, and the pads in the membranes with alcohol. The purer, the better. This cleaning process is optional, but may save trouble later. If your speaker is damaged, you can replace it now, if desired, otherwise, proceed. |
|
| SCREEN WORK | ||
|
Slowly remove the black rubber bumper that covers the end of the ribbon cable directly below the screen glass. At this point, you can power the Game Boy back up, so you will be able to verify the re-soldering. If the adhesive strip beneath it remains, carefully remove it as well, so it will be re-usable. |
|

|
Insert batteries and power the Game Boy on using the switch in the upper left. Now adjust the dial on the left until the functional parts of the screen are dark. This will allow you to see what needs work, and if your re-flowing of the solder connections was successful. | |
 6.58 Megabytes 
|
Exercise caution and patience, and press the iron to the sections of the cable
directly beneath the blank columns on the screen, and move the iron back and forth to prevent
excessive heating of the ribbon. When you see a column flicker, its connection should become solid
as it cools down, so move to the next column and repeat as needed.
After verifying that everything is in working order, take care to clear any stray particles from the
screen and the area around it, and make sure that the interior of the screen protector on the casing
is also clean before re-assembling everything. If the adhesive strip won't hold the rubber gasket
down, then a spot of hot glue on either end will do, to keep it in place. Use it sparingly. Remember
to return any differently-sized screws to their original holes, and take caution not to over-tighten
the screws, as they will chew right through the threaded plastic. In my experience, rubber cement is
the best means of re-fastening the screen protector, as it won't mar the paint on the rear side of
the protective sheet, will not cause the protector to protrude significantly above the face of the
system, and it can be easily removed. Super glue should never be used in this situation. |
|
|
|
||
|
Home |
Media |
Files |
NES |
Game Boy |
SNES |
VCS |
 DooM |
Links |
About |
Master System |
Game Gear |
Genesis |
5200 |
|
Recipes |
Neo Geo |
3DO |
TG16 |
7800 |
||
|
Saturn |
PSX |