


MotionSampler captures data about the motion of a talent using motion capture sensors placed on the talent's body.
Eleven sensors are attached to the talent and their output is transformed into a single position and approximately forty-five different angles. The angles represent the joint rotations for the limbs of a human body.
| See the Initial Model Position section at the beginning of this chapter for the default joint rotations of the initial model position. |
The magnetic sensors are labeled with names that correspond to the positions they occupy on the body. They are called Head, Chest, Arm, Hand, Leg, Foot, and Back.
Several magnetic sensor suit configurations are possible. Two of the most common are as follows:
The construction of the harness for a motion capture suit balances comfort with the rigid placement of the sensors on the body. Unfortunately, rigid placement is generally emphasized over comfort to provide more accurate data.
The suit is constructed from materials found at mountaineering shops or at drugstores. Elastic fabric bands such as those used for ankle or wrist injuries are used to attach many of the sensors. Climbing harness materials are used to attach the chest and back sensors.
Either Polhemus or Ascension magnetic sensors are sewn to the nylon webbing of the climbing harness or to the elastic fabric. They are then attached to the talent using tape, and straps. Each motion capture session requires careful fitting and adjustment of the suit to obtain the best results.
The sensor positions and their suggested construction are shown in the following diagrams.
| The sensor positions shown in the diagrams are the virtual sensor positions and coordinate systems that the Biped filter assumes. The actual sensors may be located at slightly more comfortable or secure locations on the talent's body. If this is done, the sensor rotations and joint offsets, which comprise the calibration interface, are adjusted to transform the real sensor positions to the virtual sensor positions. |
 Front and Back View of Talent in Data Capture Suit with Sensors Labeled
| The X, Y, and Z axes indicate the sensors' placement relative to the initial model position, not according to the talent's position when the sensors are attached. |
Sew the Head sensor to a cap or headband. The talent wears the sensor at the center of the forehead just below the hairline. Run the cable up over the talent's head and down the back.
Sew the Chest sensor to a harness with straps crossing the chest, going over each shoulder and then circling the waist. The sensor should be tight against the center of the talent's chest, on the sternum, about one-third of the way down between the neck and the waist. Run the cable down the center of the chest to the waist and around to the back.
Sew the Arm sensors to elastic elbow supporters which are available at drugstores. The talent wears the elbow supporters on the back of the arm just below the elbow. Run the cables down the arm toward the hand and then loop them back up the arm, across the shoulders and down the middle of the back.
Sew the Hand sensors to the center back of tight sports gloves, for example bowling or golf gloves. The sensors are aligned with the cable running up the back of the arm.
The Back sensor is extremely important as it is the basis of the Biped hierarchy and determines the position of the talent and the talent's basic rotation. The accuracy of all the data sampled from the talent's motion is affected by this sensor.
Remove all metal components from a climbing harness and attach the sensor to the center back. Strap the talent into the climbing harness and attach the back sensor to the talent's lower back near the base of the spine. You may need to use tape and additional strapping to attach the sensor firmly to the talent.
Sew the Leg sensors to elastic leg braces. The talent wears the leg braces with the sensors below the knees, on the flat part of the front of the shin toward the inside of the leg. Run the cable down the leg toward the foot and then loop it back up and around to the talent's back.
Sew the Foot sensors to an ankle brace. The talent wears the ankle brace upside-down, with the sensor against the top of the foot above the toes. Run the cable up the leg and around to the back of the waist.
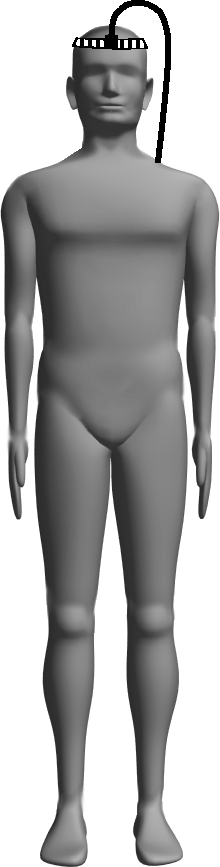 Head Sensor
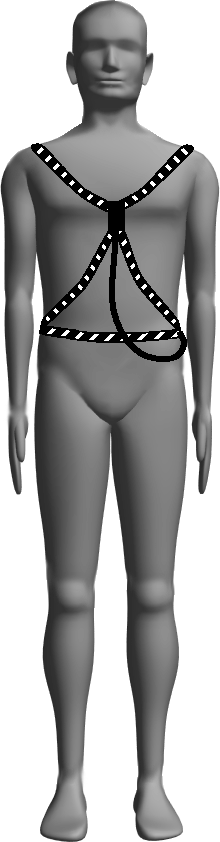 Chest Sensor
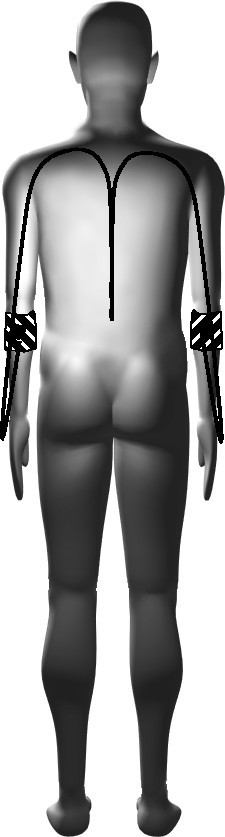 Arm Sensors
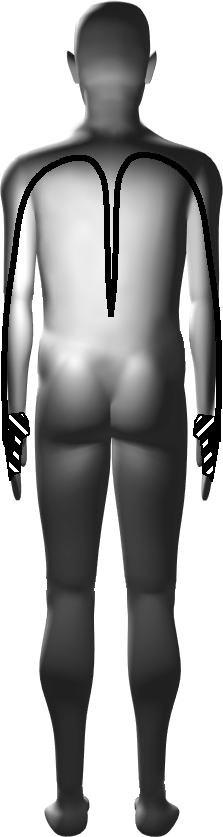 Hand Sensors
 Back Sensor
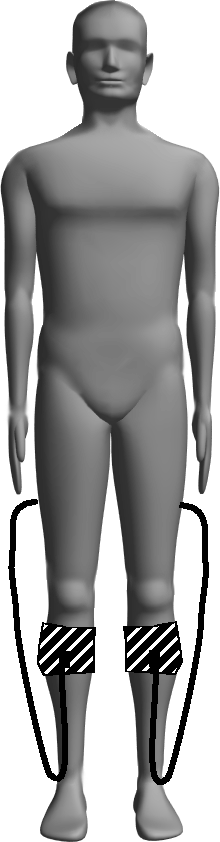 Leg Sensors
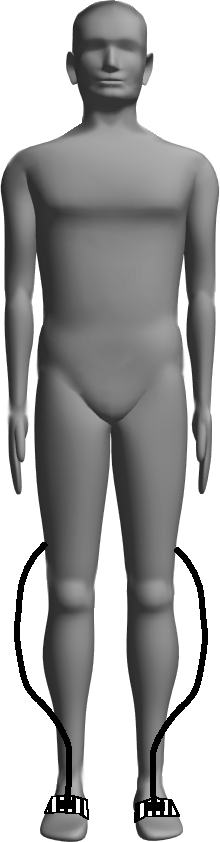 Foot Sensors