This section describes how to set the plotter and paper sizes to plot from Alias.
Alias can plot to the Postscript, HP/GL and HP/GL2 printers and plotters, using the standard interface provided as part of the UNIX(TM) Line Printer facility (namely, lp). Therefore the plotter is accessible to Alias through the network as well, if the UNIX(TM) line printing facility has been setup to use the plotter.
Some plotters, like the HP-7475A and IBM 6184, which have no sheet-feed capability, should have their use arbitrated outside the UNIX(TM) Line Printer spooling facility.
Alias provides support for a variety of printers and plotters including the following:
Other printers and plotters can be supported through C programming of the Alias plotter boiler plate program.
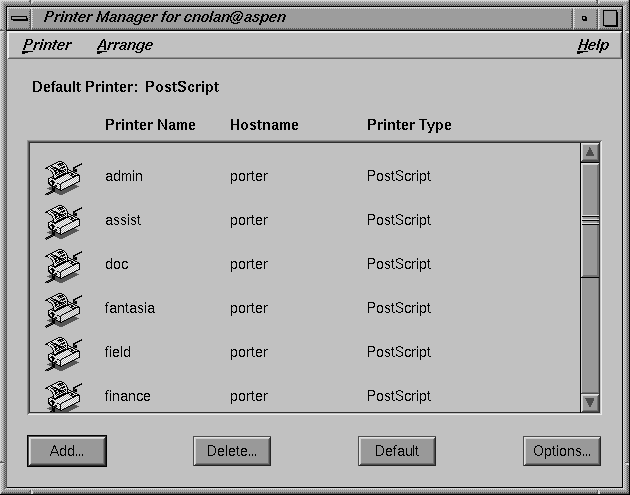
Before plotting from Alias you must connect and set up your printer or plotter and the UNIX(TM) Line Printer queue. This is described in detail in SGI's Personal System Administration Guide, Chapter 3, "Setting Up Network, Peripheral, and Printer Connections," provided with each system. This manual describes how to manage print operations from IRIX using the Printer Manager. The Printer Manager can be accessed through the Toolchest.
Recommendation: We recommend the following selections when adding a printer or plotter:
| If you are using a RS-232 serial connected plotter: | |
|---|---|
| Type of connection | Serial |
| Printer type | Serial Plotter |
| Type of handshaking | Software |
| If you are using a parallel connected plotter: | |
|---|---|
| Type of connection | Parallel |
| Printer type | Generic Printer |
To setup for remote plotting you need to run the Printer Tool on the remote system and add a networked printer.
To add configuration for new HP/GL or HP/GL2 printers and plotters, or to add a new paper size for the plotter, you need to edit the file sys/install/hp_gl.cfg. The paper sizes and plotters described in this file automatically appear in the option box of File  Output Plot.
To edit this file, you must have write permissions on that file and be familiar with one of the UNIX(TM) editors. If you do not have write permissions to this file, you can copy the file to a write-able directory and set the environment variable ALIAS_HPGL_CFG to indicate the new location of the configuration file (this variable should be set to the full path of the hp_gl.cfg file). See description of environment variable ALIAS_HPGL_CFG for more details.
Additional papers can be added for a given plotter in the sys/install/hp_gl.cfg. The details about specifying the paper size can be found in the section below. Any plotter can only have the following paper types:
Only the above mentioned paper types are recognized by Alias Plot. Please note that, even though the paper sizes are fixed for these standard paper types, the plottable sizes may be defined differently for each printer/plotter by their manufacturer. The plottable sizes may vary slightly depending on the size of the paper margin.
The users can define custom paper size only with the paper types XH and XV. The XV custom paper type should have the longer dimension of the paper along the feed direction, while the XH paper should have the shorter size along the feed direction. For any given printer/plotter, only one custom size can be defined for each XH and XV paper type.
The configuration file sys/install/hp_gl.cfg contains the information for a number of plotters. This information is used to produce HP/GL output, which is compatible with the selected plotter. Additional plotters can also be defined in this file. For each plotter described in the configuration file the following six fields of information must be provided:
Each of these fields appear as an entry in the plotter configuration file.
An entry in the plotter configuration file appears as follows:
a field identifier (CLIP, INFO, RANGE, UNITS_PER_CM, UNITS_PER_CM or
DEFAULT_PAGE_SIZE) followed by the information required
For the fields CLIP, INFO, and RANGE there are entries for each paper size. These entries consist of:
All the entries for a plotter are contained between the Start and Stop lines for that plotter. These lines appear as follows:
an identifier (either Start or Stop), followed by the plotter name, followed by the word
configuration
An IBM 6182 plotter entry appears as follows:
Start IBM-6182 configuration
...
Stop IBM-6182 configuration
The space between IBM and 6182 is replaced by a -. The plotter name cannot contain a space.
The information required for each of these fields is usually found in the User's Guide that came with your plotter. To provide a better understanding of these fields and the information required for these fields, we will run through how we added support for the IBM-6182 plotter, which is already described in the configuration file.
In the IBM 6182 Plotter User's Guide we find the following chart:
From this chart we obtain all the information required to complete the CLIP, INFO, and RANGE fields within the configuration file.
The CLIP field describes the maximum plotting length and width for each paper size. The maximum plotting length and width are similar to the plotter's hard clip limits (physical boundaries for pen movement), but are based from 0 (zero). For a vertical paper on an IBM 6182 the length and width would be 7841 by 10171, which is Y-axis maximum + 1 by X-axis maximum +1.
Often the X-axis and Y-axis limits are stated as ± <some number>, the CLIP field based from 0 (zero), so we translate the values such that they become based from 0 (zero). For example a X-axis ± 10576 and Y-axis ± 7556 would result in a CLIP field of 15112 (= 7556 + 7556 +1) by 21153 (= 10576 + 10576 + 1).
In the case of the IBM 6182 we have the following CLIP fields:
CLIP 1 7841 10171 /* A V */
CLIP 2 10171 16451 /* B V */
CLIP 3 7601 10871 /* A4 V */
CLIP 4 10871 15971 /* A3 V */
The INFO field describes the paper size acronym, the full name of the paper size, and the measured plot area size, in inches or millimeters. The third column contains the paper type, which can only be one of the paper types mentioned in the section `Adding Papers Sizes'.
In the case of the IBM 6182 we have the following INFO fields:
INFO 1 AV _A vertical_________ ___9.97 by 7.68 in.
INFO 2 BV _B vertical_________ __16.12 by 9.97 in.
INFO 3 A4V A4 vertical_________ _271.75 by 190.00 mm
INFO 4 A3V A3 vertical_________ _399.25 by 271.75 mm
The full name of the paper size and the plot area are prefixed with a _. This allows you to left and right justify the text when it appears in the plot option box interface popups.
The RANGE field describes the plotter's Scaling Points P1 and P2. These points represent the usual plotting range on the different paper sizes. They are described in the following form:
P1x P2x P1y P2y
In the case of the IBM 6182 we have the following RANGE fields:
RANGE 1 80 10080 320 7520 /* A vertical */
RANGE 2 620 15820 80 10080 /* B vertical */
RANGE 3 430 10430 200 7400 /* A4 vertical */
RANGE 4 380 15580 430 10430 /* A3 vertical */
The UNITS_PER_CM field specifies the number of plotter units per centimeter which is also known as the plotter resolution. The value can normally be found in the Plotter Specification section of the Plotter's User's Guide.
In the case of the IBM 6182 we set the UNITS_PER_CM field to:
UNITS_PER_CM 400
The PAGEFEED field specifies whether the plotter can automatically feed pages. The value is TRUE if it can.
In the case of the IBM 6182, which uses cut sheet paper automatically loaded from a paper tray, set the PAGEFEED field to:
PAGEFEED TRUE
The DEFAULT_PAGE_SIZE identifies the number representing the paper size that is the default for the plotter. This is the only field for which values can not be found within the Plotter's User's Guide. This field can be arbitrarily set based on what you decide is your default paper size.
In the case of the IBM 6182 we have set the DEFAULT_PAGE_SIZE to use A Vertical, number 1, as the default paper size:
DEFAULT_PAGE_SIZE 1
All these fields combined result is in the description of the IBM 6182 below, which also appears in the configuration file sys/install/hp_gl.cfg.
######################################################################
Start IBM-6182 configuration
######################################################################
| CLIP | 1 | 7841 | 10171 | /* A V */ |
| CLIP | 2 | 10171 | 16451 | /* B V */ |
| CLIP | 3 | 7601 | 10871 | /* A4 V */ |
| CLIP | 4 | 10871 | 15971 | /* A3 V */ |
| RANGE | 1 | 80 | 10080 | 320 | 7520 | /* A vertical */ |
| RANGE | 2 | 620 | 15820 | 80 | 10080 | /* B vertical */ |
| RANGE | 3 | 430 | 10430 | 200 | 7400 | /* A4 vertical */ |
| RANGE | 4 | 380 | 15580 | 430 | 10430 | /* A3 vertical */ |
| UNITS_PER_CM | 400 |
| PAGEFEED | TRUE |
| DEFAULT_PAGE_SIZE | 1 |
Stop IBM-6182 configuration
#####################################################################
You can specify the printer/plotter to be automatically used each time plot is sent from Alias, by editing the Plot Options section in menu item Preferences User Options Alias Preferences. To be used successfully from Alias, you should first install the printer/plotter as described earlier, and for a HP-GL or HP-GL2 plotter add the configuration to the sys/install/hp_gl.cfg file.
It is the type of the plotter specified in the sys/install/hp_gl.cfg file, after `Start' in the configuration file. If this variable is set, the option box in File Output Plot... automatically sends the output to this type of plotter. By default, the hp_gl.cfg file has the following plotter types:
Plotter host specifies the machine your plotter is connected to, on your network. Specifying localhost indicates that the plotter is accessible from your machine.
Plotter device specifies the print queue to which the plotter output should be sent. For example, specifying myprinter will write to the print queue myprinter. (The name is installation dependent. Refer to the lp(1) section of the UNIX manual.)
Plotter options specify the options to be added when Alias submits jobs to the lp(1) command, translator program (bin/psplotf or bin/hp_glplotf), or the etc/plotit script. These options are described below in the section `Alias Plot System'. These options should be in one of the following forms:
| -oh# lp | specifies don't print the header page. |
| -fpEV# | specifies use E size paper (vertical). |
| -fpBV -fa# | specifies use B size (vertical) & roll feed. |
| -s# | specifies save the Alias V8.5 plotfile. |
If this variable is empty, no options are passed on to the plotter driver. (See the Driver Options section below.)
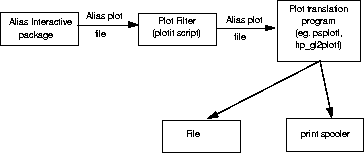
This variable specifies the full path of the plot filter program used by the Alias plot (See the Alias Plot System section below). If the variable is not set, the default script etc/plotit is used. Normally, the users can use this variable to specify an alternate location of the plotit script. The interactive package calls the plot filter script (typically etc/plotit) as follows:
plotit <ALIAS_PLOT_OPTIONS> -t<ALIAS_PLOT_TYPE> \
-d<ALIAS_PLOT_DEVICE> <plotfile>
The Plotting from the interactive package, using File Plot..., is controlled by the script etc/plotit, which passes the Alias plot information through the appropriate file format translators like postscript, HP-GL2, etc. This postscript or HP-GL2 output is then either saved in a file or sent to the printer/plotter.
In addition to the options for the lp(1) command, there are options for the translators (bin/psplotf and bin/hp_glplotf) and options for the etc/plotit script.
The only option available for the etc/plotit script is the save Alias plotfile option (-s). This option causes the intermediate file to be saved. This intermediate file, known as an Alias PLOTFILE, can be used as input to the filter programs bin/psplotf and bin/hp_glplotf.
In the descriptions of the Translators below the only options supported as Preferences are indicated with (APO). The other options are controlled by the etc/plotit script and the Alias interactive package. Even some of these options are only used as the default values to File Plot....
The bin/psplotf translates Alias plot information into Postscript.
The bin/hp_glplotf and bin/hp_gl2plotf translate Alias plot information into HP/GL and HP/GL2 respectively.
The translators require information about the model of printer or plotter you intend to use. This information is provided for a variety of printers and plotters in the file sys/install/hp_gl.cfg. This file is user editable which allows customers to add support for other HP/GL printers and plotters. Instructions on adding configurations is provided later in this section.
psplotf is a plotter driver program, which is designed to translate Alias plot files into Postscript suitable for printing on any Postscript printer.
It actually is a filter, which takes its input from stdin or <in_file> and sends its output to stdout or <out_file>, instead of to lp.
The usage statement for psplotf is as follows:
For further information about psplotf, see the psplotf section of the Stand-alone Utilities chapter of this book.
hp_glplotf is a plotter driver program designed to translate Alias plot files into HP-GL (IBM-GL) suitable for plotting on any supported plotter.
It actually is a filter, which takes input from stdin or <in_file> and sends its output to stdout or <out_file>, instead of to lp.
The usage statement for hp_plotf is as follows:
Any errors encountered by the HP-GL and IBM-GL device drivers are written to a file called /tmp/plot_err.<some number> as well as /usr/adm/syslog. Look there for any clues as to why the plotter is not working. The <some number> is determined by the operating system.
Some plotters can be fitted with a spool feed or have an automatic page advance option. This also applies to printers like the IBM-4019 and IBM-4029, which can automatically advance the page. To tell the plotter driver that you are using the spool feed option the following option should be specified as follows:
-fa
When plotting large plots, some inaccuracies can creep in over large distances. As an interim fix, it is possible to compensate for this error by specifying x and y correction factors. The default x and y correction factor is 1.0, which is no correction at all. The correction factors are used internally as multipliers. To specify an x and y correction use the following options:
-fc<xcorr>,<ycorr>
-fc<corr>
The first version sets the x correction factor to <xcorr> and y correction factor to <ycorr>. The second version sets both the x and y correction factors to <corr>.
If you plotted something that should have come out 30" and it came out to 30.125", the plot was 0.125" too large. Assuming that the same error occurs in both the x and y directions, you would need a correction factor of 30/30.125 = 0.9959. The following should compensate for the error:
-fc0.9959
Setting the correction values in the Plotting Interface window opened by File Plot..., overrides the correction values in the LP queue options for plot output section of the Alias Preferences window.
If the plot does not come out as intended, please try the following steps:
/usr/bin/lp -d <plotter_name> <filename>
If this succeeds in plotting correctly, it could mean that the default file format to send to the printer is not set correctly, i.e. the plotter is being sent HP/GL2 file instead of HP/GL file. To correct it, you will need to edit the following line in the file etc/plotit.
plotcmd="hp_gl2plotf"
plotcmd="hp_glplotf"
This would change the format of the output sent to the plotter to HP/GL format.