|
|
Polygons palette >
Extrude polygon >
Translate
|
Translating a Polygon Extrude
|
|
|
|
|
Select and extrude a polygon, creating additional polygonal geometry that extends from polygon's original position to the new position.
|
|

|
How to Use
-
1
-
Select Translate from the Polygons > Extrude polygon cascading menu, or click this icon.
-
The system prompts:
-
Select polygon to extrude (Translate):
-
2
-
Click on the polygon you want to extrude.
-
Before proceeding, you can select to extrude the polygon
on the Polygon axis (which is the default) or the
XYZ axis by
setting the options in the Poly Transform Options box.
Poly Transform Options
Select
Polygons > Extrude polygon > Translate - to open the
Poly Transform Options box. to open the
Poly Transform Options box.
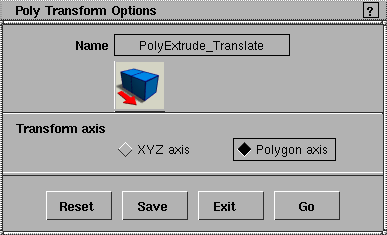
Transform Axis
-
- To extrude a polygon on the Polygon (N, S, T) axes:
-
1
-
In the Poly Transform Options box, click the Polygon axis button ON, then click Go.
-
The system prompts:
-
Translate polygon using mouse, or change
number of segments (max=64, current #=2):
|
|
|
-
2
-
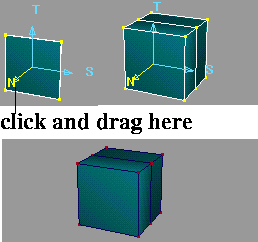
Click on the polygon you want to extrude. An N, S, T axis locator is displayed.
-
3
-
Click and drag with the mouse, or enter the move amounts at the keyboard and press Enter.
-
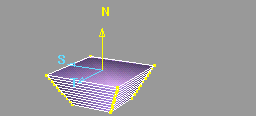
In the side example, a local axis for the selected polygon is
displayed and the polygon is translated along the N axis.
At this point you can use the mouse to translate the extruded polygon along the N, S, or T of the local axis. The geometry along the extrusion is adjusted appropriately to translations on the extruded polygon.
To transform a polygon on the XYZ axis:
-
1
-
In the Poly Transform Options box, click the XYZ axis button
ON, then click Go.
-
The system prompts:
-
Translate polygon using mouse, or change
number of segments (max=64, current #=2):
-
2
-
Click on the polygon you want to extrude. An X, Y, Z axis locator is displayed.
-
3
-
Click and drag with the mouse, or enter the move amounts at the keyboard and press
Enter.
>
|
Note:
|
You can use Snap while working with Extrude Polygon. The
point to snap is in the center of the top polygon of the
extrusion.
|
Mousing Tips
- Hold down Shift and click with the right mouse button to repeat the last transformation you made to the active extrusion or target polygon.
- Hold down Shift and click with any mouse button to deselect it.
|
|
|
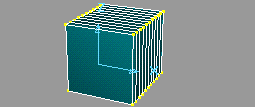
To change the number of segments
If you type a number other than the
current # displayed on the prompt line and then press Enter, the extrusion updates. In the side example, current #2 is changed to 10.
|
Polygons palette >
Extrude polygon >
Rotate
|
Rotating a Polygon Extrude
|
|
|
|
|
|
|

|
Rotate the extruded polygon. The extrusion twists to match the extruded polygon.
How to Use
-
1
-
Select Rotate
from the Polygons > Extrude polygon cascading menu, or click this icon.
-
The system prompts:
-
Select polygon to extrude (Rotate):
|
|

|
-
2
-
Click on an existing extruded polygon or click to select a polygon.
-
The system prompts:
-
Rotate polygon using mouse, or change
number of segments (max=64, current #=2);
-
3
-
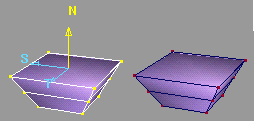
Click and drag using the mouse to rotate the extruded polygon around the S
or T
direction of the local axis.
Mousing Tips
- Hold down Shift and click with the right mouse button to repeat the last transformation you made to the active extrusion or target polygon.
- Press Shift and click with any mouse button to unpick the active extrusion.
To change the number of segments
If you type a number other than the
current #
displayed on the prompt line and then press Enter, the extrusion is updated. In the side example, current #2 is changed to 10.
|
Polygons palette >
Extrude polygon >
Scale
|
Scaling a Polygon Extrude
|
|
|
|
|
|
|

|
Scale the extruded polygon. The extrusion slopes to match the extruded polygon.
How to Use
-
1
-
Select Scale
from the Polygons > Extrude polygon cascading menu, or click this icon.
-
The system prompts:
-
Select polygon to extrude (Scale):
|
|
|
-
2
-
Click on an existing extruded polygon or click to select a polygon. The system prompts:
-
Scale polygon using mouse, or change number
of segments (max=64, current #=2);
-
3
-
Click and drag using the mouse to scale the extruded polygon uniformly about its midpoint.
Mousing Tips
- Hold down Shift and click with the right mouse button to repeat the last transformation you made to the active extrusion or target polygon.
- Press Shift and click with any mouse button to unpick the active extrusion.
|
|
|
To change the number of segments
If you type a number other than the
current #
displayed on the prompt line then press Enter, the extrusion is updated. In the side example, current #2 is changed to 10.
|


