Welcome to the world of professional 3D design and animation. With the Alias system, you have the world's most powerful tools for creating 3D digital content. Whether you are building the latest video game or designing the sleek surfaces of an automobile, you can use Alias to create freeform models, apply textures, set up lights, animate and render your work to create truly photorealistic results.
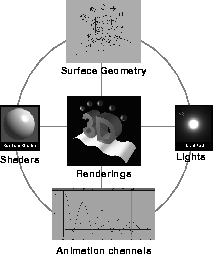
In the world of photorealistic rendering and animation, several stages are needed to complete a 3D project. These different stages involve creating surface geometry, applying shaders and textures, lighting the scene, animating objects, cameras and lights, and then rendering the final image sequence(s).
Depending on your work, one of these areas may be more important than the others. For instance, if you are a designer, most of your energies might be spent building models for export to CAD packages without worrying about shaders and lights. Or, you may create a 3D illustration using geometry, shaders and lights without needing to animate your work.
In the end, shape, form, color, light and motion are all used to create your designs, video games or animations. The Alias functions and tools will enable you to achieve photorealistic results.
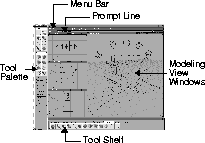
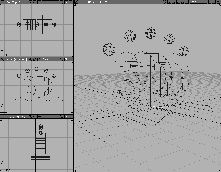
To use Alias effectively, you must first understand the user interface. The user interface defines how all of the Alias tools and functions are used to complete a given task. Alias includes many different types of tools that are arranged in menus and tool palettes. The Alias UI also includes 3D Modeling views where your objects are built and rendered. Shown below is the basic layout of the Alias user interface.
Many functions in Alias are found in the menu bar at the top of the main working window. Menu functions are functions that don't require interaction within the 3D workspace.
When working with menus you generally click and drag to choose one of the menu functions. You can also post the menu so it stays on the screen by clicking on it. This gives you the time to more carefully choose the perfect function. If you double-click on a menu, you choose the last function used from that menu. Each menu contains related types of functions. To help you decide where these functions can be found, the menus are listed below with a description of the typical types of functions they contain:
File - This menu contains functions for saving and retrieving files and exporting in various file formats.
Edit - This menu contains functions for editing objects and their relation to each other. This menu also contains functions for copying and pasting keyframes while animating.
Delete - This menu contains functions for deleting objects, windows, shaders and lights.
Layouts - This menu contains functions that help you organize your orthographic and perspective view windows.
ObjectDisplay - This menu contains functions that affect how objects are displayed in the modeling views.
DisplayTgls - This menu contains functions that change the general display of objects and other items in the workspace.
Layers - This menu contains functions that let you set up and modify layers.
Render - This menu contains functions that let you set up and perform renderings.
Animation - This menu contains functions that let you set keyframes and animate your scenes.
Windows - This menu contains functions that open key windows such as the Multi-lister or the Render stats window.
Preferences - This menu contains functions for setting individual user preferences such as Hot keys or Construction options.
Utilities - This menu is used to open other applications and utilities that interact with your Alias system such as Composer, SoundSync or StudioPaint.
Help - This menu gives you access to on-line documentation. A special help option is included so you can find where the tools are in the new user interface.
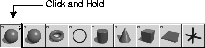
The tool palette contains all the Alias functions that require interaction in the 3D modeling views. Because of the large number of tools available, the tool palette is broken down into smaller sections that help you find tools quickly. The general purpose of each section of the tool palette is listed below:
Pick - This section contains tools for picking objects in the modeling and SBD view windows.
Xform - This section contains tools for transforming objects using functions such as Move, Scale, and Rotate.
Curves - This section contains tools for drawing curves into the modeling views.
Curve Edit - This section contains tools for modifying curves.
Objects - This section contains tools for placing objects and Lights into the modeling views.
| Note: When looking for Lights, remember to look in the Objects section since the lights don't have their own section. |
Object Edit - This section contains tools for editing objects.
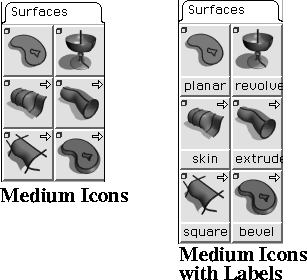
Surfaces - This section contains tools for building surfaces from curves.
Surface Edit - This section contains tools for editing surfaces.
Polygons - This section contains tools for creating and managing polygonal models.
Polygon Edit - This section contains tools for editing polygons, polysets and vertices.
Poly Shading - This section contains tools for preparing polygons for rendering.
Cameras - This section contains tools for setting up and modifying views.
Grids - This section contains tools for setting up grid spacing and using construction planes.
Anim - This section contains animation tools.
Locators - This section contains tools for measuring and labeling your models.
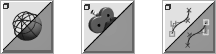
Evaluate - This section contains tools for evaluating different properties of your model such as the curvature and highlights on curves and surfaces.
Point Clouds - This section contains tools for working with point data from 3D digitizers.
By clicking on the section tabs with the left mouse button, they can be opened or closed. You can also access the tools by clicking on the tabs with the right mouse button to bring up a menu that displays the tools by name.
When the tool palette is displaying icons, you will have a large number of visual symbols to explore and understand. For many tools, the meaning of an icon will be obvious, while for others the meaning will require explanation. In these situations, click on the icon with the middle mouse button and the tool's name and path will appear in a black box.
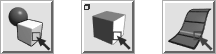
To help you become familiar with the meaning of the various icons, they have been designed with consistent symbols that make the icon a member of a "family" of icons. The most common icon families are shown below:
Picking icons - These icons display a red cursor arrow which symbolizes the action of picking.
Toggle icons - These icons are split diagonally to indicate the two states of the toggle.
Editor icons - These icons appear like a flipped page in the corner to indicate that you are exploring and editing the details of an object.
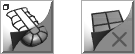
Animation icons - These icons all display a film strip to indicate that they involve an animation function.
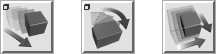
Transform arrows - These icons display a red arrow which fades out, to indicate that the tool involves a transformation such as a move, rotate or scale.
Change arrows - These icons display a red arrow that does not fade out, because these icons indicate a transition from one state to another.
Option Windows - Icons that display an open box ( ), all include option windows that can be accessed by double clicking on the icon.
Yellow arrows - These icons contain pop-up tools that can be accessed by clicking and holding on the top icon of the group.
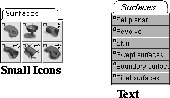
The tool palette tools can be shown in several different modes. You can display icons in different sizes, or with labels to help you find the icons. You can also display tools as simple lines of text without icons. By having these options for displaying tools, you can customize the look of your tools to best suit your needs.
Another option is to display the palette either horizontally or vertically. You can click on the orientation button on the palette to change how the icons and section tabs are displayed. You can also move the palette anywhere on the screen by either dragging and resizing the palette, or by selecting Preferences  Interface Palette/Shelves Layout -
  .
.
Many tools and menu items are linked to option windows that help you control how the tool acts once it is used. You can recognize tools that have option windows by the square icon ()found in the top left of the icon.
Once an option window is opened, you will find the options available for the tool along with a picture of the tools icon. At this point, you can either change the options and click Go to begin using the tool or menu item, or you can change the options and click Save to set the options for the next time you use the tool. If you click Cancel, all option changes are erased and they remain as they were before the option window was opened. Reset takes you back to the default option window settings.
With a large number of tools and menu functions available to you, you may find that you are jumping from one section of the tool palette to another as you work. Recognizing that you may not use the tools as they have been laid out in the Tool Palette, Alias includes several methods of customizing the user interface to best suit how you work.
An important part of the user interface that makes it customizable is the Tool Shelf. At first glance, this window appears to be a second Tool palette with many of the same tools placed in a different order. In fact, this window can be customized by adding and removing your favorite tools and menu items to it. When you click on a tool in the Tool palette with the middle mouse button, you can drag the black name box down onto the Tool shelf. When you release the mouse button, the tool is now part of the shelf.
Like the palette, the Tool Shelf contains section tabs to help organize the icons. In the Tool Shelf, these sections can be created, named and later deleted. This way, you can make a section for facial animation or for concept design that can include every tool required to complete the chosen task. You can add icons to the section, move their order within the section, or delete them if they are no longer needed.
Menu items can also be added to the Tool Shelf. When you click once on a menu's name, you post the menu so that it stays open. You can then click on any of the menu items with the middle mouse button and drag the function down to the shelf. Once on the shelf, icons are displayed for the menu items so that they can be easily recognized and used. In most cases these items have icons available. In some cases, however, text is used.
You can also move all the tools belonging to a particular palette section or menu by dragging on the section title or menu title with the middle mouse button. Once you drag onto the title area of the shelf, a new shelf is created, with all the tools contained in that section or menu placed on the chosen shelf.
Another advantage of the Tool Shelf is that tools and menu items placed in it can have option window setups that differ from the original tool or menu item. This means that you can have a Render button set up on the shelf for RayTracing while the original Render menu item is set up for Raycast rendering. You can even put more than one version of a tool on the Shelf. For example, you could have both Render functions in the Shelf, where one creates a RayTrace rendering and the other creates a RayCast.
Another method of accessing tools in Alias is marking menus. Marking menus are radial menus that appear when you press the Ctrl and Shift keys and click with one of the three mouse buttons. Once you click, you can choose one of the available tools by dragging in its direction. Each of the three mouse buttons brings up a different set of tools.
As you become more familiar with the radial location of a tool, you can press the appropriate keys and drag to the tool in a quick continuous motion. In this case, the menu won't appear, but your action will still pick the tool.
You can also change the tools available in the Marking menus by choosing Interface Marking menus from the Preferences menu. A Shelf-like window opens onto which you can drag tools to be used in the Marking menus. The three Marking menus can each hold up to 8 tools.
Note: Marking menus are not available by default when you install Alias. The use of the Control and Shift keys for the marking menus conflicts with the use of these keys for System functions. You must follow the steps outlined in the Installation Guide to set up Marking menus. |
Now that you know how to find and select tools, you can begin to focus on the virtual 3D world in which you model, animate and render.
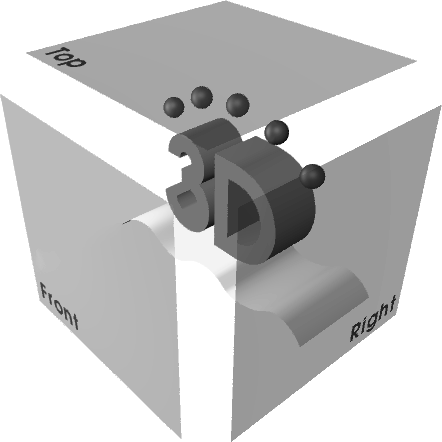
Most of your 3D work takes place in the modeling view windows. These windows let you view scenes from the top, front, side, and in perspective. When working in 3D, it is sometimes difficult to determine exactly where an object lies. Using the four Alias windows, you can confirm the positioning of objects from several points of view.
Similar to drawing a plan, section and elevation, the top, front and side views are 2D orthographic views that let you view your work analytically. The fourth view is in perspective, showing the scene in 3D.
At any time, you can expand one of these views to full screen, or you can display all four to check your work from all angles. You can also open more view windows if the four main windows are not enough. You might want two front views available that let you see the whole project and a close-up at the same time.
Alias contains several default window layouts that let you display the modeling view windows in different ways. These layouts are available in the Layouts menu under All windows. Shown below is one of these layouts that displays a larger perspective window:
The three orthographic views represent the 3D workspace as seen from the Top, Front and Right side. These views offer the most analytic view of the world space. If you want to, you can link these three views using Window Toggles Window sync, found in the DisplayTgls menu, so that changing the view in one window changes the view in the other two orthographic views.
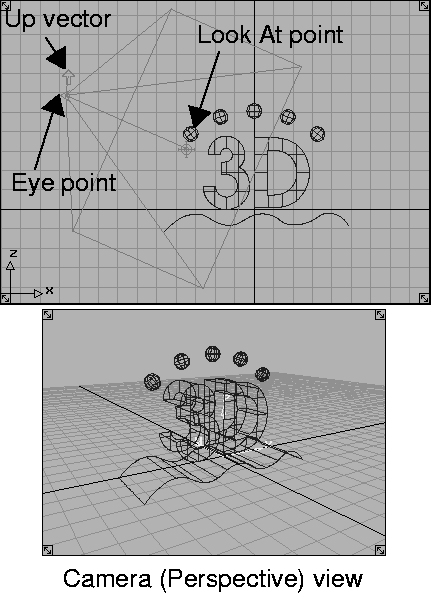
The fourth view window type is the perspective view, showing your objects in 3D. Every Perspective window is linked to a camera that "looks" into your scene. Each camera has an Eye point, Look At point and an Up vector that help determine the direction and orientation of the view.
As the scenes become more complex, the modeling windows can become very busy. The Scene Block Diagram, or SBD window, offers you a diagrammatic view of the objects, lights and cameras. Through the SBD window, you can see the objects and pick and manipulate them.
Objects can be grouped together, templated, or even hidden. As your model evolves, the SBD window keeps track of all the parts of your scene and helps keep you organized.
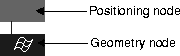
Objects are displayed in the SBD window using dag nodes. Dag is short for Directed Acyclic Graph, meaning that all of the hierarchy information is passed in only one direction, which for Alias is downwards. Dag nodes contain the various parameters associated with objects, lights and cameras. Below are some of the dag node icons used in the SBD window to represent 3D objects, as well as some of the states in which you will find these icons.
Positioning node - The brown positioning node contains all of the XYZ transformation parameter values of the chosen object.
Geometry nodes - Underneath the positioning node, you will find the geometry node. This node represents the internal geometry of an object, such as its Control Vertices and Edit points positions.
For other object types, such as Lights and Cameras, the geometry node represents the object parameters, such as light intensity or camera angle.
In addition to icons that define what an object is, the SBD window displays icons using different states that help define its relationship to other objects in the view windows.
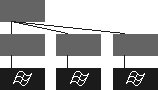
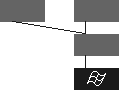
Grouped nodes - Various Dag nodes can be grouped into more complex hierarchies. This hierarchy is read from the top down. Therefore the top positioning node is read first, the second positioning node is read second and then the geometry node is read.
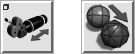
Instanced nodes - When you duplicate an object, you can choose to instance the object. An instance lets you apply multiple positioning nodes to the same hierarchy, so you are using less geometry in your work.
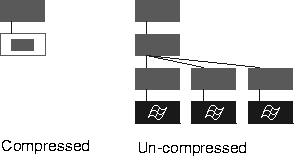
Compressed/Expanded node - As the SBD view becomes more busy, you may want to simplify hierarchies so they display only their upper nodes. From the ObjectDisplay menu, you can choose to Compress or Expand a dag node hierarchy.
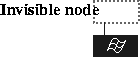
Invisible nodes - If you want an object to be hidden from view in the modeling windows, you can hide it by selecting Invisible from the ObjectDisplay menu. The resulting node icon is shown with a dotted outline.
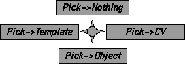
Templated nodes - If you want an object to be visible on the modeling views without actually being part of the scene, you can template it. Templated objects can't be rendered but are visible as a reference for other modeling tasks. Positioning nodes that belong to templated objects are shown in gray.
Animated nodes - When you begin setting keyframes to the parameters of a specific node, it is displayed as a parallelogram or slanted box. You can easily pick out animated nodes in the SBD.
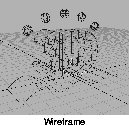
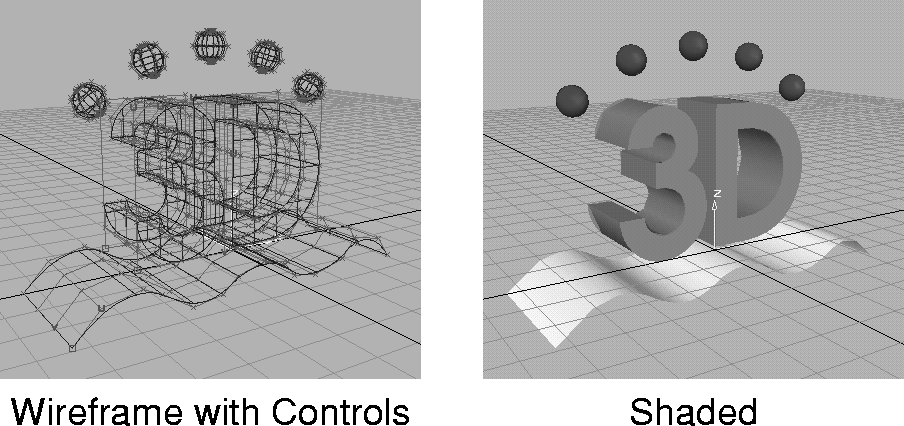
Objects can be displayed several different ways in the modeling views. The most basic is the wireframe display, where objects are displayed as curve meshes. You can display the control points of an object to help you manipulate and edit its surfaces. You can also use a shaded display to see the actual shape and form of the objects.
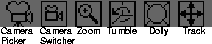
In the modeling view windows and the SBD window, you must navigate around to view certain parts of a scene. In the title bar of all view windows, several view icons offer tools that change what you see in the window. Below are some of the icons found in the Perspective window. Other view windows use some of these icons but may not use all.
Camera Picker - This view icon lets you automatically pick the lower positioning nodes of the current camera.
Camera Switcher - This view icon lets you choose which camera is being used by this Perspective window.
Zoom - This tool opens a new view window that displays a zoomed view of the window. This second window can be controlled using its own Dolly and Track view icons.
Tumble - This view icon lets you tumble in 3D space to view your objects from another angle. This view icon is not available for orthographic views.
Dolly - This view icon moves you closer and farther away from the scene.
Track - This view icon lets you pan around the view window to change your focus point.
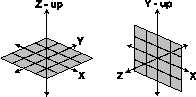
In the Alias system, you build objects in a 3D coordinate system that lets you define objects using dimensionally accurate values. Many of us are familiar with the XYZ coordinate system used to define 3D space. In this system, the origin is the center, with coordinates 0,0,0. All points are defined by one coordinate in the X direction, one in the Y direction and one in the Z direction. This numerical entry lets you plot points accurately, using keyboard input. In contrast, you can also place points interactively with the mouse, with Alias recording the resulting coordinates.
You can orient the XYZ system in two ways -Z-up and Y-up. A Z-up world starts with a ground plane that represents the X and Y directions with Z representing the up direction. This orientation is used most often by designers, whose main concern is the ground plane where their plans are placed.
On the other hand, a Y-up world is defined by the viewing plane which displays X as the horizontal and Y as the up direction. In this case, Z represents the depth of the scene. This orientation is often used by animators, whose main concern is the movie screen.
| Note: A Z-up world is used throughout these lessons to ensure consistency of dimensional information. |
In addition to placing objects in space, Alias lets you draw on freeform surfaces using curves on surface. In this case, the line being drawn is placed not into the XYZ world space, but rather on the UV space of the surface. UV space is also used when placing textures on surfaces and is an important part of working with freeform surfaces in Alias.
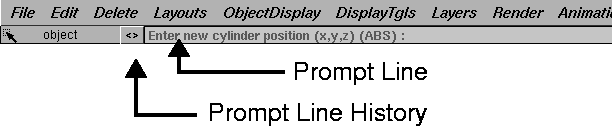
As you select various tools, the prompt line that sits right under the menu bar prompts the next action and asks for keyboard input. The prompt line gives you a means of entering accurate values instead of clicking in the modeling views. The Prompt Line History button lets you open a window displaying the series of system messages during your session.
When you are asked to enter coordinate values in Alias, you are either asked for XYZ or UV values. In both cases you can enter the values one at a time using either a single space or a comma to divide the values. For instance you could enter an XYZ value of 2, 5, 3.5 as either:
You can simplify coordinate entry where some of the values are 0. For instance, rather than entering 5, 0, 0, you could enter simply 5 and Alias assumes that the last two values are meant to be 0. In another example, instead of entering 0, 4.5, 0, you could enter 0, 4.5 and Alias assigns 0 to the last value. Notice that if the X value is 0, you must enter it for the system to recognize the next value as Y.
There are two different types of coordinate entry in Alias. One is to enter Absolute values that define exactly where to place an object or point. Another approach is to enter Relative values that use the entered coordinates to transform an object in relation to its existing position. For example, if an object is at position 2, 3, 5 and you move this object using Absolute values of 1, 1, 1, the object moves to a position of 1, 1, 1, regardless of its original position. Using Relative values of 1, 1, 1, the same object would move to 3, 4, 6, since the move is "added" to its original position.
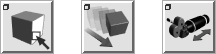
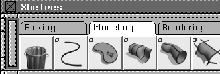
After objects are placed into the scene, you need to pick them in order to perform various operations on them. There are various Picking tools available in Alias that can be used on objects. Some of these tools are shown below:
Once a Picking tool is chosen, it is displayed in the small area below the menus on the left of the main working window. This ensures that you are always aware of the current picking mode.
All of the Pick tools give you several picking options, depending on which mouse button you use. Each mouse button can be used to pick objects using either a click to pick a single object or you can click-drag a box to select several objects. This box is referred to in Alias documentation as a pick box.
The various mouse click options are as follows:
Left button - This mouse button toggles the selection state of the chosen objects. If you use this on an unpicked object, the object becomes picked. If you use this on a picked object it becomes unpicked.
Middle button - This mouse button replaces the existing pick set with the newly chosen objects.
Right button - This button removes the picked objects from the current pick set.
When you are using the Xform tools, you can evoke these same selection options by pressing the Shift key in combination with the various mouse buttons. If you don't use the Shift key then the Xform tools can only replace the current pick set with a single object.
Once you start to create models and rendered images, you need to save and retrieve your work. Alias models are saved as wire files that contain information about objects, lights, cameras and shaders. Renderings are saved as Alias PIX files that contain pixel based information about the final image. In addition, you can save shaders, textures and mask files onto your hard drive.
Your Alias account includes a number of files and directories that help you organize your work.
This file structure is made up of the following directories:
A default Alias account. This predefined account has been prepared so that you can run Alias immediately. If you want to set up your own Alias personal account, refer to the Installation instructions.
user_data - This directory contains all your Alias projects and their related directories.
demo - This is the default Alias project. This directory contains sub-directories that contain all the files used in a single project.
anim - This subdirectory contains readable animation files for transferring animations in and out of Alias.
canvas - This subdirectory contains files for Alias Studio Paint. These files are reference files for all layers, picture, and models.
cloud - This subdirectory contains cloud files.
depth - This subdirectory contains store binary depthmaps generated by shadow-casting spolights.
environment - This subdirectory contains environment shaders. Environment shaders are used to set the attributes of a model's surroundings when you render.
light - This subdirectory contains lights as created from the Multi-lister.
mask - This subdirectory contains mask files for video, compositing or for use in texture mapping.
misc_data - This subdirectory contains colors for menus, screen background, and objects.
option - This subdirectory contains default Alias option files and customized user option files.
pix - This subdirectory contains renderings and Paint files.
plot - This subdirectory contains temporary plot output files.
rib - This subdirectory contains RIB (Renderman Interchange Bytestream) output. (If you selected RIB.)
rrfr - This subdirectory contains ReallyReallyFastRender files.
sdl - This subdirectory contains Scene Description Language files for rendering.
shader - This subdirectory contains predefined shaders.
sla - This subdirectory contains output files for stereo lithography files.
stageset - This subdirectory contains reference files for multiple wire files. Each wire file is opened as a stage.
texture - This subdirectory contains texture files.
wire - This subdirectory contains Alias geometry files.
When working with Alias, it is important to keep your files organized. The Alias demo project ensures that you begin with all the necessary files. As you begin your own projects, new directories must be created with all the necessary subdirectories. You should always create a new Alias project directory from Alias to make sure that all the directories listed above are created automatically.
Later, as you work on your projects, you should make sure that you have the desired projects set as the current project. Otherwise, the wire file may not be able to reference texture images that have been placed in the other directories. For the Learning Alias tutorials, you must set the Current project to be CourseWare.
To save and open files, you use the File lister. The file lister shows icons of your files and offers a simple interface for navigating the project directories. For users who are just learning about UNIX, the File lister offers a visual means of working with your files.
Now that you are familiar with the various pieces of the User Interface and how they apply to working in a 3D world, it is time to get your feet wet. The first tutorial lesson, The Alias Interface, teaches you how to customize your workspace and begin using viewing and picking tools on a pre-made model.