Remove the grip from the ski pole. For the pole that I used for
this project this involved removing a screw and then carefully cutting
the grip along it's length with a utility knife. Be careful doing
this as it takes quite some effort to cut the grip and if you slip with
the knife you could do yourself some damage.
Remove the snow basket from the pole. This piece of plastic was
easily removed with a pair of pliers and a little brute force.
 Strip
the paint from the pole. I have found that the paint on ski poles
was not made to easily come off. The paint stripper I tried had
little effect. I used emery cloth (not paper) starting with a
relatively course grain. The following process is probably dangerous
to you and your tools so it is not a suggestion that you use the same
process, just a description of how I did it. I mounted my drill
in the vice on my workbench. The drill's chuck is just large enough
to accept the pointy end of the pole. I then used the drill with
the pole mounted in it as a primitive lathe. Wearing work gloves
I held emery cloth of various grades on the spinning pole taking care
not to put undue stress and the cluck (a long pole is a powerful lever)
and to get out of the way if the emery cloth bound to the spinning pole.
It took a while but this method allowed me to remove the paint and many
of the surface gouges that a ski pole gains after a several seasons
of use. If you can find a suitable, cheap, new pole it may
be worth buying rather than spending all that time trying to remove
gouges from a used example. Then again, if you don't mind a slightly
battle worn look the thrift shop purchase is a great buy.
Strip
the paint from the pole. I have found that the paint on ski poles
was not made to easily come off. The paint stripper I tried had
little effect. I used emery cloth (not paper) starting with a
relatively course grain. The following process is probably dangerous
to you and your tools so it is not a suggestion that you use the same
process, just a description of how I did it. I mounted my drill
in the vice on my workbench. The drill's chuck is just large enough
to accept the pointy end of the pole. I then used the drill with
the pole mounted in it as a primitive lathe. Wearing work gloves
I held emery cloth of various grades on the spinning pole taking care
not to put undue stress and the cluck (a long pole is a powerful lever)
and to get out of the way if the emery cloth bound to the spinning pole.
It took a while but this method allowed me to remove the paint and many
of the surface gouges that a ski pole gains after a several seasons
of use. If you can find a suitable, cheap, new pole it may
be worth buying rather than spending all that time trying to remove
gouges from a used example. Then again, if you don't mind a slightly
battle worn look the thrift shop purchase is a great buy.
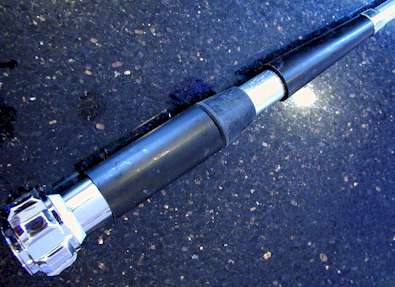
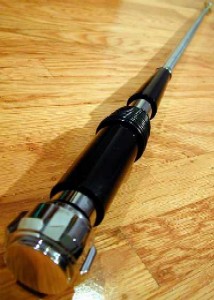
Handle; this is constructed, top to bottom, from the following parts:
A chrome faucet aerator with the aerator parts removed - basically,
I just used the chrome housing.
A suitable section cut from funnel (seen in previous picture).
About 5" but eyeball it. Cut from the funnel using a hacksaw
and then cleaned up with wet and dry paper. Scrub the surface
of the plastic a bit to give the paint some bite.
Section of 1" chrome pipe. About 1.5" are left visible
on the finished handle but I used a 6" section. This allows
the chair leg end to be mounted on it and the pipe to be solidly embedded
in the funnel section.
Rubber chair leg end. I drilled a 1" diameter hole in
the bottom and it them was mounted on the 1" chrome pipe.
Section of 1.5" ABS pipe. I cut about a 4" length
and, again, finished it with wet and dry.
Section of 1.25" chrome pipe. About 1" is left showing
on the finished handle but I used about 3" so it could be positively
mounted within the 1.5" ABS pipe.
1.25" slip washer. This mounts perfectly over the 1.25"
chrome pipe.
Finally the AS handwheel. This is mounted backwards and capped
with the chrome hole plug.
Once I'd prepared the various pieces for the handle I painted the slip
washed, ABS pipe and funnel section first with a primer and then with
a couple of coats of gloss black paint.

Handle assembly:
Dry fitting all the pieces together on the ski pole I estimated where
to mount the funnel section of the handle. I then removed all
the pieces except the funnel section and epoxied it in place on the
shaft.
When the epoxy holding the funnel section in place had cured I carefully
epoxied the 1.25" chrome pipe into place in the funnel.
When this had cured I used my secret weapon, plumber's water putty.
This comes as a powder than is simply mixed with water before use.
I mixed enough to fill the funnel and 1.25" chrome pipe.
I pored the putty into the partly constructed handle and left it over
night to cure. The putty locks everything solidly in place giving
strength and heft to the finished piece.
I now fitted the rubber chair leg over the 1.25" chrome pipe.
No glue was required to hold this in place.
I then carefully epoxied the 1.5" ABS pipe in place on the rubber
chair leg.
Once the epoxy had cured I carefully wrapped the end of the 1.25"
chrome pipe with tape until it snuggly fitted in place within the
ABS pipe.
With all of the handle now precariously in place apart from the slip
washed and handwheel I again mixed water putty, filled the rest of
the handle and left it to cure.
The next night, with the handle pieces all solidly held in place
I put the painted slip washer in position and then screwed the handwheel
in place. I then capped the pommel with the metal hole plug.
I then carefully wrapped the rubber chair leg stopper in the black
wire. To make this look as professional as possible I drilled
a hole the same diameter at the start and the end of this detail and
superglued the ends of the wire in these holes.
Finally I slipped the aerator hosing in place from the top of the
pike and epoxied it permanently in place.
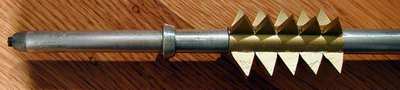
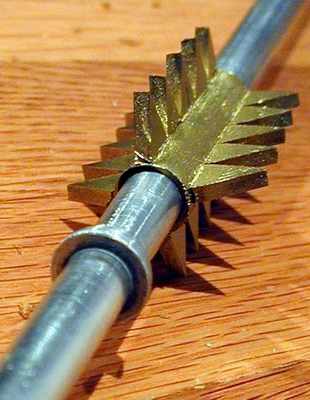
The spiky detail was scratch built:
I cut a suitable section from the old marker pen barrel.
I then split this along its length and epoxied it in place close
to the snow basket detail of the pole.
When the epoxy had cured I sanded the joint and the barrel smooth.
I cut the the spikes themselves from the scrap acrylic. This
was quickly achieved using my Dremel and a standard cut off wheel.
Each spike is a triangle approximately 1/3" x 1/2" x 1/2".
Again, I eyeballed these pieces for appropriate scale with the rest
of the pike.
The spikes were then glued in place using a good brand, gap filling
superglue.
The rest of the pike was masked and this detail was painted in place
using metalizer, non-buffing brass paint.
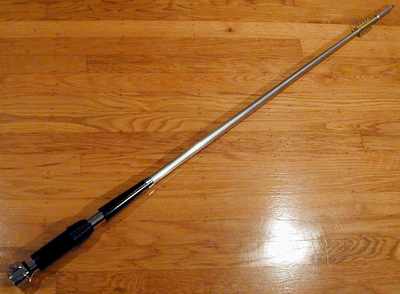


 Whilst
wandering around my local thrift store I peered into a tub containing
sports equipment; old golf clubs, fishing rods, crutches and skis
and poles. Suddenly it occurred to me that a ski pole would
be an ideal basis for a force pike; they seemed to be a good length
straight off, they are metal and they have a gradual taper that
begins half way down the length of the pole. They also have
an interesting detail which holds the snow basket in place (the
round thing that stops the pointy end going to far into the show)
and the tip itself looks very business like. You can't beat
the price either; I picked up a pair for $3. I'd wanted to
build an accurate force pike for a while but was frustrated by a
lack of clear
Whilst
wandering around my local thrift store I peered into a tub containing
sports equipment; old golf clubs, fishing rods, crutches and skis
and poles. Suddenly it occurred to me that a ski pole would
be an ideal basis for a force pike; they seemed to be a good length
straight off, they are metal and they have a gradual taper that
begins half way down the length of the pole. They also have
an interesting detail which holds the snow basket in place (the
round thing that stops the pointy end going to far into the show)
and the tip itself looks very business like. You can't beat
the price either; I picked up a pair for $3. I'd wanted to
build an accurate force pike for a while but was frustrated by a
lack of clear 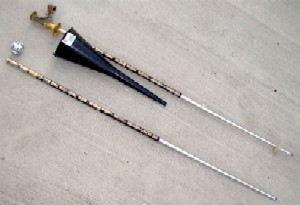 Below
are the parts and tools I used for this project. As you can
see this is a pretty cheap and simple project that requires the
minimum of tools but the resulting prop, I hope you agree, is relatively
high grade.
Below
are the parts and tools I used for this project. As you can
see this is a pretty cheap and simple project that requires the
minimum of tools but the resulting prop, I hope you agree, is relatively
high grade.