|
~Lesson 14~ |
 Next Page |
| ||
|
~Lesson 14~ |
Next Page |
| ||
 | There is also a PowerPoint show called "Importance of Saving" available. |
NOTE: For this lesson you will need to have two windows on the screen at the same time. Click on "How to Show Two Windows at Once" on the list at the left to learn how to do this.
Work done on the computer is lost when the computer is shut off or when the power goes off, unless it is saved first. Saving your work means that you will be able to open it and work on it again at a later time. If you don't save your work before the computer goes off, you will have to do it over again. Don't wait until you have finished working before you save - save your work every few minutes!
There are 2 ways to save a document or file to the computer: From the File menu and by using the Save toolbar button.
 | Saving from the File Menu |
On the File menu in any open application there are two save commands: Save and Save As. The first time a document is saved, whether you select the Save or Save As command on the File menu, the Save As dialog box appears and asks for more information. The computer needs to know what you want to name the document and where on the computer you want it to be placed. Every time you save the document after the first time, the computer will save it under that name and in that location until you tell it to do otherwise.
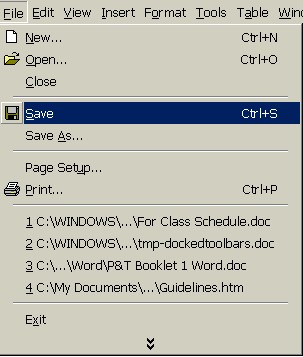
After saving a file, you can change the name of the document and/or the location. To do so, select Save As from the File menu. Another Save As dialog box will appear so that you can make the name and/or location changes. Every time the document is saved after making those changes, it will be saved under that new name and location.
When Save or Save As is selected from the File menu, the Save As dialog box appears.
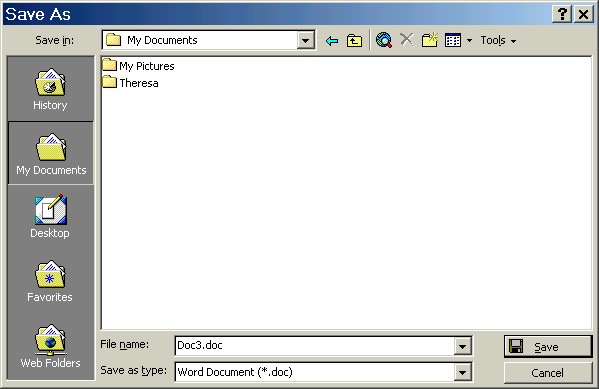
| 1. | The first step in the Save As dialog box is to choose where on there computer to save the file. The
Save In box on the top line will have the name of a location in it already.
 Save In Location Box If that is where you want to save the document, go on to Step 3 below. If you want to change the location, click on the drop-down arrow next to the folder name in the Save In box.
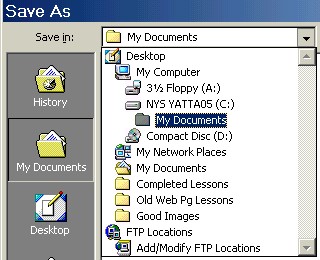 Save In Drop-Down Box Select the location by left-clicking on it once. |
| 2. | Folders can be placed inside of other folders, so you may have to navigate, or move, to the correct location. For example, the My Pictures folder, where many people store their pictures on the computer, is usually located inside of the My Documents folder. To get there, open the Save In drop-down box and select My Documents. Click on the My Pictures folder and then on the Open button to open the My Pictures folder. |
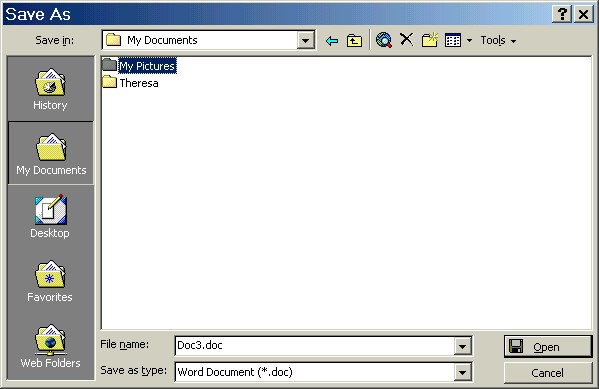
| When saving documents, continue opening as many folders as needed to get to the place where you want to save the file. | |
| 3. | The next step is to type a file name for the document in the
File Name box.
 File Name Box Left-click once in the box, delete the name that is already there (called the default name) by using the Delete or Backspace keys on the keyboard, and type the new name. |
| 4. | The Save as Type box contains what are called file name extensions, which is information needed by the computer.
 Save as Type Box You normally don't need to change the file type. In fact, you should not change any file types until you are more experienced with the computer. File extensions will be covered in "Learning the Computer - Intermediate" lessons. |
| 5. | When you are satisfied with the name and location for your document, click on the Save button. If you change your mind and do not want to save, click on the Cancel button instead, or on the Close ("X") button in the upper right-hand corner. Note: While the Save As dialog box is open, you must save or cancel before you can go back to the main window. The computer will not let you leave the Save As dialog box until you Save or Cancel. |
Practice:
READ ALL INSTRUCTIONS BEFORE STARTING.
| 1. | In this lesson window, open the File menu on the Menu Bar above and select Save or Save As. |
| 2. | In the Save In box at the top, click on the drop-down arrow to open the list, then select Desktop by left-clicking on it once. |
| 3. | In the File Name box, click on the name that is already there (probably "Learning the Computer - Beginning" and change it to your name. |
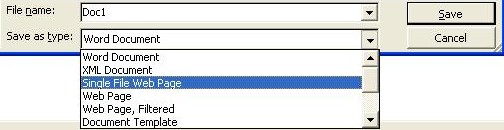
| 4. | In the Save as Type box, click on the drop-down arrow to look at the choices. You will be saving this document as a web page, but the option you choose will depend on the version of Microsoft Word you are using. Select one of these options: "Save as Web Page," "Web Page, HTML only (*.htm, *.html)," or "Single File Web Page" (see pictures below). If none of these options is available, let your teacher know.

|
| 5. | If there is a box that says Encoding, do not change it. If there is no Encoding box, skip this step. |
| 6. | Click on the Save button. |
| 7. | Click on the Minimize button in the upper right-hand corner of this window and look for your file on the Desktop. |
| 8. | When you've found your file on the Desktop, click on the Taskbar button to return to this lesson. Note: If you cannot find your file on the Desktop, repeat steps 1-8. |
|
Next Page |