|
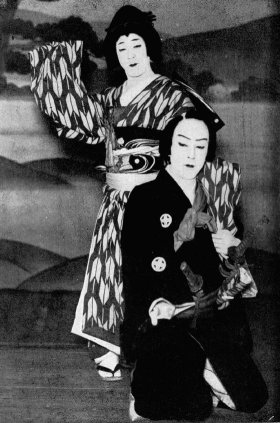
Males stand with their feet about their hips' width apart, toes out. Females press their knees tightly together and fold one set of toes over the other -- as pigeon-toed as can be managed, which is at least a little with the gymnast body. You might consider using wide rubber-bands to hold her knees and ankles together for dressing, or several inches of bias tape. They can be snipped off afterwards, by carefully laying back the fronts of the skirts. For both sexes, clothes wrap left side over right, what the West considers "boy-style." In Japan, right over left is not "girl-style": it's "dead-style," reserved for corpses.
For her: the bottom center back seam should finish up just above floor level. Men wear it a bit higher, with the ankles not quite showing. In both cases, grasp the front edges about hip height from the hem and draw them somewhat upwards as you pull them forward. The front should be what some call a tulip hem. Put the himo across the front of the hips, cross it behind, and tie it in front with a simple bow knot -- hard and tight. Tuck the ends under the himo so they disappear. An orange stick will do the job. The kimono will look real baggy and gaping above the himo. For male dolls, pull the back of the neck band against his neck and cross the front to cover the pit of his throat. Press and tug the excess down over the himo, then tie in place with a second himo over the hips. Now you see why you can't just tack the edges of the kimono: the himo all around shapes the drape. At this point comes the finest artistry of female dress. Decide how modest your doll is. Risque is not a display of bosom: kimono always cross high in front. The sexy thing is to show off the nape of the neck. That's right: a neckband tilted back until the large vertebra shows will have all the guys staring -- and, if it's any lower, get a girl a slap from her momma for running around dressed like that. Keep the real low back for Madame Butterfly and the other bad girls. Still, a doll needn't have it prudishly right up against her hair. Also, how upstanding or flat the band sets on the sides of the neck, how far away from the neck, how narrow or wide the part of each band showing, can make a woman look slimmer or rounder in the face and body. Well, they say. See if you can see any difference. This all is adjusted by pulling the excess body length down in a fold over the first himo, all around, until the back of the collar band sits right and the front crosses properly. Hold it with another himo around the waist. Unlike the male, you can put it this high because of where the obi is worn. The set of each layer, if only of faux neckbands, can now be determined by the hadajuban's collar. Each kimono goes on the same way with the over drape around the hips. Practically, for most dolls this will be a hadajuban, several collar layers (they still have to be crossed one by one, not all at once), and the main kimono. Once the main kimono is on, it's obi time! A man leaves a tail sticking up, tightly (not just snugly, but tight as you can) wraps the obi several times around his hips from his left to his right across his front, and ties it in a flat bow knot that should sit horizontally. Think bow tie. Otherwise he uses a single-loop bow that sits very flat but at an angle, like the first female obi knots described below. The loops should be as small as practicable. You then rotate it clockwise around the body until the bow is at center back. Over this he slings a hapi or haori, and fastens its sewn-on ties in front with a square or bow knot.
For a female, the obi end is put up to or over the shoulder, the obi wrapped several times in the same direction as the kimono, until the unfolded point is reached, then tied any of a dozen ways. The simplest and most common is to make a single-looped knot, with the loop of the unfolded end to the left. Just open out the end and fold it back on itself. Bring the first end down over it, under the loop, and out under itself horizontally to the right. This is a more casual, everyday knot, better with a narrower obi.
For dressier occasions, turn the opened-out end upwards. Fold it down so there is a loop on top. Don't bring the first end behind it, but over the front of it to the right, then behind the loose end and pull it downwards.
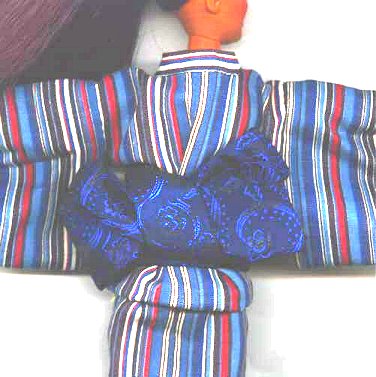
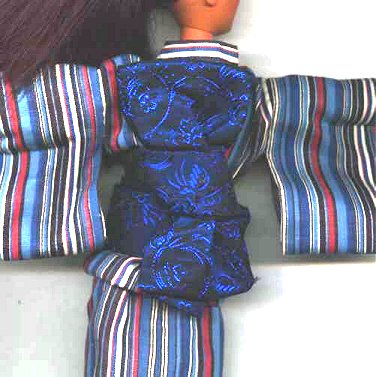
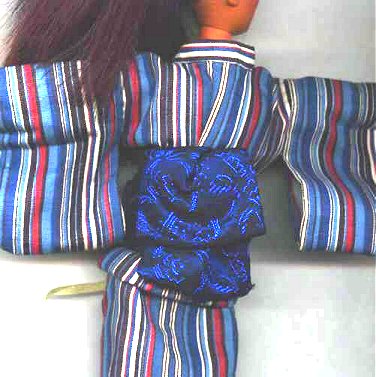
This can be modified by folding the loop down over the knot, and tugging the ends vertical. To make this drape right, it may take a bit more length in the loop. This can then be adjusted: smaller for simpler kimono, puffy and splendid for full dress. Making the loop stay down requires an obi cord, because in this scale the fabric does not have enough weight to keep itself down. Gravity doesn't scale!
The obi cord is a flat woven cord in co-ordinating colors that is put through the loop to keep part of it against the knot. The ends of the cord are brought to the front and tied in a square knot. Then the ends go around to the back to be tied in hiding. They should not dangle loose. You will have to find out how long this will have to be for your particular doll and costume. The obi scarf is gently and puffily tucked in around the top of the obi, to hide any gap at the top between kimono front and a stiff, wide obi -- not likely in fashion dolls. It is usually 1 1/2" (3.75 cm) wide in Barbie scale, by 3" to 4" (7.5-10 cm), in a very lightweight but not-quite-sheer fabric. You can neaten it up by making it a tube, and tucking the seam in first. By the way, if you see a woman in an old print with her obi knot in front, she is advertising that she is a prostitute available for hire.
Put on or paint on white tabi, for no one of any refinement over toddler age runs around barefoot. We're not talking hod-carriers and field workers here. Young girls may wear red tabi with white soles with their red and pink furisode. Tuck in a fan, and any other accessories the doll may carry. Enjoy!
Barbie® is a registered trademark of Mattel®, Inc. Gene® is a registered trademark of Mel Odom and Ashton Drake. Candi® is a registered trademark of Hamilton Designs. Tyler Wentworth® is a registered trademark of the Robert Tonner Doll Company. Any other dolls mentioned are registered trademarks of their respective owners. This website and those who maintain it are in no way affiliated with the any above mentioned parties. The images of the dolls displayed are photos taken by the author(s) of the article and/or the designer featured. Please do not remove pictures and/or text from this website without permission of the webmaster and/or the photographer. |