|
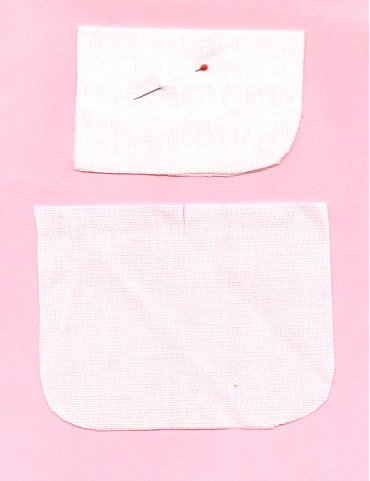
Fold the sleeves in half lengthwise. Mark the shoulder line on one side of the fold. On the opposite corner, cut a rounded corner off a 1 1/4" (3.125 cm) jar cap or plastic template
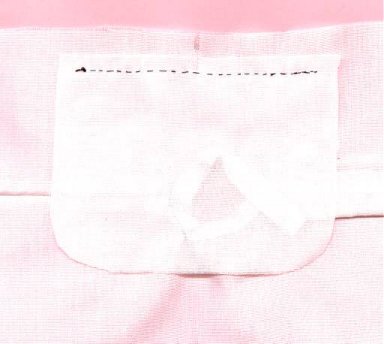
Fold the kimono and sleeves at the shoulder line, right side to right side. Of all places, this is where male and female garments differ. Female kimono are left open under the arm on the body, and all down the inner edge of the sleeve. Male kimono are sewn up. Remember the sideseam seam allowance is deeper for more slender figures. On the female kimono, leave 1" (2.5 cm) open below the point where you have sewn the sleeve to the body. Sew from here to the hem with a 3/4" (1.875 cm) seam allowance. On the sleeves, mark down 1" (2.5 cm) from the shoulder line at the wrist opening. Sew from here, around the curve, but only to the back edge. On a male kimono, mark 1" (2.5 cm) to either side of the shoulder line to leave a wrist opening for the gymnast hands, 1 1/4" (3.125 cm) for the regular Ken doll with the big paws. Sew from this point around the curve, pivot at the lower corner, and up until you meet the stitching that holds the sleeve to the body. A handstitcher may now bring the needle up through the sleeve's seam allowance and down through the seam allowance of the body, crossing the seam. Machine sewers will have to stop here, not cross the seam, and start up again on the body seam down to the hem. The underarm body seam allowance is 5/8" (1.5625 cm).
Press all seams open. Turn under and blindstitch all raw edges for a neat look. STEP 7: The Hem If you put the kimono on the doll now, it will hang considerably longer all around. It is supposed to! Kimono need a certain amount of blousing to be correct. So only press under the edge a 1/4" (0.625 cm) and 1/2" (1.25 cm) again to make a narrow hem. Blindstitch. You're done!
Use a single piece of tan width, twice the length from shoulder to hip. Mark the shoulder line halfway along, and cut from one narrow end to this to make the center front opening. Finish the edges as you like, as they will never be seen on the dressed doll. Fold lengthwise and cut the neckline as directed above, from the center fold rather than a back seam. Cut a neckband of the fancy fabric. Sew on as above, ending it at the edge of the fabric, since this has no front extension.
When dressing, put this over the hadajuban, cross over in the front to suit,
and tie in place with a himo. You can often carefully cross all the false
neckbands, one at a time, and tie them with one himo.
Barbie® is a registered trademark of Mattel®, Inc. Gene® is a registered trademark of Mel Odom and Ashton Drake. Candi® is a registered trademark of Hamilton Designs. Tyler Wentworth® is a registered trademark of the Robert Tonner Doll Company. Any other dolls mentioned are registered trademarks of their respective owners. This website and those who maintain it are in no way affiliated with the any above mentioned parties. The images of the dolls displayed are photos taken by the author(s) of the article and/or the designer featured. Please do not remove pictures and/or text from this website without permission of the webmaster and/or the photographer. |