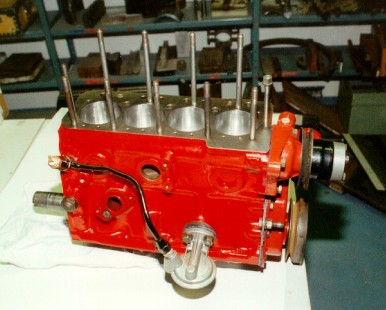
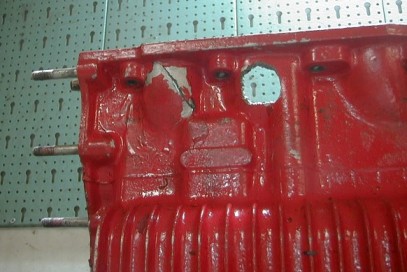
 Engine block assembled
The head is either Marina or Allegro 12G940 casting. Intake valves are 36 mm and ports are rather conservative, I wanted to retain as much gas velocity as possible. The throats just under the valve seats are as big as possible, as per Vizard book. The exhaust is more special. I drilled the guide holes to 16,00 mm with a counterbore of 20,00 mm at the top under the spring. I then turned a set of collared sleeves with interference fit and drilled the new guide holes offset 1,3 mm on a lathe. Then I simply pressed the offset sleeves into the head, offset AWAY from the intake. Fitted new guides. Offsetting means that bigger valve needs to be used. Exhaust valve is 32 mm with 8 mm stem from VMax, don�t know the origin. Metro used 29 mm valve. VW turbodiesels use 32 mm valve which could be used. The exhaust was cut as much as I could and still be on the safe side.
 Cylinder head components
Offsetting has two advantages, first you can fit larger valves and still retain enough material between valve seats to reduce cracking tendency, and second: the exhaust port efficiency increases because the exhaust gases have a more direct route from the combustion chamber. The ports have been modified by myself. I kept the intake ports reasonable to keep the mixture speed as high as possible for good low down response and opened the exhaust ports as much as I dared. This combination seems to work. One must remember to have enough material left for good heat dissipation because turbo engines will generate a lot of heat
Head studs are ARP items, expensive but worth every penny. I have a TAM 1521 head gasket which is the original composite gasket, no O-rings and no extra reinforcements. So far after 19 000 miles no problems whatsoever even if the block is overbore to such an extent. Block and head were resurfaced when I built the engine. You actually feel the difference when you torque up the head nuts. Highly recommended. If you blow up gasket with these studs then you have problems elsewhere. ARP fasteners are probably the strongest in the world. Very nice finish and strong like hell. There are also some uprated studs available, e.g. from Mini spares. I chose ARP. No problems with the engine even if I cooked the engine once...
Valve springs are double racing springs from Mini Spares, actually the only reason for them being the 1.5:1 ratio rockers. Valve lift necessitates springs that do not bottom and these springs were the only ones I knew would work. Total valve lift is about 0.450 in.
By the time I was putting the engine together I got a lot of help from VMax in England. I had to rely on their suggestions and therefore chose their cam. Nowadays Avonbar is selling turbo cam which is probably the same spec or very close... Camshaft is a spider drive turbo cam from Vmax Racing, spec unknown (proprietor Stuart Gurr informed about 270 in, 288 ex), timed about 4 degrees advanced. I have advanced the cam timing on all of my engines because I do a lot of road driving where you need good response at lower rpm range. Advancing the cam will help to bring the power at lower rpm but you also loose some at high rpm. With turbo you can partly compensate with higher boost. Besides I don�t like screamers that spend most of the time above 6000 rpm. Adjustable duplex cam drive from Mini Spares.
Distributor was Aldon yellow centrifugal modified with Metro Turbo vacuum clock. Not the best possible dizzy. So I rebuilt another dizzy with different springs to give a better ignition curve. Ignition is MSD 6AL capasitive discharge with matching 45000 volt MSD coil, triggered with points.

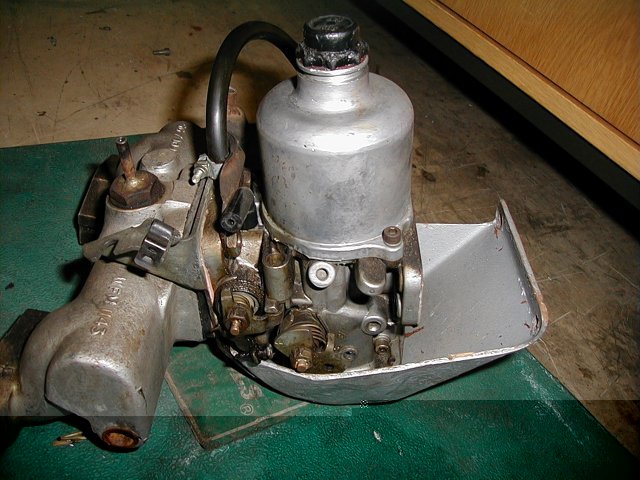
Garrett T3 turbocharger from MG Metro Turbo is as delivered second hand. I simply opened it and checked that impellers are intact. Intake and exhaust manifolds are also original. Carb is SU HIF from Metro Turbo, fitted with throttle plate that has no over-run valve. Carb needle is heavily modified and I have two dashpot springs fitted.
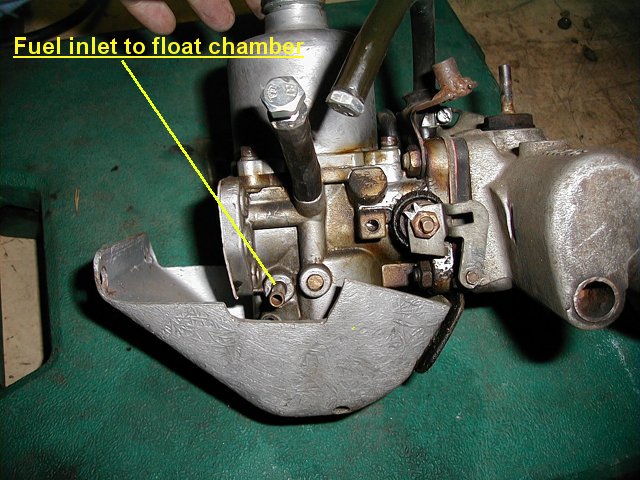
These pics show the SU HIF44 turbo carb:

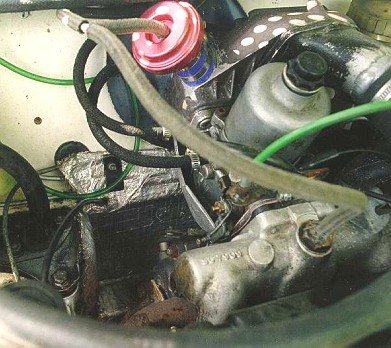
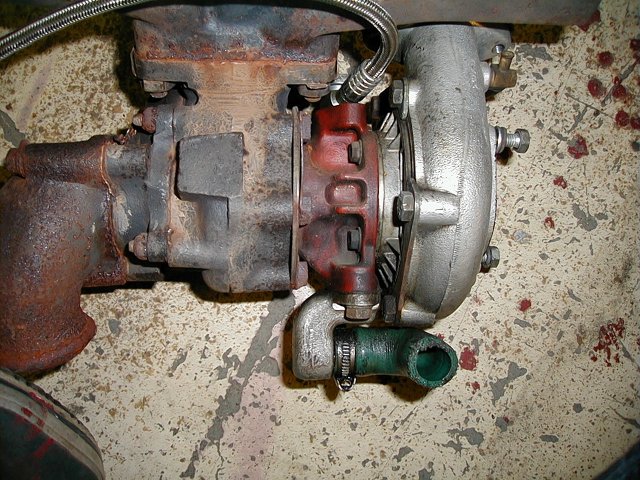
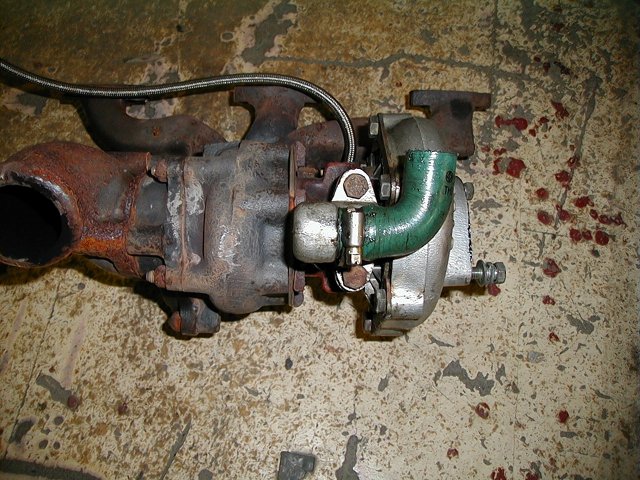
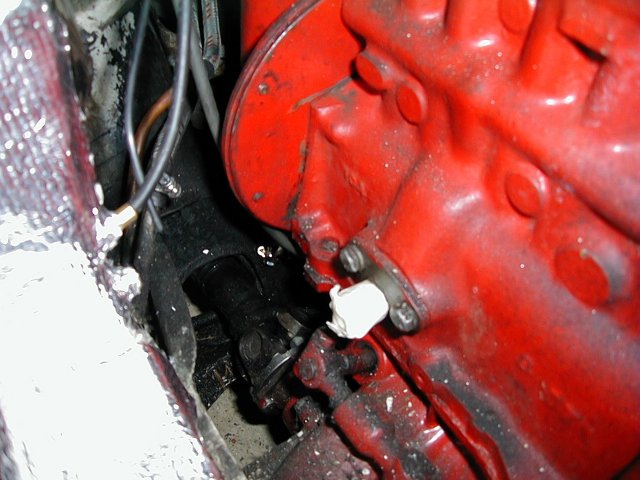
Here are some pics of the oil return hose from turbocharger to block:
Renault intercooler is fitted at the front left hand corner, just behind the grille. I have a front mounted radiator as well, from Sprite/Midget. Radiator has a very slim electric fan from Nissan. Radiator and intercooler just fit next to each other and some utting was required. Space is very tight. Photos show the installation. Intercooler tubes were welded from 45 mm thin wall steel tubing.
Exhaust is 2 in. with two BIG silencers. This keeps the back pressure low and the car is really quiet for a modified Mini. I like it this way because it does not attract attention.
I have also fitted an alloy dump valve. I removed the original dump valve and plugged the original hole with brass plug. Alloy dump valve was fitted to the plenum chamber via a aluminium tube brazed to the plenum. It is a cheap insurance against turbo failures and enables future boost increases...
No problems with the clutch. Never slipped. My driving style ??? I don�t burn rubber but I do know where the gas pedal is. The best kicks come when you start on 1st gear and select 2nd at about 3500-4000 and then hit it. The pull on 2nd gear is fantastic all the way to 7000. Same thing with overtaking, 3rd gear and nail it. And keep it straight... Actually I am also surprised that the transmission is holding. But if you scream it all the time it�s easy to break anything. I must warn you though; you do get addicted to the torque. I have ended up using power while overtaking even if the roads are empty and you have all the time in the world. But it feels so nice to have the kick even on the 4th gear that you have to use it. Mileage hurts... Its not bad though, it takes about 9-10 litres/100 km, maybe about 20 mpg.
1380 Turbo intercooler - Engine rebuild winter 2000
Latest visit to rollers revealed problems with engine, major leaks in cylinders 3 (30 %) and 4 (60 %). I took the cylinder head off and found the exhaust valves sunken in the head. The exhaust valve in cylinder 4 had sunken almost 3 mm deep into the head. No wonder it leaked that much. Other exhaust valves had sunken but only about 0,3-0,5 mm. Further problems were found: bent pushrod, worn cam, worn cam followers, broken outer valve spring, worn rocker shaft, worn rocker bushes etc. Basically the head and complete valve gear was scrap.
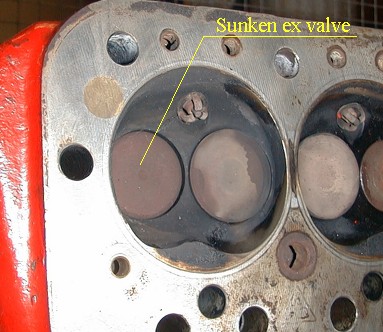 Sunken exhaust valve in cylinder 4
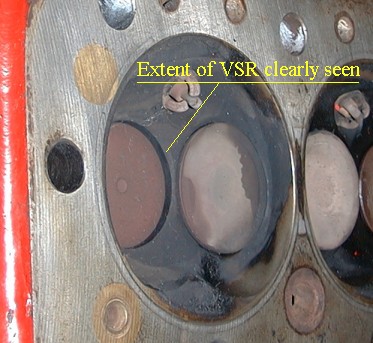 Extent of valve seat recession (VSR)
At the same time I chose to check and rebuild the helical gearbox. It had survived pretty well considering the output of the engine. Only broken items were a couple of synchro teeth on 1st and 2nd gear due to smashing gears. These were replaced with better second hand gears. Otherwise the box was cleaned and clearances adjusted to factory spec. I also fitted new synchro rings since the box was apart.
Diff was in good condition. Minispares comp diff pin was slightly worn but still usable. I fitted the Minispares cross pin differential with 2,95:1 ratio, replacing the former 3,21:1. Drop gears were checked and primary gear bushes found to be worn. I fitted a new gear because replacement bushes were not available at the moment. Drop gear endfloat was checked and adjusted.
Engine was slightly updated. I fitted new bearings, oil pump, duplex chain, new turbo cam, followers, rocker bushes and shaft. The head was beyond repair even if seat inserts were tried to be fitted. Machining revealed a water jacket and inserts were considered unreliable. So back to head cutting. I ported another head with 36 mm Rimflo intakes and 31 mm exhausts. I did not fit the old 32 mm ex valves because they were bulky and all e.g. MED nowadays use stainless valves in their turbo heads. The exhausts were offset as per the old head and ports modified. Since I will fit a Dellorto DHLA 45H turbo carb at a later date I cut the intake ports to match the larger manifold ports. The head has slightly larger chambers so the CR will be lower, now around 8,2-8,3:1.
 My chief mechanic at valve lapping
I also found out that I had screwed up big time when the engine was assembled a few years ago. When checking the exhaust manifold I noticed that there is a mismatch between the port and manifold, about 4 mm. This has caused a massive restriction in exhaust flow in cylinder 4. This may have something to do with the valve problem. A few minutes with a grinder cured that mistake.
Once the cam is run in and carb rejetted to suit the new head and cam I will visit the rollers and check what has happened.
April 19, 2000
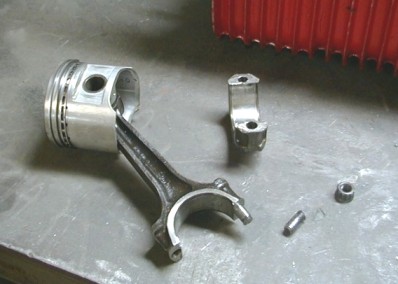
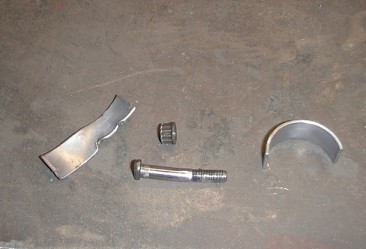
No need to visit rollers, engine blew up after 15 minutes from the initial start. I managed to drive only 200 meters when terminal knock appeared. After a quick check a big end bearing shell was found to be sticking out of the gearbox casing. Once I took the engine apart the big end cap of #4 con rod was found inside the gearbox. It appears that nuts had come loose. Big question is how since the nuts were torqued properly and all other con rod nuts were in proper torque setting. Now there is additional work waiting, not to mention extra expenses !!!
April 26, 2000
Fortunately the crank was OK and can be refitted. New gearbox casing was located and gears are already fitted. New cam bearings were also fitted in the block since they were worn and engine happens to be in pieces... New pistons and conrods are at the machine shop to be fitted and engine assembly starts on Friday.
May 2, 2000
Engine and gearbox are back together. I fitted new Omega low comp. height pistons and balanced set of A+ rods with ARP bolts and nuts. Supplied by MED in a few days. CR is actually lower than thought, combustion chambers in the head are 37 cc which equals to 7,7:1 CR. Well, if the head works OK maybe a slight skimming is in order. A couple of hours work and the car is back on the road. LH side lower ball joint is worn and has to be replaced as well.
May 4, 2000
Engine runs nicely and all gears work. I replaced the ball joints on LH side and track rod ends (split rubber boots)on both sides. Only thing that remains is to fit two jubilee clips and put some fuel in the tank and prepare yet another needle to suit new engine spec. I hope that this needle will be the last because I have already bought a Dellorto DHLA 45H turbo carb and Janspeed manifold. I have also fabricated a special aluminium plenum chamber for the carb. To fit the manifold the original manifold needs to be replaced with a fabricated item since the two won�t fit together. And I might as well change the turbo for a smaller T2 or T25 and...
May 15, 2000
500 miles covered after the rebuild. Engine works nice but some work remains. Clutch is slipping badly at about 4000 rpm on 3rd and 4th gear so new plate and a grey diaphragm will be fitted tomorrow. The final drive ratio is great and engine does not seem to be affected of the new ratio. The engine does not consume oil so the rebuild seems to have succeeded pretty nice.
May 19, 2000
New clutch plate and grey diaphragm fitted with engine in situ. Pain in the butt but succeeded at last. Also changed the clutch seal even if the one fitted was new one. Still there was evidence of oil around the seal. Another new red Payen seal fitted. Clutch is just about as heavy as the previous clutch but needs more careful use. It seems to bite pretty fast... I also repaired a couple of holes from the LH front floor. I also took the car to the Finnish MoT and it passed as expected. The only complaint was about the brake light switch which seems to switch on at high pedal pressure, not instantly when the pedal is pressed. The man had trouble with clutch and commented that "the carb seems to be out of tune...".
August 9, 2000
Summer�s just about over and Mini has covered about 3000 miles. the drive to Saariselka IMM 2000 meeting went without problems, apart from one annoying fuse that refused to connect. Engine worked beautifully, 2,95 diff is superb on long journeys. A cruising speed of 80 mph was kept most of the time. Despite the diff the acceleration is quite nice. Exact figures need to be measured before engine modifications.
I modified the carb by plugging the hose from RH side of the carb to carb manifold flange. This caused the mixture to richen at low revs and leaner needle was required. A slight stumble that was present at about 2500 rpm disappeared. It seems that this connection affects the fuelling especially when going from vacuum to boost.
I have also fitted a solenoid valve which enables the boost to be raised with a switch in the dash. The setup includes a couple of Dellorto jets that allow fine tuning the exact amount of extra boost. With the solenoid activated the boost will be 1 bar (14,7 psi). Just to be sure if the car feels too slow...