Home
Lessons
Gallery
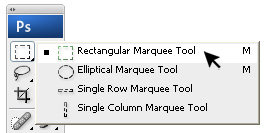
The Layer palette is where we handle all of our layer-related tasks, from adding and deleting layers to adding layer masks and adjustment layers, changing layer blend modes, turning layers on and off in the document, renaming layers, grouping layers, and anything else that has anything to do with layers. Since it�s one of the most commonly used panels in all of Photoshop, Adobe set things up so that the Layers panel opens automatically for us each time we launch the program. Thsi are the parts of the Layer Palette:
Picture |
Name |
Description
Name Tab First of all, how do we know that what we�re looking at is, in fact, the Layers panel? We know because it says so in the name tab at the top of the panel. Layer Row Each time we open a new image in Photoshop, the image opens in its own document and is placed on a single layer. Photoshop represents layers in the document as rows in the Layers panel, with each layer getting its own row. Each row gives us various bits of information about the layer. I only have one layer in my document at the moment, so my Layers panel is displaying a single row, but as we add more layers, additional rows will appear. Layer Name Photoshop places the new image on a layer named Background. It�s named Background because it serves as the background for our document. We can see the name of each layer displayed in its row. Preview Thumbnail To the left of a layer�s name is a small thumbnail image known as the layer�s preview thumbnail because it shows us a small preview of what�s on that specific layer. In my case, the preview thumbnail is showing me that the Background layer contains my image. Adding a New Layer A new layer appears in the Layers panel directly above the Background layer. Photoshop automatically names new layers for us. In this case, it named the layer "Layer 10". Notice that we now have two layer rows in the Layers panel, each representing a different layer. Moving layer We can move layers above and below each other in the Layers panel simply by dragging them. Deleting Layer To delete a layer, simply click on it and, with your mouse button still held down, drag it down onto the Trash Bin icon at the bottom of the Layers panel. Release your mouse button when you�re over the icon. Copying Layer We�ve seen how to add a new blank layer to a document, but we can also make a copy of an existing layer using the Layers panel. To copy a layer, click on it and, with your mouse button held down, drag it down onto the New Layer icon. Layer Visibility Icon f I want to see the original photo again in the document, I can simply turn the blurred layer off by clicking on its layer visibility icon. When the little eyeball is visible in the box, it means the layer is visible in the document. Clicking the icon will hide the eyeball and hide the layer. Renaming Layer As we�ve seen, Photoshop automatically names layers for us as we add them, but the names it gives them, like "Layer 10 and Background Copy", are pretty generic and not very helpful. When we only have a couple of layers in a document, the names may not seem very important, but when we find ourselves working with 10, 20 or even 100 or more layers, it�s much easier to keep them organized if they have meaningful names. Thankfully, Photoshop makes it easy to rename a layer. Simply double-click directly on a layer�s name in the Layers panel, then type in a new name. When you�re done, press Enter. |