The examples we have discovered can be broken into three main categories those with a flat wooden sole, those with a stilted wooden platform and those of laminated leather. The two wooden sole styles are very similar in construction, each being carved most often from a single piece of wood. The strapping was fastened in place using iron nails. The leather sole style was composed of several layers of leather sewn together to a desired thickness. The straps were generally sewn in between two of the upper most layers.
The style of flat, wood-soled, patyns with hinges were common in the late 1300’s and continued to be worn until the mid 1400’s. They were often made in two parts, a heel and forepart, and joined together by a leather hinge of some sort. This hinge was primarily inset to be flush with the top surface of the sole, however fragments have been found to suggest that at least one pair in history may have possessed a complete leather covering to and the sole and act as a hinge.
The strapping was made of two layers of leather stitched with their flesh face together. Strips of leather were known to have been used as edging on the straps. This embellished them by hiding the visible flesh face at the laminate edge. Leather stripping was also used as a form of washer to protect the straps from the nail heads. It is thought that this stripping encircled the sole for not only function but for ornamentation.
The extended toe points on shoes and patyns were referred to as either Crackowes, after the city of Crakow (Poland), or poulaines after the region named Poland. Poulaine was the exceedingly wider used of the terms. This new fashion trend is thought to have been introduced to Western Europe with the marriage of Richard II and Anne of Bohemia. Poland was at that time part of Bohemian rule, which would explain a migration of the fashion with Anne. The lengths of 14th-century poulaines mimicked those of the shoes. The three most popular theories for this trait are:
- Fashion, pure and simple: If it was stylish to have long poulaines on one’s shoe, should it not be the same for their patyns?
- To keep the poulaines of ones shoe or hose in position and protected: It would seem that without support, the poulaines would tend to “bounce” when one walked. By strapping a wooden form to t, hem two, they would not bounce down into the ground or worse, ending up under the patyns themselves and potentially causing the wearer to fall.
- To facilitate the transition of their use with/from that of the shoes of the same time: It takes a bit of practice to walk with lengthy poulaines. It would make sense to keep the designs similar so the wearer did not have to adjust their walking motions according to weather or not they wore their patyns that day.
Broader straps were most prominent during the 14th–century, giving way to the embellishments characterizing this period’s patyns. Nearly all of them had some form of decoration adorning their straps, such as stampings, painted images or by far the most popular, stitched patterns.
The flat-soled patyn gradually faded into the background as stilted and (at this time) rare laminated sole patyns grew in popularity.
As with the use of shoes during this time period, I have not been able to identify a clear-cut practice of when patyn use was called for. Additionally, the trend for illuminators to show patyns on the feet of their central figures has caused some researchers to presume only the higher social classes owned and/or used patyns
General Fabrication:
My patyns are based on traits of those found in the Baynard’s Castle, Billingsgate and Trig lane excavations. Since I could not locate a completely intact 14th-century patyn, the work before you is a collage of information retrieved from period finds. The base design was chosen due to my walking pattern. While I like roller-skating, I do not care for the way you need to walk with a stilted, fixed plane sole. This left me with the flat-sole type of patyn though they are not as effective at avoiding water/mud. For the closure method, I chose to go with the iron nail locking pin-type fastener. As the majority of finds and depictions from the 1300’s show decoration of some form on patyns, I examined illuminations, photographic images of surviving objects and redrawings of finds. I found floral motifs to be very popular in the 14th-century. The modern stigma of men wearing flowers helped me decide on my unique pattern and the way in which I applied it. I chose to stay with floral images because of their popularity for my period, but toned them down by selecting simpler designs and deciding to stamp them after dying the strapping. This would keep the leather from accepting so much of the detail as well as highlighting the impressions with some flesh tone accents. 13/16” thick poplar A coping saw Various files 1/2" & 1” chisels Sandpaper A natural bristle paint brush X-acto blade Glover’s needles A pin vice (to hold a glover’s needle and pierce holes prior to stitching) Linen Bee’s wax (for linen & strapping) Various stamping tools Oil based dye Neat’s-foot oil A mallet A tack hammer This project did not reveal any trick or traps during its implementation as most of my others have. Everything was pretty straightforward with no surprises. My only piece of advice for those beginning their adventure in patyns is to make a mock up in fabric or paper first. Have someone trace the parameter of your footprint while you stand in a natural position. Cut pattern out and verify your foot does not hang over any edge. Cut the sole out of the material you chose; then, with your foot on the sole, drape some old fabric over your foot and sketch your pattern on it. Cut out the pattern and tape it to the sole where you would nail it. Everything should fall into place as you go. Addendum: 09-05-03 Upon using a pair of patyns (identical to those shown above) at an event, I learned a couple key pieces of information. First off, this type if footwear was actually rather comfortable when worn over chausse. I was quite surprised to suffer no foot or back aches from their use. After the event, I searched for cut tacks longer then ¾” long, but could not find any. In fact I had little luck finding anything even remotely close so decided to made my own. (It is necessary for the tacks to pass completely through the ¾” poplar soles so their tips can be bent over to lock themselves in place hence the required length.) The closest thing I found to cut tacks were “1-1/4” bright ring shank underlayment nails” (commonly used to hang pictures in drywall). The first thing I did was to distress the heads to obtain an appearance similar to that of the cut tack. Next, I removed the points and shortened the nail by two shank rings. I then hammered the end into a wedge shaped to thin it for bending. Finally, the wedge was ground into a pyramidal shape to better pass through the patyn soles. The heads can be blackened, if so desired, by heating with a torch and oil quenching a few times. I left mine the nail’s natural color as I did not want to take the chance that the black may eventually come off on my chausse. To install the new nails, I through-drilled the original holes made by the cut tacks to 3/32” diameter. I found this size drill bit still allows the shank rings to grip the patyn sole while being loose enough to keep them from splitting when the “formed tacks” are driven in. When the point of the formed tack was through, a tack hammer was used to start rolling it’s point over. While performing this step (and the next) be sure the head of the formed tack is reinforced by some hard surface to prevent it from backing out as you hammer it’s point. When the point is aimed downward, change the angle of the hammer blows so the point buries itself into the wood and the remaining protrusion is flattened flush with the bottom of the sole. This will help to prevent snagging if you should find yourself walking on carpet or such. Sources: Dress Accessories 1150-1450 by Geoff Egan & Frances Pritchard (Medieval Finds from Excavations in London #3 by Museum of London) Fashion in the Age of the Black Prince by Stella Mary Newton Shoes and Pattens by Francis Grew & Margrethe de Neergaard (Medieval Finds from Excavations in London #2 by Museum of London) Textiles and Clothing 1150-1450 by Elisabeth Crowfoot, Frances Pritchard & Kay Staniland (Medieval Finds from Excavations in London #4 by Museum of London) Gothic and Renaissance Art in Nurembeg 1300-1550 by Mwtropolitan Museum of Art Illuminated Manuscripts; Treasures of the Pierpoint Morgan Library in New York By Abbeville Press Manuscript Painting at the Court of France by George Braziller Knives and Scabbards by J. Cowgill, M. De Neergaard, N. Griffiths, Margrethe De Neergaard, Francis Grew (Medieval Finds from Excavations in London #1 by Museum of London) What life was Like: In the Age of Chivalry (Medieval Europe AD 800-1500) by Time Life Books Medieval Costume in England and France; The 13th, 14th and 15th Centuries by Mary G. Houston The Luttrell Psalter by Janet Backhouse (Medieval Manuscripts in the British Library) Medieval Manner of Dress by Else Marie Gutarp Medieval Costume and Fashion by Herbert Norris Knights by Andrea Hopkins History of Costume by Milia Davenport
Copyright Terms,
Copyright Wolfram von Taus © 2002, 2003, 2004
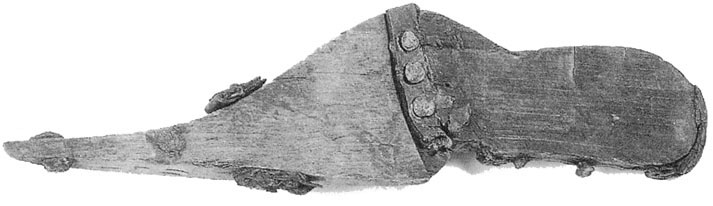
Flat, wood sole with leather hinge
I could not distinguish a dominant color for patyns of my period so I chose to go with a dark, almost red, brown dye. I am pleased with the way it looks on leather and it lends itself very well to my charge.
The tools I used were as follows:
![]()
![]()
![]()
![]()
![]()
![]()
![]()
![]()
![]()
![]()
![]()
![]()
![]()
![]()
![]()
![]()
The second thing I learned was oiling the soles to waterproof them also reduces their ability to retain the assembly hardware. The tacks holding the hinge and soles together are pulled free when the wearer walks but with each smooth and level step, they are driven back into the soles by the wearer’s foot. (This is an odd, but not too uncomfortable feeling). The first time the two sole sections were not level in this cycle, the tacks tried to form new holes which become an annoyance and occasionally painful. The patyn had to then be removed and the tacks re-inserted into their proper holes. Since the only tools I had with me on site were a tack hammer and some wire cutters, I tried to “barb” the tacks by partially “cutting” them with the wire cutters. This seemed to work for general use, but when I bent to one knee to take a picture, the angle of my toes in the patyns ripped even the barbed tacks out. Back to square one…
![]()
![]()