Tape Measure & Carpenter's Square
Handsaw & Coping Saw
Drill
Mallet & Chisels
Block Plainer, Various Files & Sand paper
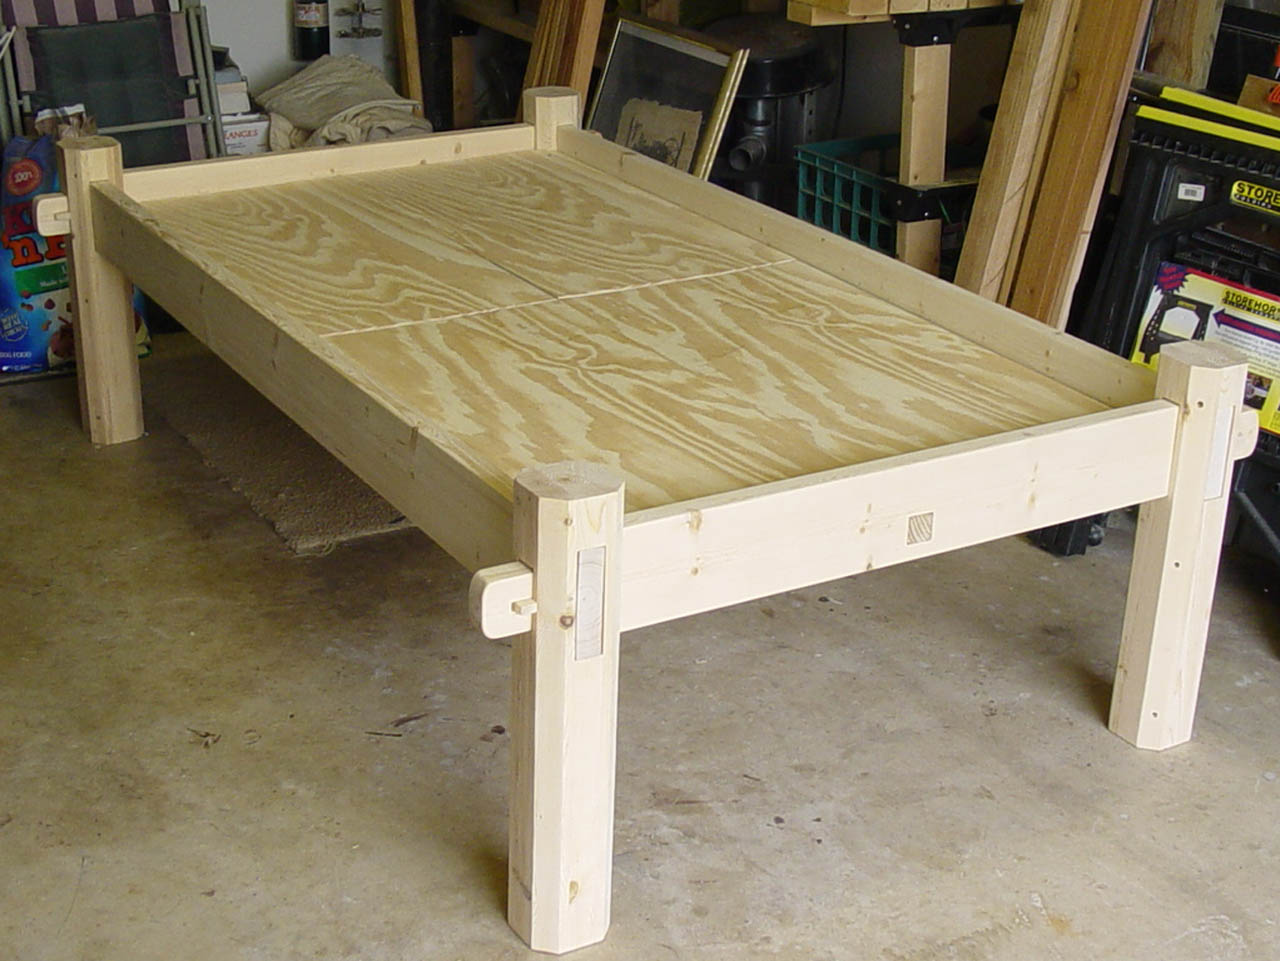
The bed outlined here is for a twin-size mattress and is tall enough to store items up to 16” high under. There is no headboard on this design as of yet, but one is forthcoming.
This write up is not truly a slat bed, but it can be easily converted to one with by removing the plywood panels and the adding twelve 1"x6"x3’-2 7/8" slats. I chose to use panels so an air mattress could be used without worrying about what effects the slat supports would have on it.
Here's a list of tools you'll need to get this thing operational:
|
Tape Measure & Carpenter's Square | |
|
Handsaw & Coping Saw | |
|
Drill | |
|
Mallet & Chisels | |
|
Block Plainer, Various Files & Sand paper |
|
One 2"x10"x8' (Side and Center Slat Rails) | |
|
Two 2"x6"x8' (Side rails | |
|
One 2"x6"x10' (Head and Foot Rails) | |
|
Two 2"x6"x12' (Posts) | |
|
One 4’x8’x19/32” plywood (“Slat” panels) or four 1"x6"x10' (Individual Slats) |
Be sure to get Kiln-dried lumber. Do not get pressure treated or otherwise weatherproofed wood! The pressure treating adds un-necessary weight and chemicals that are harmful if you get a splinter. Another point of interest; keep all your scrap wood you’ll use some of it later.
Head and Foot Rails
First, measure out and cut the head- and foot-rails to length. You should get 2 pieces measuring 2"x6"x6'4" from the 2"x6"x10' board.
| Both ends of each rail need to be cut into tenons as shown. Measure 5-1/2” in from both ends and mark. From these marks, measure down 1 1/2" on either side. With the square, mark the 1 1/2"x5-1/2" section to be removed. Lay out the "biscuit slot" (in red). Use a drill to open a hole for the coping saw and then saw the slot open. Use your chisels and files to clean the opening. Make your all your cuts. |
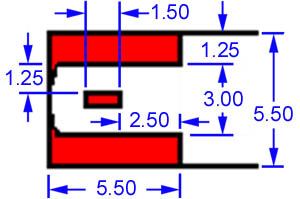 |
You should have something that looks like this at both ends (red sections are to be removed):

The red square located in the center is the mortise for the center rail. Measure and cut the opening.
Now take both 2"x6"x8' pieces and cut them to the length of the side rails. You should now have 2 pieces measuring 2"x6"x6'8".
| Next cut out the 2"x3" mortise (four holes total), each 1 1/2" in from either end of both rails. It is essential to get the hole centered. If you are not sure of your mortise cutting shills, it is recommended to cut the 3" length of the mortise a bit on the long side. This way if the mortise is out of center the head and foot rails will still fit.Please bare in mind, this step will add slop to the assembly of the bed. |  |
You should end up with something like this (again, the red being the part you remove):

Bed Posts
The corner posts can be confusing, take your time and visualize what you need to do to get the shapes you desire. Use both 2"x6"x12' boards. Cut them at 24” intervals to get 12 pieces 2"x6"x24” in size. Separate them into 4 sets.
| On the first set of post laminates (the inside); measure and cut out to length then create the mortise on four pieces as illustrated here. The red is the area (mortise) to be removed. The green areas may be removed for added stylization. | 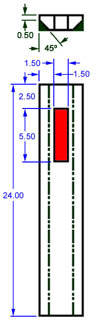 | On the second set of post laminates (the core segments); Cut four of each size as shown. | 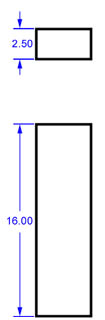 | On the second set of post laminates (the outside); measure and cut out to length then create the mortise on four pieces as illustrated here. The red is the area (mortise) to be removed. The green areas may be removed for added stylization. | 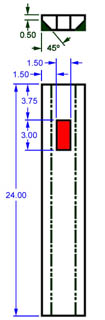 |
| The final stage of post construction is laminating the posts. Start by taking one finished part from each “set” and assemble as shown. Do not bond them yet! Examine how the pieces fit together and mark any areas that need plaining. Use the block plainer to attain a smooth, flush fit between all the laminates. Once this is accomplished, screw or glue the 4 pieces together. Repeat this step four times. If you use screws, countersunk them 1/2 to 3/4”. Cut wood dowel rod to make plugs for the countersink holes. This will work best if everything is cut / drilled square. Install the plugs prior to your final sanding and staining. This way they can be made flush and “hidden” in your posts. I recommend using glue then reinforcing with screws. This gives you a solid lamination and helps hide the joining lines. | 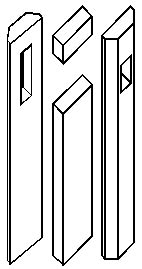 |
Slat Rails and Biscuits
| The slat rails are very easy to make. Take the 2"x10"x8’ board and cut it to 6’-6" in length. Next, rip this piece it into three 2-1/2" wide pieces. Leave on 6'-6” but cut 2 to 6’-0’ in length. Cut notches on either side of the 6'-6" as shown: | 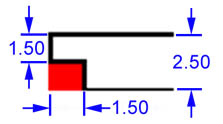 |
You should have a piece that looks like this:

| The "biscuits" are wedges made from the scrap wood you saved above. Rip a piece of scrap 1/2" thick then cut four of the trapezoids shown. This is an aesthetically designed locking lug. You will either wish to have several sets handy or increase the 2-1/2” length to something more like 4 to 4-1/2” for constant setup and teardown of this bed. | 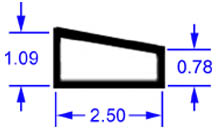 |
| Screw (and glue) the 2 6' long slat rails so they are flush with the bottoms of the side rails. If this is not done correctly, the slats will not seat properly. If your slat rails are bowed straighten them during their attachment. Note: It will be hard to use glue with this scenario. One of mine was bowed so I placed it (arch up) against the side rail and screwed each end in. While standing on the bow (to flatten it), I sunk the center screw. I then went back and added a few more screws to either side for support. (The magenta piece is the 6' slat rail): | 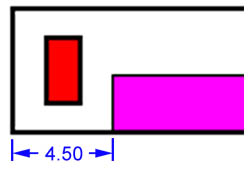 |

Take note to attach the slat rails so there one in on the *inside* of each side rail. This may not seem important as you can simply rotate the side rail assembly 180° to turn it from outside to in, but if you have a specific side you wanted to be on the outside you may lose it if you aren’t careful.
Cut the 4’x8’x19/32” plywood into 4 panels measuring 37-7/16”x19-7/16. You will need to cope the corners to match the inside corner of the posts after you assemble the frame.
Putting It All Together
Step 1
| Slide the side rails into the posts with attention to facing the small mortises on the posts away from the bed. Depending how much you had to plain your post laminates and how large your mortise are, you may need to shave a bit off your side rails. This will be much easier then enlarging the mortise in the post. | 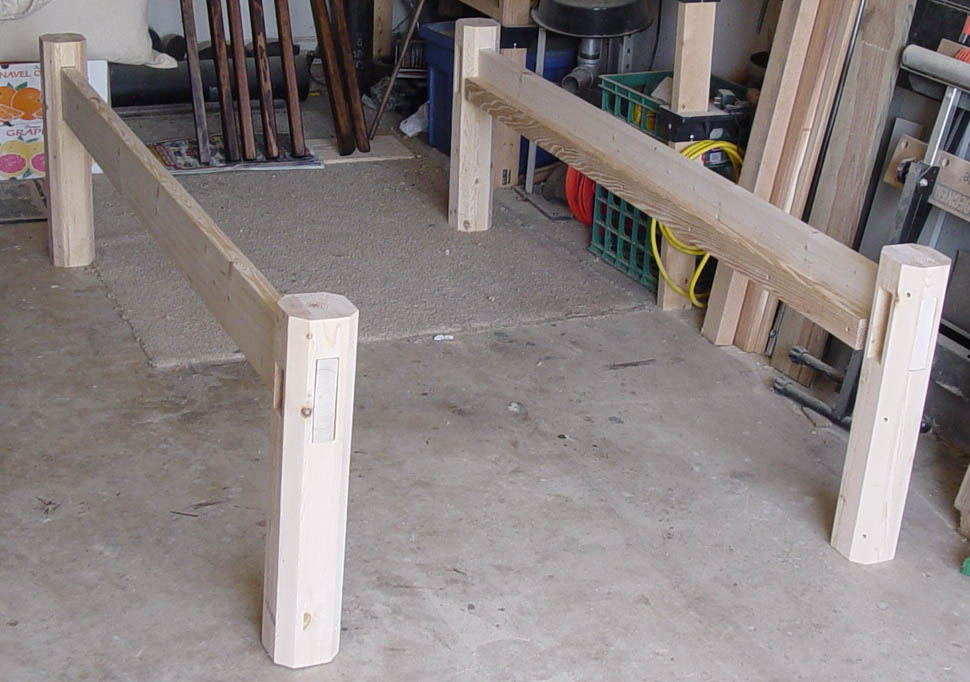 |
Step 2
| Insert the ends of the center rail into the square holes in the middle of the head and foot rails. Again some fitting may be required. It is easiest to file the mortise then shave the tenon in this case. | 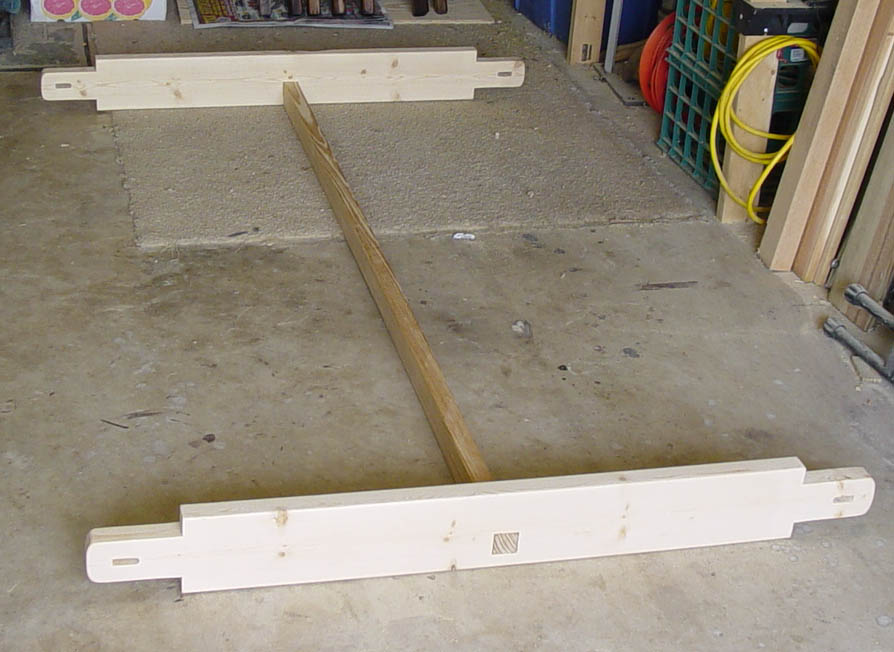 |
Step 3
| Insert the head and foot rail tenons into the posts. (See fitting notes for step 1 if required). | 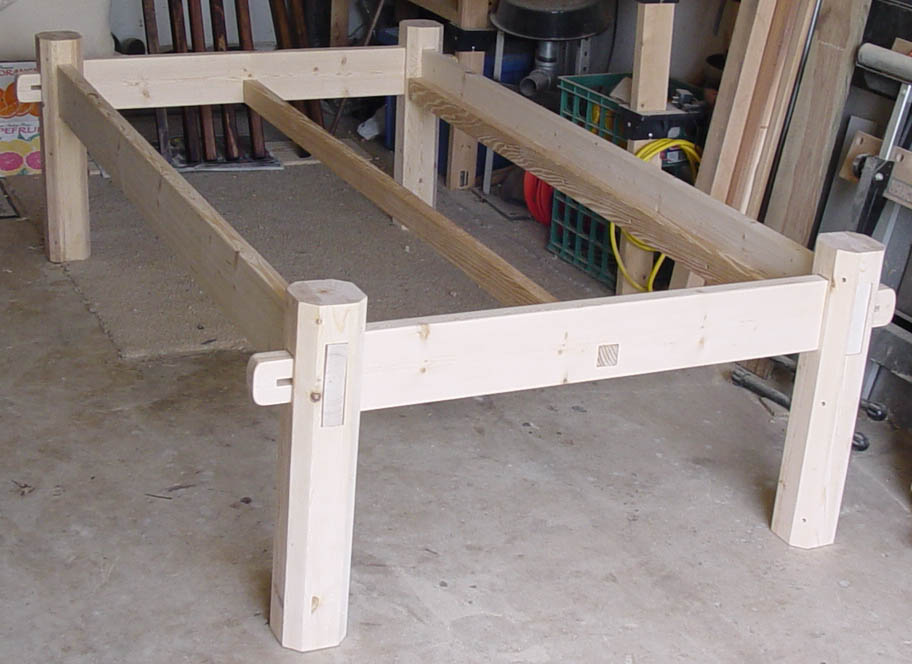 |
Step 4
| Insert the biscuits into the their slots in the head and foot rails with the "flat side" (long edge with 2 right angle ends) against the posts. It is recommend the wider end of the biscuit be towards the center of the side rails (as illustration below). This minimizes its projection from the bed, not to mention anything moving at that it’s elevation will appreciate it, especially your knees. | 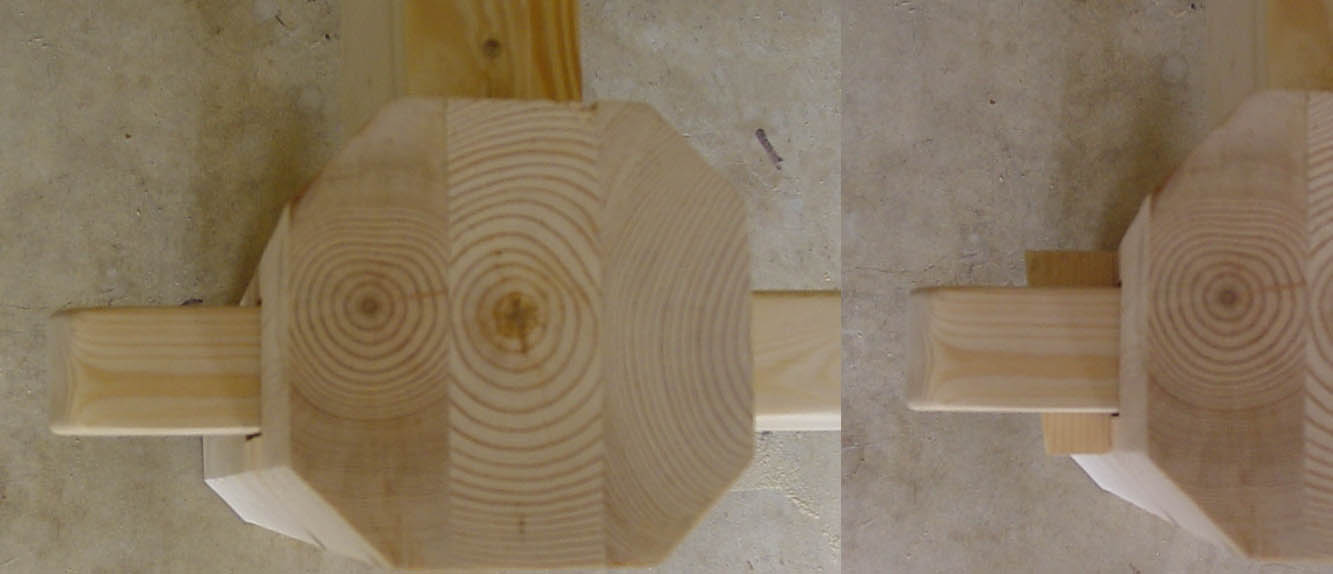 |
Step 5
Put the slats/slat panels on.
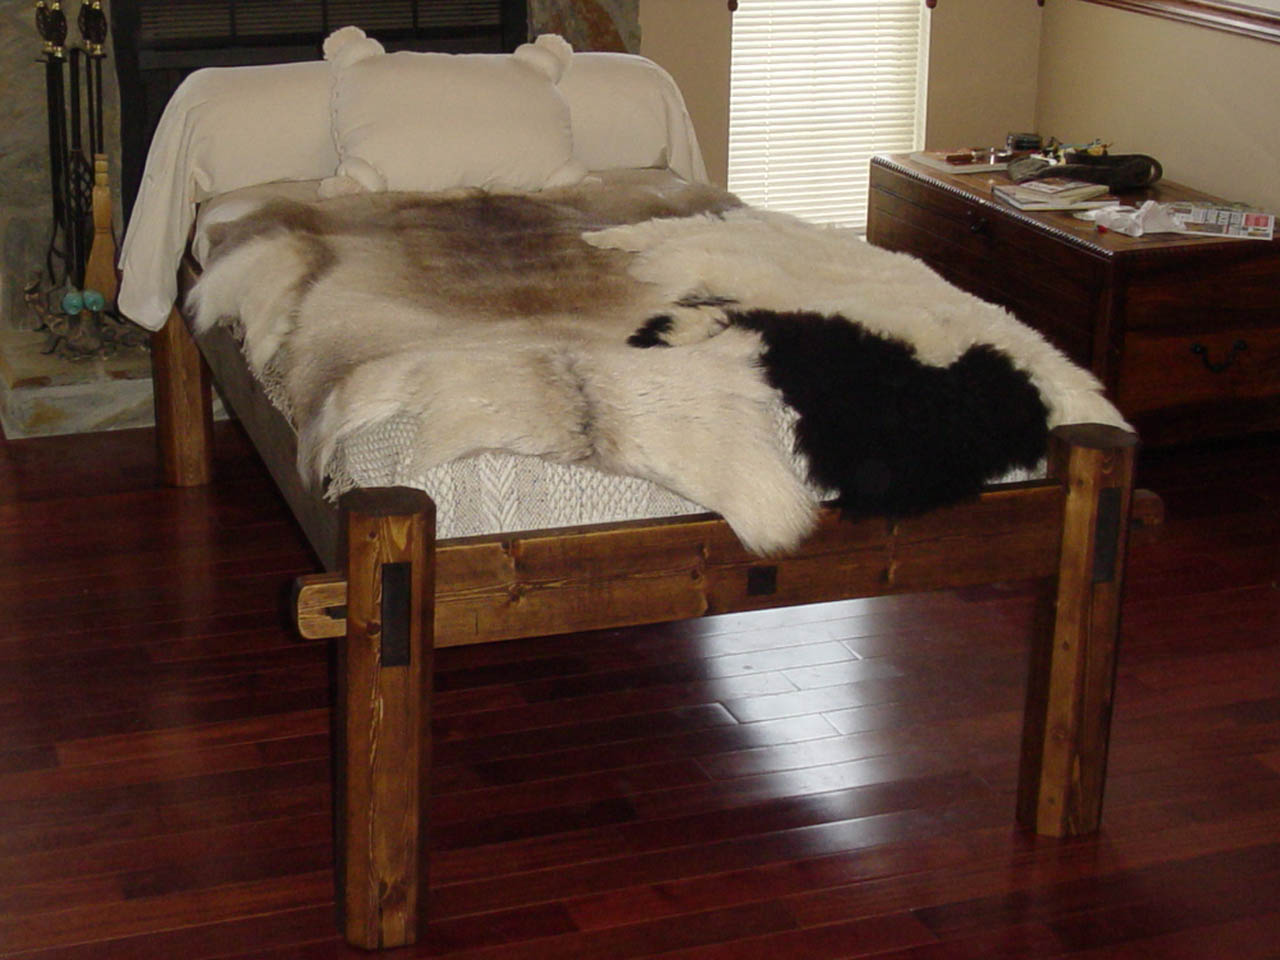
Dismantle the bed, stain and seal (or oil) it to complete the wood portion of this project.
A few things words of wisdom before you depart:
Always take some scrap wood with you to level out the bed on uneven ground.
Don't hammer the biscuits in too hard or you may split the rails. A rubber mallet works great, but it’s one more thing you need to tote to an event if you don’t already. So I recommend hand power or tapping them lightly with a piece of your scrap wood.
When you cut the holes, it is all right to make them a little larger then called for. The worst that will happen is your bed will be a bit loose until you lodge the biscuits in, at which point it will square and sturdy itself right up.
And last but certainly not least:
Purchase your air mattress before starting this project! While the box may say 39x75”, this is an “approximation”. Ours is barely over 73” long and leaves a gap at one end. Fortunately my removable headboard concept can eat up some of this space, but that will come later. Until then, I use the area to “hide” an alarm clock, the mattress pump and various other anachronisms.
*Special thanks to Lord Iain Macquarrie of Ulva ([email protected]) for the base of this document. All you have just read is merely a conversion from Lord Iain’s double/full size slat bed to a twin size. For the original pattern please visit his site at: http://www.checksix.net/jon/bed/bed.htm
![]()
![]()
Copyright Terms, Copyright Wolfram von Taus © 2002, 2003, 2004